Thermador T36BB110SS View Kitchen Design and Planning Guide - Page 99
Grounding Instruction, Additional Grounding Procedure, Warning, Electrical Location, Water Location
 |
View all Thermador T36BB110SS manuals
Add to My Manuals
Save this manual to your list of manuals |
Page 99 highlights
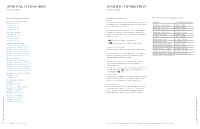
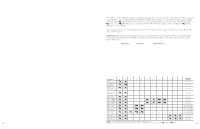
PLANNING INFORMATION Freedom® Collection Electrical Specifications The appliance comes with a 3-wire power supply cord. UL listed in the USA. Each appliance requires a separate 3-wire receptacle that is fitted with a 15 Amp fuse or higher. Refer to the following table for max load details. Appliance 23.5-Inch Fresh Food Column 24-Inch Fresh Food Column 30-Inch Fresh Food Column 36-Inch Fresh Food Column 18-Inch Freezer Column* 24-Inch Freezer Column* 30-Inch Freezer Column* 36-Inch Freezer Column* 18-Inch Wine Preservation Column 24-Inch Wine Preservation Column 30-Inch 2-Door Bottom Freezer* 36-Inch 2-Door Bottom Freezer* 36-Inch French Door Bottom Freezer* *Including ice maker Max load 120V AC, 60Hz 15 A 15 A 15 A 15 A 15 A 15 A 15 A 15 A 15 A 15 A 15 A 15 A 15 A The receptacle must be installed by a licensed electrician only. For the installation position of the receptacle refer to diagram in "Electrical Location". Grounding Instruction This appliance must be grounded. In the event of a malfunction or breakdown, grounding will reduce the risk of electric shock by providing a path of least resistance for the electric current. Additional Grounding Procedure Some local regulations may require a separate ground. In such cases, the required accessory ground wire, clamp and screw must be purchased separately. Never ground the appliance to plastic plumbing lines, gas lines or water pipes. A 4-conductor cord shall be used when the appliance is installed in an area where local codes do not permit grounding through the neutral. Power supply cord must be replaced by a licensed electrician only. Warning Improper connection of the equipment grounding conductor may result in electric shock. Have the appliance checked by a qualified electrician or service technician if you are in doubt as to whether the appliance has been properly grounded. Electrical Location Connect the appliance to an outlet that is near the appliance. The outlet must be freely accessible following installation of the appliance. 84"... 85 3/16" (2134 mm ... 2164 mm) 18" 23.5" 24" 30" 36" (457 mm) (597 mm) (610 mm) (762 mm) (914 mm) min. 4" min. 100 mm 1" (25.4 mm) min. 25" min. 635 mm PLANNING INFORMATION Freedom® Collection Water Location A cold water connection is required for appliances that feature an ice maker or an ice and water dispenser. The water pressure must be between 40 and 120 p.s.i. (2.75-8.25 bar). The installation must comply with local plumbing regulations. A separate shut-off valve must be installed for the appliance water connection. The shut-off valve for the water connection may not be behind the appliance. It is recommended to place the shut-off valve outside the cutout next to the appliance or in another easily accessible location. When installing the water connection, observe the permitted installation areas for the water supply line. The supply line can be located to the right (a), to the left (b), or underneath (c). | THERMADOR | FREEDOM® REFRIGERATION | THERMADOR | FREEDOM® REFRIGERATION 194 Visit Thermador.com for complete specifications or text a Thermador model number to 21432 to have specs sent to your phone Visit Thermador.com for complete specifications or text a Thermador model number to 21432 to have specs sent to your phone 195
-
 1
1 -
2
-
3
-
4
-
5
-
6
-
7
-
8
-
9
-
10
-
11
-
12
-
13
-
14
-
15
-
16
-
17
-
18
-
19
-
20
-
21
-
22
-
23
-
24
-
25
-
26
-
27
-
28
-
29
-
30
-
31
-
32
-
33
-
34
-
35
-
36
-
37
-
38
-
39
-
40
-
41
-
42
-
43
-
44
-
45
-
46
-
47
-
48
-
49
-
50
-
51
-
52
-
53
-
54
-
55
-
56
-
57
-
58
-
59
-
60
-
61
-
62
-
63
-
64
-
65
-
66
-
67
-
68
-
69
-
70
-
71
-
72
-
73
-
74
-
75
-
76
-
77
-
78
-
79
-
80
-
81
-
82
-
83
-
84
-
85
-
86
-
87
-
88
-
89
-
90
-
91
-
92
-
93
-
 94
94 -
 95
95 -
 96
96 -
 97
97 -
 98
98 -
 99
99 -
 100
100 -
 101
101 -
 102
102 -
 103
103 -
 104
104 -
105
-
106
-
107
-
108
-
109
-
110
-
111
-
112
-
113
-
114
-
115
-
116
-
117
-
118
-
119
-
120
-
121
-
122
-
123
-
124
-
125
-
126
-
127
-
128
-
129
-
130
-
131
 |
 |