Toshiba 42HL196 Operation Guide - Page 27
Setting the time and date, Setting the HDMI, audio mode - update
 |
UPC - 022265240755
View all Toshiba 42HL196 manuals
Add to My Manuals
Save this manual to your list of manuals |
Page 27 highlights
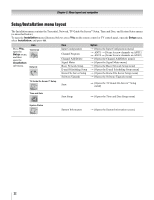
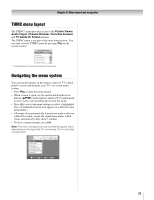
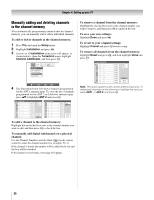
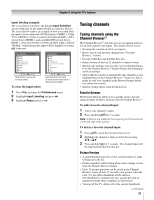
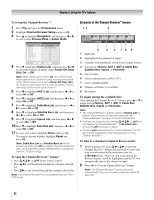
Chapter 4: Setting up your TV Setting the time and date Note: If you already set up the TV Guide On Screen™ system, the time and date were set automatically and you can skip this step. To set the time and date: 1 Press Y and open the Setup menu. 2 Highlight Installation and press T. 3 (A new set of Installation menu icons will appear, as shown below.) Open the Time And Date menu, highlight Start Setup, and press T. Setting the HDMI™ audio mode To set the HDMI audio mode: 1 Press Y and open the Setup menu. 2 Highlight HDMI 1 Audio and press c. 3 Press b or B to select the HDMI audio mode (Auto, Digital, or Analog) and press T. (Auto is the recommended mode.) See "Connecting an HDMI or DVI device to the HDMI input" (- Installation Guide). Time And Date Start Setup Navigate ENTER Select CH RTN Back EXIT Exit If you have not set up the TV Guide On Screen™ system, the following screen will appear. To set the time, highlight TV Guide On Screen™ and press T. The TV Guide On Screen™ setup sequence will start, and the time and date will be set automatically. Time And Date Your TV Guide On Screen system can provide accurate time and date information. It is recommended you set up TV Guide On Screen first and use it to obtain the time and date. Manual TV Guide On Screen Cancel If you have already set up the TV Guide On Screen™ system, or if you have not set up the time, the Time and Date setting screen will appear and you will need to manually set the time and date. Time And Date Date (MM/DD/YY) 0 6/3 0/0 5 Time (HH:MM) 1 1 : 1 1 AM In the event that your TV Guide On Screen system has acquired time, the television will use network acquired time rather than manually enterred time. Cancel Done Note: • If you highlight TV Guide On Screen™ (above) to set the time and date through the TV Guide On Screen™ system and a power outage occurs, the time and date will be updated automatically when the power is restored. • If you highlight Manual (above) to set the time and date manually and a power outage occurs, you will lose the time and date settings when the power is restored. • If you manually set the time and date and then perform TV Guide On Screen™ setup, the manual time and date settings will be overridden by the TV Guide On Screen™ settings. Setup Installation Sleep Timer On/Off Timer PC Settings PC Audio HDMI 1 Audio Slide Show Interval No Auto 2 Sec Auto Digital Analog Navigate ENTER Select CH RTN Back EXIT Exit Note: Because the PC IN and HDMI (DVI) IN inputs share the same set of analog audio inputs, the PC Audio menu setting influences the HDMI 1 Audio menu setting. If PC Audio is set to "No," the HDMI 1 Audio setting changes to "Auto." If PC Audio is set to "Yes," the HDMI Audio setting is set to "Digital" and is grayed out in the menu. (Also see item 3 on page 8 and "Setting the PC Audio mode" on page 51.) 27
-
 1
1 -
2
-
3
-
4
-
5
-
6
-
7
-
8
-
9
-
10
-
11
-
12
-
13
-
14
-
15
-
16
-
17
-
18
-
19
-
20
-
21
-
 22
22 -
 23
23 -
 24
24 -
 25
25 -
 26
26 -
 27
27 -
 28
28 -
 29
29 -
 30
30 -
 31
31 -
 32
32 -
33
-
34
-
35
-
36
-
37
-
38
-
39
-
40
-
41
-
42
-
43
-
44
-
45
-
46
-
47
-
48
-
49
-
50
-
51
-
52
-
53
-
54
-
55
-
56
-
57
-
58
-
59
-
60
-
61
-
62
-
63
-
64
-
65
-
66
-
67
-
68
-
69
-
70
-
71
-
72
-
73
-
74
-
75
-
76
-
77
-
78
-
79
-
80
-
81
-
82
-
83
-
84
-
85
-
86
 |
 |
