Toshiba 42HL196 Operation Guide - Page 67
Important Note
 |
UPC - 022265240755
View all Toshiba 42HL196 manuals
Add to My Manuals
Save this manual to your list of manuals |
Page 67 highlights
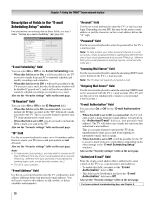
Chapter 7: Using the THINC™ home network feature 6 When you are finished entering all characters for the selected field, highlight Done and press T. E-mail Scheduling Setup Please enter your E-mail Setup Information. E-mail Scheduling On ID Required On ID XXXXXXXXXXXXXXXX E-mail Address Account Password Incoming Mail Server Outgoing Mail Server E-mail Authorization Authorized E-mail On Enter YOUR E-mail here Advanced Test Cancel Done 7 Highlight Test and press T to test the e-mail setup. During testing, the TV will display the message "Testing E-mail". Note: Depending on your configuration, the e-mail test can take several minutes. Do not press O during this time. 8 When testing is finished, a message will appear indicating whether the e-mail test passed or not. If the e-mail test passes: a) The "Test Passes" message (shown below) will appear. E-mail Scheduling Setup Please enter your E-mail Setup Information. E-mail Scheduling On ID Required On ID XXXXXXXXXXXXXXXX E-mail Address Testing E-mail Account Password Test Passes Incoming Mail Server OK Outgoing Mail Server E-mail Authorization Authorized E-mail On Enter YOUR E-mail here Advanced Test Cancel Done b) Go to step 9. If the e-mail test does not pass: a) An error message and code will appear on-screen (similar to the example below). E-mail Scheduling Setup Please enter your E-mail Setup Information. E-mail Scheduling On ID Required On ID XXXXXXXXXXXXXXXX E-mail Address Testing E-mail Account Password Error Sending and Receiving Mail (30 _ 30) Incoming Mail Server OK Outgoing Mail Server E-mail Authorization Authorized E-mail On Enter YOUR E-mail here Advanced Test Cancel Done Note: The first number in the error code denotes an error that occurs when the TV is receiving an e-mail; the second number denotes an error that occurs when the TV is sending an e-mail. b) Locate the error code in the "TESTING E-MAIL" ERROR CODES table (- page 69) and try the solutions. c) Repeat steps 1-8. 9 To exit the E-mail Scheduling Setup window and save your settings, highlight Done and press T. To exit the E-mail Scheduling Setup window without saving your settings, highlight Cancel and press T. IMPORTANT NOTE To use e-mail scheduling, you must first set up the TV Guide On Screen™ system. E-mail scheduling will not be available unless the TV Guide On Screen™ system is fully operational. See the separate TV Guide On Screen™ Interactive Program Guide for details on setting up the TV Guide On Screen™ system. If you experience any issues with e-mail scheduling, please contact the following: • In the U.S., call TACP Consumer Solutions at 1-800-631-3811 or visit http://www.tacp.com/customersupport/contact.asp. • In Canada, call TCL Customer Service at 1-800-268-3404 or visit http://www.toshiba.ca. For home network troubleshooting tips, see Chapter 8. 67
-
 1
1 -
2
-
3
-
4
-
5
-
6
-
7
-
8
-
9
-
10
-
11
-
12
-
13
-
14
-
15
-
16
-
17
-
18
-
19
-
20
-
21
-
22
-
23
-
24
-
25
-
26
-
27
-
28
-
29
-
30
-
31
-
32
-
33
-
34
-
35
-
36
-
37
-
38
-
39
-
40
-
41
-
42
-
43
-
44
-
45
-
46
-
47
-
48
-
49
-
50
-
51
-
52
-
53
-
54
-
55
-
56
-
57
-
58
-
59
-
60
-
61
-
 62
62 -
 63
63 -
 64
64 -
 65
65 -
 66
66 -
 67
67 -
 68
68 -
 69
69 -
 70
70 -
 71
71 -
 72
72 -
73
-
74
-
75
-
76
-
77
-
78
-
79
-
80
-
81
-
82
-
83
-
84
-
85
-
86
 |
 |
