Toshiba 42HL196 Operation Guide - Page 6
Overview of steps for installing, setting up, and using your new TV - 3 blinks
 |
UPC - 022265240755
View all Toshiba 42HL196 manuals
Add to My Manuals
Save this manual to your list of manuals |
Page 6 highlights
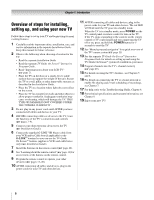
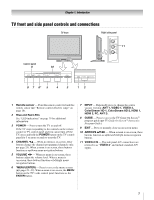
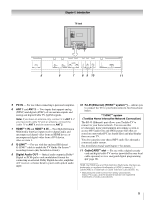
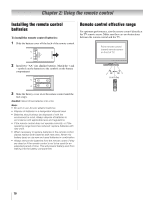
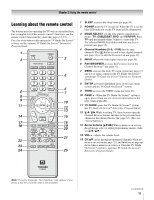
Chapter 1: Introduction Overview of steps for installing, setting up, and using your new TV Follow these steps to set up your TV and begin using its many exciting features. 1 Carefully read the important safety, installation, care, and service information in the separate Installation Guide. Keep this manual for future reference. 2 Observe the following when choosing a location for the TV: • Read the separate Installation Guide. • Read the separate TV Guide On Screen™ Interactive Program Guide. • Read "Important notes about your LCD TV" (- page 2). • Place the TV on the floor or a sturdy, level, stable surface that can support the weight of the unit. Secure the TV to a wall, pillar, or other immovable structure as described in the Installation Guide. • Place the TV in a location where light does not reflect on the screen. • Place the TV far enough from walls and other objects to allow proper ventilation. Inadequate ventilation may cause overheating, which will damage the TV. THIS TYPE OF DAMAGE IS NOT COVERED UNDER THE TOSHIBA WARRANTY. 3 Do not plug in any power cords until AFTER you have connected all cables and devices to your TV. 4 BEFORE connecting cables or devices to the TV, learn the functions of the TV's connections and controls (- pages 7-9). 5 Connect your other electronic device(s) to the TV (- Installation Guide). 6 Connect the supplied G-LINK™/IR blaster cable from your VCR and/or Cable box (if applicable) to the G-LINK™ terminal so you can use the TV Guide On Screen™ features (applies to VCRs and cable boxes only) (- Installation Guide). 7 Install the batteries in the remote control (- page 10). 8 See "Learning about the remote control" (- page 11) for an overview of the buttons on the remote control. 9 Program the remote control to operate your other device(s) (- pages 15-20). 10 AFTER connecting all cables and devices, plug in the power cords for your TV and other devices. 11 AFTER connecting all cables and devices, plug in the power cords for your TV and other devices. The red LED will blink until the TV goes into standby mode. When the TV is in standby mode, press POWER on the TV control panel or remote control to turn on the TV. If the TV stops responding to the controls on the remote control or TV control panel and you cannot turn the TV off or on, press and hold the POWER button for 5 seconds to reset the TV. 12 See "Menu layout and navigation" for a quick overview of the TV's menu system (- page 21). 13 See the separate TV Guide On Screen™ Interactive Program Guide for details on setting up and using the TV Guide On Screen™ system (if available in your area). 14 Program channels into the TV's channel memory (- page 25). 15 For details on using the TV's features, see Chapters 5 and 6. 16 For details on connecting the TV to a home network to enable file sharing and e-mail scheduling of recordings, see Chapter 7. 17 For help, refer to the Troubleshooting Guide, Chapter 8. 18 For technical specifications and warranty information, see Chapter 9. 19 Enjoy your new TV! 6
-
 1
1 -
 2
2 -
 3
3 -
 4
4 -
 5
5 -
 6
6 -
 7
7 -
 8
8 -
 9
9 -
 10
10 -
 11
11 -
 12
12 -
13
-
14
-
15
-
16
-
17
-
18
-
19
-
20
-
21
-
22
-
23
-
24
-
25
-
26
-
27
-
28
-
29
-
30
-
31
-
32
-
33
-
34
-
35
-
36
-
37
-
38
-
39
-
40
-
41
-
42
-
43
-
44
-
45
-
46
-
47
-
48
-
49
-
50
-
51
-
52
-
53
-
54
-
55
-
56
-
57
-
58
-
59
-
60
-
61
-
62
-
63
-
64
-
65
-
66
-
67
-
68
-
69
-
70
-
71
-
72
-
73
-
74
-
75
-
76
-
77
-
78
-
79
-
80
-
81
-
82
-
83
-
84
-
85
-
86
 |
 |