Toshiba 42HL196 Operation Guide - Page 60
D. Setting up file sharing on the TV
 |
UPC - 022265240755
View all Toshiba 42HL196 manuals
Add to My Manuals
Save this manual to your list of manuals |
Page 60 highlights
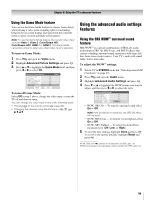
4 In the Properties window: Chapter 7: Using the THINC™ home network feature D. Setting up file sharing on the TV 1 Press Y and open the Setup menu. 2 Highlight Installation and press T. The Installation menu will appear. Open the Network menu. Click "OK" (which closes the Properties window). 5 The shared folder will display with a "shared folder" icon (a hand holding a folder). 6 Go to section D, "Setting up file sharing on the TV" at right. For home network troubleshooting tips, see Chapter 8. Network Basic Network Setup E-mail Scheduling Setup Home File Server Setup Software Upgrade Navigate ENTER Select CH RTN Back EXIT Exit 3 Highlight Home File Server Setup and press T. The Home File Server Setup window will appear. After a few moments, the message "Please Wait..." will appear until the network finds your networked PC. The networked PC will act as the "Home Server" for file sharing with the TV. Home File Server Setup Please enter your Home Server Setup Information. Home Server Name ABCD User Name XYZ Password JPEG Picture Directory ******* JPEG MP3 Music Directory MP3 Software Upgrade Directory -- Cancel Done 4 Press Bb to highlight Home Server Name, and then press C c to select the name of the PC you set up for file sharing. If you have multiple PCs on your home network that have shared folders, press C c to select the PC (home server) from which you want to access files. Home File Server Setup Please enter your Home Server Setup Information. Home Server Name ABCD User Name XYZ Password JPEG Picture Directory ******* JPEG MP3 Music Directory MP3 Software Upgrade Directory -- Cancel Done 5 a. Press Bb to highlight User Name and then press T to open the on-screen keyboard for that field. b. Enter the User Name for your PC using the on-screen keyboard. See "Using the on-screen keyboard." Note: The User Name is case sensitive. c. When finished entering all characters, highlight Done and press T. 6 Repeat step 5 for the Password field. Note: The Password is case sensitive. 60
-
 1
1 -
2
-
3
-
4
-
5
-
6
-
7
-
8
-
9
-
10
-
11
-
12
-
13
-
14
-
15
-
16
-
17
-
18
-
19
-
20
-
21
-
22
-
23
-
24
-
25
-
26
-
27
-
28
-
29
-
30
-
31
-
32
-
33
-
34
-
35
-
36
-
37
-
38
-
39
-
40
-
41
-
42
-
43
-
44
-
45
-
46
-
47
-
48
-
49
-
50
-
51
-
52
-
53
-
54
-
 55
55 -
 56
56 -
 57
57 -
 58
58 -
 59
59 -
 60
60 -
 61
61 -
 62
62 -
 63
63 -
 64
64 -
 65
65 -
66
-
67
-
68
-
69
-
70
-
71
-
72
-
73
-
74
-
75
-
76
-
77
-
78
-
79
-
80
-
81
-
82
-
83
-
84
-
85
-
86
 |
 |
