Toshiba TLP-250 Owners Manual
Toshiba TLP-250 Manual
 |
View all Toshiba TLP-250 manuals
Add to My Manuals
Save this manual to your list of manuals |
Toshiba TLP-250 manual content summary:
- Toshiba TLP-250 | Owners Manual - Page 1
Before use OWNER'S MANUAL 3LCD DATA PROJECTOR TLP550 TLP551 TLP250 TLP251 (WITH DOCUMENT IMAGING CAMERA) (WITH DOCUMENT IMAGING CAMERA) MENU CONTENTS 1 TLP550/TLP250 - Toshiba TLP-250 | Owners Manual - Page 2
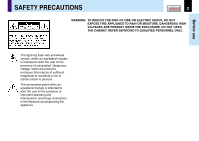
HIGH VOLTAGES ARE PRESENT INSIDE THE ENCLOSURE. DO NOT OPEN THE CABINET. REFER SERVICING TO QUALIFIED PERSONNEL ONLY. Before use The lightning flash with arrowhead symbol, within an of important operating and maintenance (servicing) instructions in the literature accompanying the appliance. - Toshiba TLP-250 | Owners Manual - Page 3
improper operation and other problems. • Toshiba Corporation bears no responsibility for incidental damages (lost profit, work interruption, corruption or Toshiba Corporation. CONTENTS 3 In the spaces provided below, record the Model and Serial No. located at the bottom of your LCD projector. Model - Toshiba TLP-250 | Owners Manual - Page 4
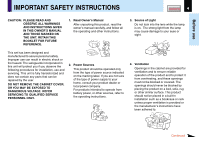
Manual After unpacking this product, read the owner's manual carefully, and follow all the operating and other instructions. 3. Source of Light Do not look into the lens while the lamp is on. The strong light from the lamp DANGEROUS VOLTAGE. REFER SERVICING TO QUALIFIED SERVICE PERSONNEL ONLY. 2. - Toshiba TLP-250 | Owners Manual - Page 5
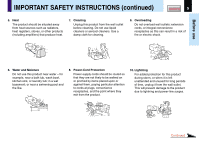
Before use IMPORTANT SAFETY INSTRUCTIONS (continued) CONTENTS 5 5. Heat The product should be situated away from heat sources such as radiators, heat registers, stoves, or other products (including amplifiers) that produce - Toshiba TLP-250 | Owners Manual - Page 6
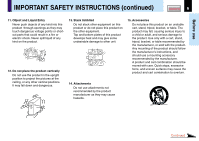
the product vertically Do not use the product in the upright position to project the pictures at the ceiling, or any other vertical positions. It may product. Any mounting of the product should follow the manufacturer's instructions, and should use a mounting accessory recommended by the manufacturer - Toshiba TLP-250 | Owners Manual - Page 7
pieces of glass may cause to injury. In the unlikely event of the lamp rupturing, thoroughly clean the area around the projector and discard any edible items placed in that area. 18. Servicing Do not attempt to service this product yourself as opening or removing covers may expose you to dangerous - Toshiba TLP-250 | Owners Manual - Page 8
Before use IMPORTANT SAFETY INSTRUCTIONS (continued) CONTENTS 8 21. Do not get your hands between the not carry by the camera arm. Do not carry the projector by the camera arm. Doing so can result in damage or injury. 24. Do not move the projector while the arm is still erect. Always store the - Toshiba TLP-250 | Owners Manual - Page 9
Power supply cord selection If your line voltage is 220 to 240V, use one of the following types of cable. Plug configuration Plug type Line voltage EURO 240V 10 - 15A 220 - 240V UK 240V 6A 200 - 240V Australian 240V 10A 200 - 240V North American 240V 15A 200 - 240V Switzerland 240V 6A - Toshiba TLP-250 | Owners Manual - Page 10
Correcting illuminated defects 59 Maintenance Trouble indications 60 Air filter cleaning 61 Lens and main unit cleaning 63 Lamp replacement 64 Others Before calling service personal 66 Pin assignment of COMPUTER connector 68 Applicable signal 69 Controlling the projector by using RS-232C 71 - Toshiba TLP-250 | Owners Manual - Page 11
. For the model with the document imaging camera, refer to 53 . Air intake Infrared remote sensor 16 Zooming lever 30 Focusing ring 30 Air intake Lens shift dial 20 Control panel 12 Infrared remote sensor AC IN socket 19 Left side Speaker Carrying handle Open to carry the projector. Anti-theft - Toshiba TLP-250 | Owners Manual - Page 12
Use the selection buttons and the EXIT button to enlarge the image. 37 EXIT button Selection buttons ENTER button MENU button ON LAMP ON / STANDBY ON/STANDBY button 27 32 To turn the projector on or off (standby). ON indicator 27 32 60 LAMP indicator 27 32 60 TEMP indicator 60 FAN indicator 27 - Toshiba TLP-250 | Owners Manual - Page 13
to a USB connector of a computer when using the presentation mode. CONTROL connector 26 71 (RS-232C connector) To connect a computer to control the projector. VIDEO jack 24 To enter video signal from a video equipment, etc. S-VIDEO connector 24 To enter S-Video signal from video equipment, etc - Toshiba TLP-250 | Owners Manual - Page 14
RESIZE MENU VOL / ADJ ENTER CT-90106 EXIT / P.MODE ON/STANDBY button 27 32 To turn the projector on or off (Standby). AUTO SET button 33 To adjust the computer input image automatically. RESIZE buttons 37 To enlarge the picture size. CALL button 39 To display the information. MENU button - Toshiba TLP-250 | Owners Manual - Page 15
Loading batteries Notes Using batteries incorrectly can cause them to leak or burst. Strictly period, take the batteries out of the remote control. • When the remote control stops working or only works at very close range, replace all the batteries with new ones. • When replacing the batteries - Toshiba TLP-250 | Owners Manual - Page 16
ITXE -2709TC TERN About 5m About 15° About 15° About 15° About 15° Notes • The remote control may not operate when there is sunlight or other strong light such as a fluorescent lamp shining on the projector's remote sensor. • Operate the remote control from a position where the remote sensor - Toshiba TLP-250 | Owners Manual - Page 17
Installation and connections Floor-mounted projector placement CONTENTS 17 There are two ways to place the floor-mounted projector. When the projector is mounted in the rear projection mode, the picture is reversed. Set the "Projection mode" (on the menu screen) according to the projection method - Toshiba TLP-250 | Owners Manual - Page 18
LAMP TEMP FAN ENTER EXIT AUTO SET VOL / ADJ 90° CONTENTS 18 Installation and connections MENU INPUT Point the lens straight at the center of the screen as above. Place the projector horizontally so that the projecting a • The values are approximations. Projection size (inches) 30 36 50 - Toshiba TLP-250 | Owners Manual - Page 19
indicators are lit green. ON LAMP ON / STANDBY TEMP FAN Light (Orange) CONTENTS 19 Power cord (Supplied) 4 Take off the lens cover. Notes • When the projector is moved from a cold location to a warm location, or when the ambient temperature in the projection room has risen suddenly, moisture - Toshiba TLP-250 | Owners Manual - Page 20
shift dial is set to this state. 90% 90° 10% Notes • Never give strong force to the lens shift dial as this may cause malfunction. • At the ceiling-mounted projector placement 22 , the relation between the moving direction of the projection position and the turning direction of the lens shift dial - Toshiba TLP-250 | Owners Manual - Page 21
Installation and connections Projector placement angle adjustment (Foot adjuster) CONTENTS 21 The tilt of the projector can be adjusted using the foot adjuster. Adjust this when the highest position by the lens shift dial 20 is insufficient. Refer to "Projection on the screen" 27 , and adjust the - Toshiba TLP-250 | Owners Manual - Page 22
ceiling installation. Installation and connections CONTROL USB AUDIO VIDEO S-VIDEO COMPUTER ( Y/PB/PR ) Viewer Viewer Translucent screen Perform the "Projection mode" setting on the menu screen for the projection method. 50 Note The relation between the projection size and the distance to - Toshiba TLP-250 | Owners Manual - Page 23
port Notes • The projector cannot be connected to a computer without an analog RGB connector. For details, refer to the computer manual. • You may not be able to connect some computers to the projector. For details, consult the dealer. • When connecting to a Macintosh computer, some models may - Toshiba TLP-250 | Owners Manual - Page 24
Installation and connections Connecting video equipment You can project the picture from video equipment. Check that the power supplies for the projector and for the video equipment are off before connecting the cables. CONTROL USB AUDIO VIDEO S-VIDEO COMPUTER ( Y/PB/PR ) VIDEO jack S-VIDEO - Toshiba TLP-250 | Owners Manual - Page 25
project the picture from video equipment with component video output jack. Check that the power supplies for the projector and for the video equipment are off before connecting (DVD player, etc.) To COMPUTER connector Be sure to connect in the proper direction. Monitor cable Mini D-sub 15P-BNC - Toshiba TLP-250 | Owners Manual - Page 26
for the projector and for the computer are off before connecting the cables. CONTROL USB AUDIO VIDEO S-VIDEO COMPUTER ( Y/PB/PR ) CONTROL connector CONTENTS 26 To CONTROL connector Be sure to connect in the proper direction. Control cable (supplied) Computer To RS-232C port Note Do not - Toshiba TLP-250 | Owners Manual - Page 27
27 CAUTION - Do not look into the projection lens while operating the projector. Preparation 1 Install and connect the projector properly. 2 Take off the lens cover. Remote control 1 ON/STANDBY Press ON/STANDBY. The projector turns on and the ON, LAMP and FAN indicators light in green. ON - Toshiba TLP-250 | Owners Manual - Page 28
Main unit side) ON LAMP ON / STANDBY TEMP FAN MENU ENTER VOL / ADJ EXIT AUTO SET 2,3 2 INPUT Notes • The language selection manual is described on the supposition that English was selected. 4 Turn on the connected equipment and put it in playback mode. Select "Cancel" or install driver - Toshiba TLP-250 | Owners Manual - Page 29
to COMPUTER connector or "Video" connected to VIDEO Jack can be selected. (You can select "Camera" when using the model with a document imaging camera.) The icon and the name of the selected input source appear on the screen. Note The types of input sources selected when the INPUT button is - Toshiba TLP-250 | Owners Manual - Page 30
TLP250/TLP251 projects an image by SVGA signal (800 x 600) in full screen. The image quality of a computer signal except SVGA may deteriorate. It is recommended to set the external monitor connected to the computer to SVGA mode (800 x 600). • The projector can be also applied to DDC2B (Display Data - Toshiba TLP-250 | Owners Manual - Page 31
ENTER CT-90106 EXIT / P.MODE Control panel (Main unit side) ON LAMP ON / STANDBY TEMP FAN MENU ENTER VOL / ADJ EXIT AUTO SET 8 Notes • To change the projecting angle, adjust the foot adjuster. 21 • If the screen image suffers keystone distortion, press the KEYSTONE button to adjust the - Toshiba TLP-250 | Owners Manual - Page 32
ON/STANDBY after using the projector. An instruction message for turning the time. Unplugging the power cord at this time will shorten the lamp's duration life. B The cooling fan continues to run for The standby mode is set. Notes • The projector consumes about 15W of power in the standby mode. - Toshiba TLP-250 | Owners Manual - Page 33
/ P.MODE Control panel (Main unit side) ON LAMP ON / STANDBY TEMP FAN MENU ENTER VOL / ADJ EXIT AUTO SET 2 Notes • Automatic adjustment may not be performed properly for signals other than those computers' signals with which the projector is compatible. • The horizontal position, vertical - Toshiba TLP-250 | Owners Manual - Page 34
Correcting the keystone distortion CONTENTS 34 A picture may be expanded on the upper side if projected upward from the projector lifted up by the foot adjuster. The projector can correct this keystone distortion. Remote control Before correction After correction Operations KEYSTONE 1 INPUT - Toshiba TLP-250 | Owners Manual - Page 35
CONTENTS 35 The image and sound of this projector can be turned off if you wish to temporarily project the image from another projector or an OHP, image and sound will be output. The icon appears in the mute mode. INPUT KEYSTONE ON / STANDBY AUTO SET FREEZE MUTE PIP CALL RESIZE MUTE Note - Toshiba TLP-250 | Owners Manual - Page 36
freeze the image being projected. Use this function to stop moving images from a FREEZE MUTE PIP CALL RESIZE MENU VOL / ADJ Notes • The frozen image can be enlarged with the RESIZE buttons. The source's moving image continues to run even when the projector is set in freeze mode. Operations ENTER - Toshiba TLP-250 | Owners Manual - Page 37
resize) the picture size projected. CONTENTS 37 Remote original size. EXIT Notes • Enlarged images can be frozen by pressing the FREEZE button. The frozen image can also be enlarged . • This projector uses electrical digital resizing, so the picture quality degrades when images are enlarged. - Toshiba TLP-250 | Owners Manual - Page 38
the computer's image. (Referred to as "sub-pictures" in this manual.) Remote control PIP Press PIP. A sub-picture is displayed. Press the PIP button again to turn off the sub-picture. PIP INPUT KEYSTONE ON / STANDBY AUTO SET FREEZE MUTE PIP CALL RESIZE MENU VOL / ADJ Notes • The PIP - Toshiba TLP-250 | Owners Manual - Page 39
of the Y/PB/PR signal (at Y/PB/PR input) Lamp time - the elapsed usage time of the lamp Version - the version of the firmware Shutter - the shutter speed of the document imaging camera (at document imaging camera input) Notes • The information displayed is not refreshed even if it changes - Toshiba TLP-250 | Owners Manual - Page 40
to the projector with the supplied USB cable. Also connect the RGB cable and the audio cable if necessary. 23 USB connector CONTROL USB AUDIO Computer for presentation Operations USB cable (supplied) To USB connector Be sure to connect in the proper direction. To USB port Notes • This - Toshiba TLP-250 | Owners Manual - Page 41
MUTE PIP CALL RESIZE MENU VOL / ADJ ENTER CT-90106 EXIT / P.MODE 6 5,7 P.MODE Control panel (Main unit side) ON LAMP ON / STANDBY TEMP FAN MENU ENTER VOL / ADJ EXIT AUTO SET 3 4 Adjust the projector before presentation if necessary. In the presentation mode after step 5, the - Toshiba TLP-250 | Owners Manual - Page 42
For the operating instruction, refer to the next page. 43 MENU Press MENU. Then GUIDE MENU appears. ( LAMP ON / STANDBY TEMP FAN EXIT MENU ENTER VOL / ADJ EXIT AUTO SET INPUT Remote control MENU MENU VOL / ADJ ENTER ENTER CT-90106 EXIT / P.MODE VOL/ADJ Selection EXIT VOL/ADJ Note - Toshiba TLP-250 | Owners Manual - Page 43
GUIDE Adjust Page Item ENTER Execute EXIT Quit At the items whose the adjustment bar is displayed; At the items whose the choices are displayed; Control panel (Main unit side) ENTER MENU Selection ON LAMP Press EXIT. FULL MENU disappears, and Notes EXIT adjustment or setting is finished. - Toshiba TLP-250 | Owners Manual - Page 44
is selectable with the INPUT button. Yes (common for all of the inputs) Adjustments & Settings Notes • The items related to the camera (the document imaging camera) are displayed only with models having a camera. • "Sampling phase" is adjusted and memorized for each RGB signal 69 . • "Keystone - Toshiba TLP-250 | Owners Manual - Page 45
picture is converted to XGA (1024 x 768 dot) resolution. TLP250/251: The picture is converted to SVGA (800 x 600 dot Yes Yes Notes • The items related to the camera (the document imaging camera) are displayed only with models having projector is on, the adjustments or settings are not memorized. - Toshiba TLP-250 | Owners Manual - Page 46
signal if vertical stripes appear in the detailed image. EXEC. Return the adjustments of FULL MENU - - Yes - - - - Yes - - - - Adjustments & Settings Notes • This menu is not displayed except with analog RGB input. • The adjustment of projector is on, the adjustments are not memorized. - Toshiba TLP-250 | Owners Manual - Page 47
Yes Yes Yes Yes Yes Yes Yes: Adjustable -: Not displayed S-Video Camera Yes - Yes - Yes Yes Yes Yes Yes Yes Yes Yes Adjustments & Settings Note The adjustments made are memorized automatically when the power is turned off by pressing the ON/STANDBY button. If the power cord is - Toshiba TLP-250 | Owners Manual - Page 48
- Yes (common) - Yes (common) - Yes (common) - Yes (common) - Adjustments & Settings Notes • When the camera input is selected, sound is not emitted. • Each item can be set at every or if a power failure occurs while the projector is on, the adjustments or settings are not memorized. - Toshiba TLP-250 | Owners Manual - Page 49
of the inputs) Yes (common for all of the inputs) Adjustments & Settings Notes • Each item can be set at all input sources, but the settings made If the power cord is unplugged or if a power failure occurs while the projector is on, the adjustments or settings are not memorized. • The setting of - Toshiba TLP-250 | Owners Manual - Page 50
projection mode. SET The projector is set to the ceiling-mounted front projection mode. SET The projector is set to the ceiling-mounted rear projection mode. Background Logo Blue None SET The TOSHIBA Power on Manual Auto. SET input is selected. • Note that the projector automatically powers up at - Toshiba TLP-250 | Owners Manual - Page 51
factory default setting. Reset all EXEC. Return the adjustments and settings of all menus to the factory default setting. CONTENTS 51 Adjustments & Settings Note The resettings made are memorized automatically when the power is turned off by pressing the ON/STANDBY button. If the power cord is - Toshiba TLP-250 | Owners Manual - Page 52
EXEC. Return the settings of PIP MENU to the factory default setting. CONTENTS 52 Adjustments & Settings Notes • The size of the PIP sub-picture differs according to the signal type (resolution) of the or if a power failure occurs while the projector is on, the settings are not memorized. - Toshiba TLP-250 | Owners Manual - Page 53
, be careful not to pinch your hand or fingers into the arm. On the document imaging camera model, you can project pictures using the document imaging camera. The document imaging camera can directly project any materials (documents, illustrations, etc.) without using an OHP film. Camera head IEC - Toshiba TLP-250 | Owners Manual - Page 54
camera head. 3) Turn the camera head. 4) Incline the arm backward. 5) Move the camera head toward the object. 6) Pull up the light. 7) Turn the light. Document imaging camera Note Never give shocks or impacts to the camera or arm as this may cause malfunction. - Toshiba TLP-250 | Owners Manual - Page 55
GAIN CAMERA 1 123 123 2 Set a document to be projected. Place the document (illustrations, etc.) onto or around the projector, and turn the camera head to the direction of the document. Images on the screen 123 123 123 Setting direction Notes • Do not leave documents on the unit or near - Toshiba TLP-250 | Owners Manual - Page 56
Picture projection with the document imaging camera (continued) CONTENTS 56 Remote control 3 INPUT KEYSTONE adjust the size of the picture. Up: To reduce. INPUT Control panel (Main unit side) ON LAMP ON / STANDBY TEMP FAN MENU ENTER VOL / ADJ EXIT AUTO SET 3 Camera control panel LOCK - Toshiba TLP-250 | Owners Manual - Page 57
Picture projection with the document imaging camera (continued) CONTENTS 57 6 CAMERA GAIN Press CAMERA GAIN (+/-) to improve view of a camera subject which is too dark or vivid. Camera control panel LOCK W.BALANCE ARM LIGHT CAMERA GAIN CAMERA 6 Notes • You can adjust the "Sharpness" of the - Toshiba TLP-250 | Owners Manual - Page 58
using the following procedure. 1 Project a white paper and enlarge it to fill the screen. Document imaging camera Camera control panel LOCK it again while the white balance is locked (the LOCK indicator is lit), the projector will release the white balance. • Should this be the case, or if you - Toshiba TLP-250 | Owners Manual - Page 59
ON LAMP ON / STANDBY TEMP FAN For the CCD image sensor on the document camera image, use the procedure described below to correct the problem. 1 With the projector's control panel simultaneously. EXIT You can not use the remote control buttons. Document imaging camera KEYSTONE Note - Toshiba TLP-250 | Owners Manual - Page 60
Trouble indications If there is some problem inside the projector, the indicators light up or blink. Indicators ON LAMP ON / STANDBY TEMP FAN MENU ENTER VOL / ADJ EXIT AUTO SET Control panel (Main unit side) INPUT Maintenance KEYSTONE CONTENTS 60 ON LAMP TEMP FAN (Off) Or (Lit in red - Toshiba TLP-250 | Owners Manual - Page 61
the maintenance such as cleaning. The filter inside the air filter cover is the part to shut out dusts or dregs. Do not use the projector with the filter taken off. We recommend you clean the air filter frequently. (The cleaning period is once per 50 hours approximately). 1 Unplug the power - Toshiba TLP-250 | Owners Manual - Page 62
Notes • When the air filter is dusty, the ventilation is impaired. This causes the temperature inside the projector to rise, and may damage the unit. • Attach the air filter and the filter frame firmly after the cleaning. If it is not set correctly, the dusts will enter and they will be projected - Toshiba TLP-250 | Owners Manual - Page 63
Lens and main unit cleaning CAUTION If you use the projector mounted on the ceiling, ask the dealer to carry out the intake, exhaust fans and air filter To maintain the efficiency of the projector, replace the intake and exhaust fans about every two to three years. Ask the dealer for - Toshiba TLP-250 | Owners Manual - Page 64
the dealer to carry out the maintenance such as cleaning or replacement of the lamp. • When replacing, always use lamp "TLPL55" (sold separately). For details, refer to the lamp instruction. • If you have been using the projector, the lamp will be very hot, and may cause burn injuries. Wait for the - Toshiba TLP-250 | Owners Manual - Page 65
replacement (continued) CONTENTS 65 Notes • When the CALL button is pressed, the "Lamp time" (the approximate amount of time the lamp has been used) will be displayed. 39 • The lamp should be replaced if the total working time exceeds about 1,500 hours. When the "Lamp time" is displayed as 1500 - Toshiba TLP-250 | Owners Manual - Page 66
personal Check the following points before asking for support service. Refer also to "Trouble indications". 60 CONTENTS 66 Symptom The power does not come on. The power turns off while using the projector. No image appears. No sound is heard. Desired input source cannot be selected by the INPUT - Toshiba TLP-250 | Owners Manual - Page 67
focus. • The light is not on. • Image is being affected by fluorescent light in the room. Correction Face the remote control transmitter toward the remote sensor on the projector. Operate within about 5 meters. Remove the obstacle. Replace the batteries. Connect the USB cable properly. The remote - Toshiba TLP-250 | Owners Manual - Page 68
(Blue) Color difference signal (PB) 4 GND 5 GND 6 GND (Red) * * GND (PR) 7 GND (Green) GND (Y) 8 GND (Blue) GND (PB) 9 N.C * 10 GND * 11 GND * 12 DDC data * 13 Horizontal sync signal * 14 Vertical sync signal * 15 DDC clock * * : Do not connect anything. CONTENTS 68 Others - Toshiba TLP-250 | Owners Manual - Page 69
computer signal The unit is applicable to the following signals. However, some computers may have different timings than those 640 64 64 864 35.000 66.667 30.240 39 480 3 128 800 24 72 1024 35.156 56.250 36.000 22 600 1 88 800 40 128 1056 37.879 60.317 40.000 23 600 1 64 800 - Toshiba TLP-250 | Owners Manual - Page 70
Applicable signal (continued) 60.000 162.000 46 1200 1 304 1600 64 192 2160 81.250 65.000 175.500 46 1200 1 304 1600 64 192 2160 87 Notes • Signal sources marked "*" and "**" are displayed in compressed format ("*": TLP250/TLP251, "**": TLP250/TLP251/TLP550/TLP551), so some of their data - Toshiba TLP-250 | Owners Manual - Page 71
projector by entering the command from a computer via RS-232C. Signal assignment of RS-232C 12 4 3 5 6 8 7 CONTROL RS-232C Pin No. 1 2 3 4 5 6 7 8 Signal RXD CTS DSR GND RTS N.C TXD N.C Description Receiving data Consent to send Data set ready Signal ground Request to send No connection - Toshiba TLP-250 | Owners Manual - Page 72
Controlling the projector by using RS-232C (continued) CONTENTS 72 Classification Items/Status Picture Video mode (Continued) Signal format Shutter Screen size Position Color Picture reset H-position V-position - Toshiba TLP-250 | Owners Manual - Page 73
Controlling the projector by using RS-232C (continued) CONTENTS 73 Classification Items/Status Selection Command Audio Volume Increase VLU Decrease VLD Speaker output On AS1 Off AS0 Channel - Toshiba TLP-250 | Owners Manual - Page 74
Y/PB/PR VIDEO On Off S-VIDEO On Off CAMERA On Off Projection mode Standard Rear Ceiling Rear ceiling No signal background Logo Blue background Non No signal power off Off 5 min. Power on Manual Auto. Startup screen On Off Default setting initialize Reset Reset all Status - Toshiba TLP-250 | Owners Manual - Page 75
Controlling the projector by using RS-232C (continued) CONTENTS 75 Classification Items/Status Selection Command RESIZE Increase the enlargement ratio RUP Decrease the enlargement ratio (Minimum: reset status) - Toshiba TLP-250 | Owners Manual - Page 76
3 480,000 pixels (800 x 600 dots) (H./V.) x 3 Projection lens Lens Focusing Zooming Zooming lens F=2.0 to 2.4 f=14.5 to 17.4mm Manual operation Manual operation Document imaging camera (with camera model) Lens F = 2.8, f = 3.4mm Focusing Manual operation Zoom None (adjusted by distance to - Toshiba TLP-250 | Owners Manual - Page 77
Specifications (continued) Sold separately Replacement lamp TLPL55 • The design and specifications are subject to change without a registered trademark of Microsoft Corporation in the U.S. and other countries. Display Data Channel is a trademark of Video Electronics Standard Association. Others
-
 1
1 -
 2
2 -
 3
3 -
 4
4 -
 5
5 -
 6
6 -
 7
7 -
8
-
9
-
10
-
11
-
12
-
13
-
14
-
15
-
16
-
17
-
18
-
19
-
20
-
21
-
22
-
23
-
24
-
25
-
26
-
27
-
28
-
29
-
30
-
31
-
32
-
33
-
34
-
35
-
36
-
37
-
38
-
39
-
40
-
41
-
42
-
43
-
44
-
45
-
46
-
47
-
48
-
49
-
50
-
51
-
52
-
53
-
54
-
55
-
56
-
57
-
58
-
59
-
60
-
61
-
62
-
63
-
64
-
65
-
66
-
67
-
68
-
69
-
70
-
71
-
72
-
73
-
74
-
75
-
76
-
77
 |
 |
1
Before use
CONTENTS
OWNER’S MANUAL
3LCD DATA PROJECTOR
TLP550
TLP551
TLP250
TLP251
(
WITH DOCUMENT IMAGING CAMERA
)
MENU
TLP550/TLP250
(
WITH DOCUMENT IMAGING CAMERA
)