Toshiba TLP-250 Owners Manual - Page 44
GUIDE MENU adjustments and settings
 |
View all Toshiba TLP-250 manuals
Add to My Manuals
Save this manual to your list of manuals |
Page 44 highlights
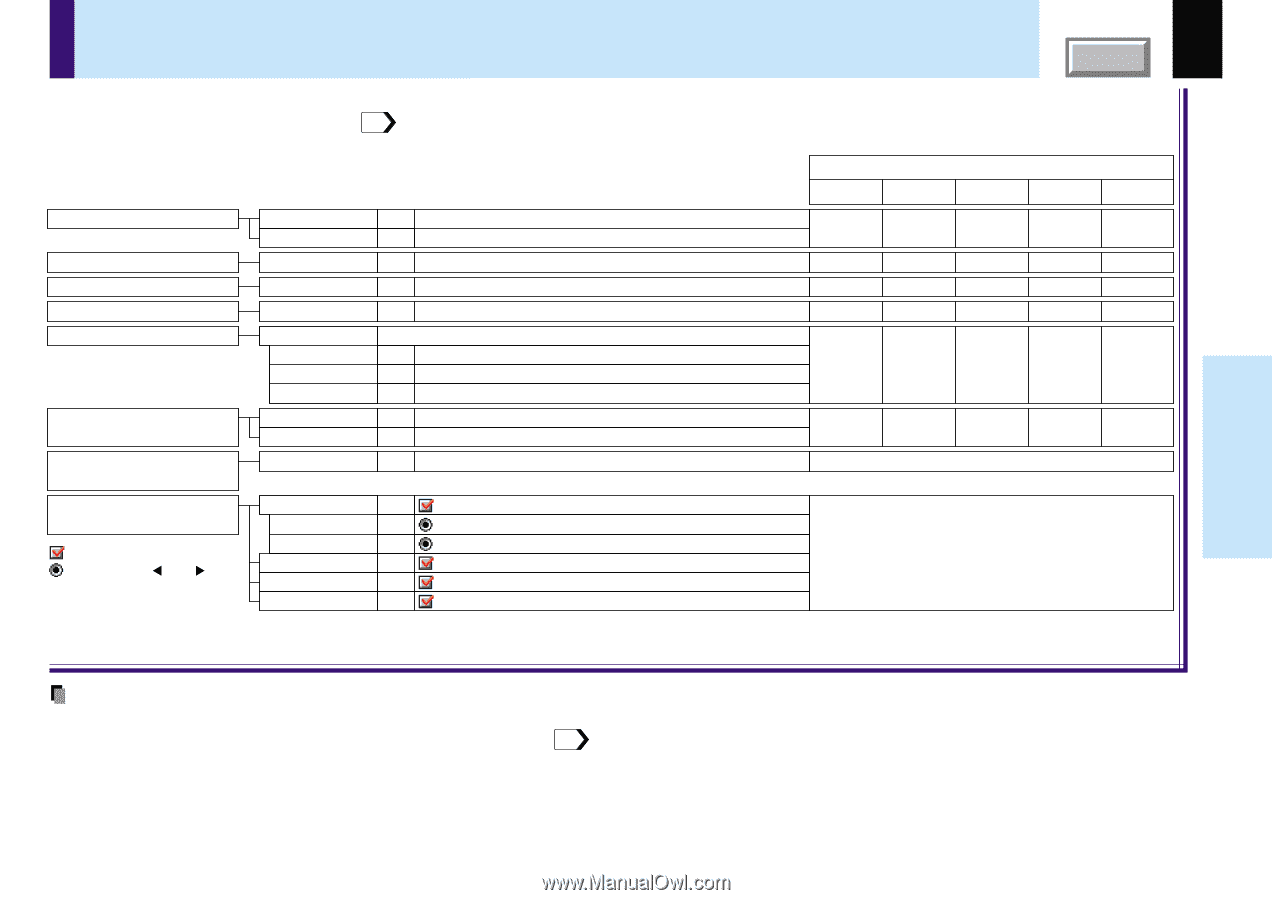
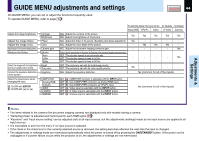
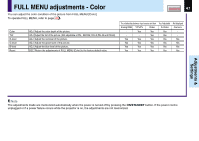
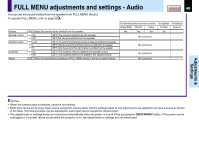
GUIDE MENU adjustments and settings On GUIDE MENU, you can set or adjust the functions frequently used. To operate GUIDE MENU, refer to page 42 . CONTENTS 44 Adjust the image brightness. Adjust the image flicker. Adjust the image color. Adjust the gain of the document imaging camera. Reduce the flicker. Select the image with its brightness priority or quality (color) priority. Correct the keystone distortion of the screen. Select the input source when changing the input. : On/Off with ENTER : On/Off with ( ) or ( ) Contrast Brightness Phase Color Camera gain Shutter Auto 50Hz 60Hz Bright True color Keystone COMPUTER Analog RGB Y/PB/PR VIDEO S-VIDEO CAMERA The relationship between input source and item Yes: Adjustable -: Not displayed Analog RGB Y/PB/PR Video S-Video Camera ADJ. Adjust the contrast of the picture. ADJ. Adjust the brightness of the picture. Yes Yes Yes Yes Yes ADJ. Adjust the flicker of the picture. (Sampling clock phase adjustment) Yes - - - - ADJ. Adjust the color depth of the picture. - Yes Yes Yes - ADJ. Adjust the document imaging camera's gain. - - - - Yes Select a shutter speed below to decrease the flickering of the document imaging camera's picture. SET The shutter speed is set automatically. SET The shutter speed is fixed to 50 Hz. - - - - Yes SET The shutter speed is fixed to 60 Hz. SET The picture is set with its brightness priority. SET The picture is set with its color quality priority. Yes - - - - ADJ. Adjust the keystone distortion. Yes (common for all of the inputs) SET : COMPUTER connector is selectable with the INPUT button. SET : Use COMPUTER connector as Analog RGB input. SET : Use COMPUTER connector as Y/PB/PR input. SET : Video input is selectable with the INPUT button. SET : S-Video input is selectable with the INPUT button. SET : Camera input is selectable with the INPUT button. Yes (common for all of the inputs) Adjustments & Settings Notes • The items related to the camera (the document imaging camera) are displayed only with models having a camera. • "Sampling phase" is adjusted and memorized for each RGB signal 69 . • "Keystone" and "Input source setting" can be adjusted (set) at all input sources, but the adjustments (settings) made at one input source are applied to all input sources. • It is impossible to exit from the menu if no input source is selected. • If the check in the check box for the currently selected source is removed, the setting becomes effective the next time the input is changed. • The adjustments or settings made are memorized automatically when the power is turned off by pressing the ON/STANDBY button. If the power cord is unplugged or if a power failure occurs while the projector is on, the adjustments or settings are not memorized.
-
 1
1 -
2
-
3
-
4
-
5
-
6
-
7
-
8
-
9
-
10
-
11
-
12
-
13
-
14
-
15
-
16
-
17
-
18
-
19
-
20
-
21
-
22
-
23
-
24
-
25
-
26
-
27
-
28
-
29
-
30
-
31
-
32
-
33
-
34
-
35
-
36
-
37
-
38
-
 39
39 -
 40
40 -
 41
41 -
 42
42 -
 43
43 -
 44
44 -
 45
45 -
 46
46 -
 47
47 -
 48
48 -
 49
49 -
50
-
51
-
52
-
53
-
54
-
55
-
56
-
57
-
58
-
59
-
60
-
61
-
62
-
63
-
64
-
65
-
66
-
67
-
68
-
69
-
70
-
71
-
72
-
73
-
74
-
75
-
76
-
77
 |
 |