Toshiba Tecra C50 User Guide - Page 30
Initial setup, Getting to know Windows, Start menu, Windows taskbar
 |
View all Toshiba Tecra C50 manuals
Add to My Manuals
Save this manual to your list of manuals |
Page 30 highlights
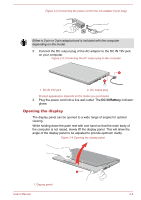
Figure 2-5 Turning on the power 1 1. Power button Product appearance depends on the model you purchased. Initial setup The Windows Startup Screen is the first screen displayed when you turn on the power. To install the operating system properly, follow the on-screen instructions on each screen. When it is displayed, be sure to read the license terms and license agreement carefully. Getting to know Windows For detailed information on what is new and how to operate Windows, refer to the Tips in the Start menu. Start menu The Start menu is the launching pad for everything you can do in the Windows operating system, providing easy ways to access your apps, programs, websites and other important information. You can access the Start menu from an app or the desktop in the following ways: Click the Start button ( ) in the lower-left corner of the screen. Press the Windows® logo key ( ) on your keyboard. You can pin your favorite apps to the Start menu as tiles in grid-like pattern, and also group them. Tiles show you dynamic information from apps without having to open them. Windows taskbar By default, the bottom of the desktop is Windows taskbar. You can see all of your currently running apps on the Windows taskbar. User's Manual 2-6
-
 1
1 -
2
-
3
-
4
-
5
-
6
-
7
-
8
-
9
-
10
-
11
-
12
-
13
-
14
-
15
-
16
-
17
-
18
-
19
-
20
-
21
-
22
-
23
-
24
-
 25
25 -
 26
26 -
 27
27 -
 28
28 -
 29
29 -
 30
30 -
 31
31 -
 32
32 -
 33
33 -
 34
34 -
 35
35 -
36
-
37
-
38
-
39
-
40
-
41
-
42
-
43
-
44
-
45
-
46
-
47
-
48
-
49
-
50
-
51
-
52
-
53
-
54
-
55
-
56
-
57
-
58
-
59
-
60
-
61
-
62
-
63
-
64
-
65
-
66
-
67
-
68
-
69
-
70
-
71
-
72
-
73
-
74
-
75
-
76
-
77
-
78
-
79
-
80
-
81
-
82
-
83
-
84
-
85
-
86
-
87
-
88
-
89
-
90
-
91
-
92
-
93
-
94
-
95
-
96
-
97
-
98
-
99
-
100
-
101
-
102
-
103
-
104
-
105
-
106
-
107
-
108
-
109
-
110
-
111
-
112
-
113
-
114
-
115
-
116
-
117
-
118
-
119
-
120
-
121
-
122
-
123
-
124
-
125
-
126
-
127
-
128
-
129
-
130
-
131
-
132
-
133
-
134
-
135
-
136
-
137
-
138
-
139
-
140
-
141
-
142
-
143
-
144
-
145
-
146
-
147
-
148
-
149
-
150
-
151
-
152
-
153
-
154
-
155
-
156
-
157
-
158
-
159
-
160
-
161
-
162
-
163
-
164
-
165
-
166
-
167
-
168
-
169
-
170
-
171
-
172
-
173
-
174
-
175
-
176
-
177
-
178
 |
 |
