Toshiba Tecra C50 User Guide - Page 65
Starting CyberLink PowerDVD 14 DVD for TOSHIBA, Using the AccuPoint, AccuPoint precautions
 |
View all Toshiba Tecra C50 manuals
Add to My Manuals
Save this manual to your list of manuals |
Page 65 highlights
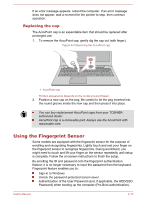
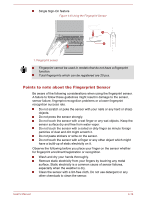
Do not change the screen resolution while running the CyberLink PowerDVD 14 DVD for TOSHIBA. Do not change the display device while running the CyberLink PowerDVD 14 DVD for TOSHIBA. Starting CyberLink PowerDVD 14 DVD for TOSHIBA To start CyberLink PowerDVD 14 DVD for TOSHIBA, click Start -> CyberLink PowerDVD 14 DVD for TOSHIBA. Operating CyberLink PowerDVD 14 DVD for TOSHIBA Notes on Using CyberLink PowerDVD 14 DVD for TOSHIBA. Screen display and available features may vary amongst videos and scenes. Open CyberLink PowerDVD 14 DVD for TOSHIBA Manual CyberLink PowerDVD 14 DVD for TOSHIBA features and instructions are detailed in CyberLink PowerDVD 14 DVD for TOSHIBA Help. Use the following procedure to open CyberLink PowerDVD 14 DVD for TOSHIBA Help. Press the F1 key when CyberLink PowerDVD 14 DVD for TOSHIBA is launched. Using the AccuPoint To use the AccuPoint, simply push it with your finger tip in the direction you want to move the on-screen pointer. The control buttons below the AccuPoint are used like the buttons on a standard mouse. Press the left button to select a menu item or to manipulate text or graphics designated by the pointer, and press the right button to display a menu or other function depending on the software you are using. Some models are equipped with an AccuPoint. AccuPoint precautions Certain conditions can affect the on-screen pointer when using AccuPoint. For example, the pointer might travel contrary to AccuPoint operation or an error message might appear, if You touch the AccuPoint during power-up. You apply constant, soft pressure during power-up. There is a sudden temperature change. Strong stress is applied to the AccuPoint. User's Manual 4-12
-
 1
1 -
2
-
3
-
4
-
5
-
6
-
7
-
8
-
9
-
10
-
11
-
12
-
13
-
14
-
15
-
16
-
17
-
18
-
19
-
20
-
21
-
22
-
23
-
24
-
25
-
26
-
27
-
28
-
29
-
30
-
31
-
32
-
33
-
34
-
35
-
36
-
37
-
38
-
39
-
40
-
41
-
42
-
43
-
44
-
45
-
46
-
47
-
48
-
49
-
50
-
51
-
52
-
53
-
54
-
55
-
56
-
57
-
58
-
59
-
 60
60 -
 61
61 -
 62
62 -
 63
63 -
 64
64 -
 65
65 -
 66
66 -
 67
67 -
 68
68 -
 69
69 -
 70
70 -
71
-
72
-
73
-
74
-
75
-
76
-
77
-
78
-
79
-
80
-
81
-
82
-
83
-
84
-
85
-
86
-
87
-
88
-
89
-
90
-
91
-
92
-
93
-
94
-
95
-
96
-
97
-
98
-
99
-
100
-
101
-
102
-
103
-
104
-
105
-
106
-
107
-
108
-
109
-
110
-
111
-
112
-
113
-
114
-
115
-
116
-
117
-
118
-
119
-
120
-
121
-
122
-
123
-
124
-
125
-
126
-
127
-
128
-
129
-
130
-
131
-
132
-
133
-
134
-
135
-
136
-
137
-
138
-
139
-
140
-
141
-
142
-
143
-
144
-
145
-
146
-
147
-
148
-
149
-
150
-
151
-
152
-
153
-
154
-
155
-
156
-
157
-
158
-
159
-
160
-
161
-
162
-
163
-
164
-
165
-
166
-
167
-
168
-
169
-
170
-
171
-
172
-
173
-
174
-
175
-
176
-
177
-
178
 |
 |
