ViewSonic PJ452 User Guide - Page 13
About the filter cover for bottom-up use
 |
UPC - 766907174311
View all ViewSonic PJ452 manuals
Add to My Manuals
Save this manual to your list of manuals |
Page 13 highlights
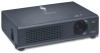
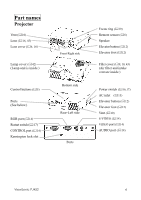
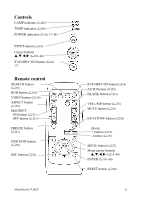
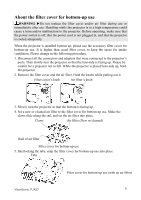
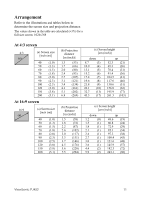
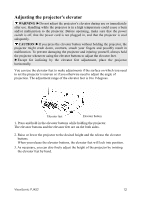
About the filter cover for bottom-up use WARNING ►Do not replace the filter cover and/or air filter during use or immediately after use. Handling while the projector is in a high temperature could cause a burn and/or malfunction to the projector. Before operating, make sure that the power switch is off, that the power cord is not plugged in, and that the projector is cooled adequately. When the projector is installed bottom up, please use the accessory filter cover for bottom-up use. It is higher than usual filter cover, to keep the space for intake ventilation. Please change in the following procedure. 1. Disconnect all the connectors and adapters that were connected to the projector's ports. Then slowly turn the projector so that the lens-side is facing up. Please be careful for a projector not to fall. While the projector is placed lens-side up, hold the projector. 2. Remove the filter cover and the air filter. Hold the knobs while pulling out it. Filter cover's knob Air filter's knob 3. Slowly turn the projector so that the bottom is facing up. 4. Set a new or cleaned air filter to the filter cover for bottom-up use. Make the claws slide along the rail, and set the air filter into place. Claws Air filter (New or cleaned) Rail of air filter Filter cover for bottom-up use 5. Interlocking the tabs, snap the filter cover for bottom-up use into place. Tabs ViewSonic PJ452 Filter cover for bottom-up use (with an air filter) 9
-
 1
1 -
2
-
3
-
4
-
5
-
6
-
7
-
 8
8 -
 9
9 -
 10
10 -
 11
11 -
 12
12 -
 13
13 -
 14
14 -
 15
15 -
 16
16 -
 17
17 -
 18
18 -
19
-
20
-
21
-
22
-
23
-
24
-
25
-
26
-
27
-
28
-
29
-
30
-
31
-
32
-
33
-
34
-
35
-
36
-
37
-
38
-
39
-
40
-
41
-
42
-
43
-
44
-
45
-
46
-
47
-
48
-
49
-
50
-
51
-
52
-
53
-
54
-
55
-
56
-
57
-
58
-
59
-
60
 |
 |