ViewSonic Pro8800WUL PRO8800WUL User Guide English - Page 13
Remote control code, Using the remote mouse control, Operating the LASER pointer
 |
View all ViewSonic Pro8800WUL manuals
Add to My Manuals
Save this manual to your list of manuals |
Page 13 highlights
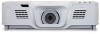
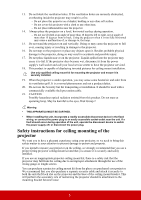
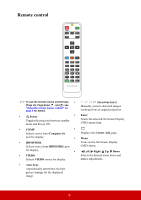
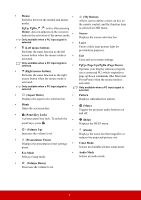
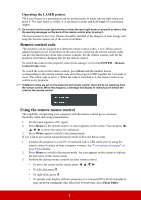
Operating the LASER pointer The Laser Pointer is a presentation aid for professionals. It emits colored light when you press it. The laser beam is visible. It is necessary to press and hold Laser for continuous output. Do not look into the laser light window or shine the laser light beam on yourself or others. See the warning messages on the back of the remote control prior to using it. The laser pointer is not a toy. Parents should be mindful of the dangers of laser energy and keep this remote control out of the reach of children. Remote control code The projector can be assigned to 8 different remote control codes, 1 to 8. When several adjacent projectors are in operation at the same time, switching the remote control codes can prevent interference from other remote controls. Set the remote control code for the projector first before changing that for the remote control. To switch the code for the projector, select from among 1 to 8 in the SYSTEM > Remote Control Code menu. To switch the code for the remote control, press ID set and the number button corresponding to the remote control code set in the projector OSD together for 5 seconds or more. The initial code is set to 1. When the code is switched to 8, the remote control can control every projector. If different codes are set on the projector and remote control, there will be no response from the remote control. When that happens, a message will display to remind you to switch the code for the remote control. Using the remote mouse control The capability of operating your computer with the remote control gives you more flexibility when delivering presentations. 1. Set the input signal to a PC signal. 2. Press Mouse on the remote control. A cursor appears on the screen. You can press / / / to move the cursor for indication. 3. Press Mouse again to switch to the normal mode. If you wish to use a more advanced mouse mode, follow the below steps: 1. Connect the projector to your PC or notebook with a USB cable prior to using the remote control in place of your computer's mouse. See "Connecting a computer" on page 19 for details. 2. Press Mouse to switch to the mouse mode. An icon appears on the screen to indicate the activation of the mouse mode. 3. Perform the desired mouse controls on your remote control. • To move the cursor on the screen, press To left-click, press . • To right-click, press . • To operate your display software program (on a connected PC) which responds to page up/down commands (like Microsoft PowerPoint), press PgUp/PgDn. 8
-
 1
1 -
2
-
3
-
4
-
5
-
6
-
7
-
 8
8 -
 9
9 -
 10
10 -
 11
11 -
 12
12 -
 13
13 -
 14
14 -
 15
15 -
 16
16 -
 17
17 -
 18
18 -
19
-
20
-
21
-
22
-
23
-
24
-
25
-
26
-
27
-
28
-
29
-
30
-
31
-
32
-
33
-
34
-
35
-
36
-
37
-
38
-
39
-
40
-
41
-
42
-
43
-
44
-
45
-
46
-
47
-
48
-
49
-
50
-
51
-
52
-
53
-
54
-
55
-
56
-
57
-
58
-
59
-
60
-
61
-
62
-
63
-
64
-
65
-
66
-
67
-
68
-
69
-
70
-
71
-
72
-
73
-
74
-
75
-
76
-
77
-
78
-
79
-
80
-
81
-
82
-
83
-
84
-
85
-
86
-
87
-
88
-
89
-
90
-
91
-
92
-
93
-
94
-
95
-
96
 |
 |