ViewSonic Pro8800WUL PRO8800WUL User Guide English - Page 21
Shifting the projection lens vertically
 |
View all ViewSonic Pro8800WUL manuals
Add to My Manuals
Save this manual to your list of manuals |
Page 21 highlights
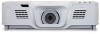
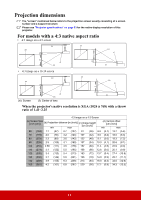
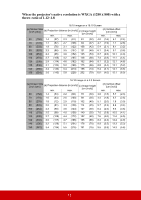
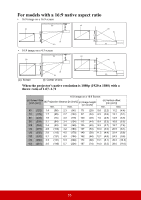
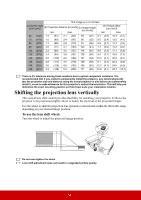
16:9 image on a 4:3 Screen (a) Screen Size [inch (cm)] (b) Projection distance [m (inch)] (c) Image height min. max. [cm (inch)] (d) Vertical offset [cm (inch)] min. max. 60 (152) 1.3 (51) 2.1 (82) 69 (27) 5.1 (2.0) 10.3 (4.1) 70 (178) 1.5 (60) 2.4 (96) 80 (32) 6.0 (2.4) 12.0 (4.7) 80 (203) 1.7 (68) 2.8 (110) 91 (36) 6.9 (2.7) 13.7 (5.4) 90 (229) 2.0 (77) 3.1 (123) 103 (41) 7.7 (3.0) 15.4 (6.1) 100 (254) 2.2 (86) 3.5 (137) 114 (45) 8.6 (3.4) 17.1 (6.8) 110 (279) 2.4 (94) 3.8 (151) 126 (50) 9.4 (3.7) 18.9 (7.4) 120 (305) 2.6 (103) 4.2 (164) 137 (54) 10.3 (4.1) 20.6 (8.1) 130 (330) 2.8 (111) 4.5 (178) 149 (59) 11.1 (4.4) 22.3 (8.8) 140 (356) 3.0 (120) 4.9 (192) 160 (63) 12.0 (4.7) 24.0 (9.5) 150 (381) 3.3 (128) 5.2 (205) 171 (68) 12.9 (5.1) 25.7 (10.1) There is 3% tolerance among these numbers due to optical component variations. It is recommended that if you intend to permanently install the projector, you should physically test the projection size and distance using the actual projector in situ before you permanently install it, so as to make allowance for this projector's optical characteristics. This will help you determine the exact mounting position so that it best suits your installation location. Shifting the projection lens vertically The vertical lens shift control provides flexibility for installing your projector. It allows the projector to be positioned slightly above or below the top level of the projected images. Use the wheel to shift the projection lens upwards or downwards within the allowable range depending on your desired image position. To use the lens shift wheel: Turn the wheel to adjust the projected image position. Do not over-tighten the wheel. Lens shift adjustment does not result in a degraded picture quality. 16
-
 1
1 -
2
-
3
-
4
-
5
-
6
-
7
-
8
-
9
-
10
-
11
-
12
-
13
-
14
-
15
-
 16
16 -
 17
17 -
 18
18 -
 19
19 -
 20
20 -
 21
21 -
 22
22 -
 23
23 -
 24
24 -
 25
25 -
 26
26 -
27
-
28
-
29
-
30
-
31
-
32
-
33
-
34
-
35
-
36
-
37
-
38
-
39
-
40
-
41
-
42
-
43
-
44
-
45
-
46
-
47
-
48
-
49
-
50
-
51
-
52
-
53
-
54
-
55
-
56
-
57
-
58
-
59
-
60
-
61
-
62
-
63
-
64
-
65
-
66
-
67
-
68
-
69
-
70
-
71
-
72
-
73
-
74
-
75
-
76
-
77
-
78
-
79
-
80
-
81
-
82
-
83
-
84
-
85
-
86
-
87
-
88
-
89
-
90
-
91
-
92
-
93
-
94
-
95
-
96
 |
 |