ViewSonic Pro8800WUL PRO8800WUL User Guide English - Page 37
Selecting the aspect ratio, About the aspect ratio
 |
View all ViewSonic Pro8800WUL manuals
Add to My Manuals
Save this manual to your list of manuals |
Page 37 highlights
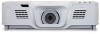
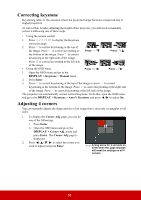
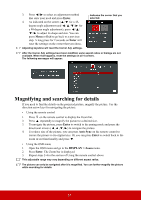
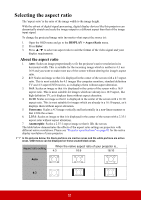
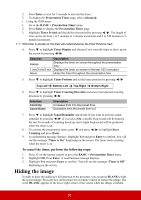
Selecting the aspect ratio The 'aspect ratio' is the ratio of the image width to the image height. With the advent of digital signal processing, digital display devices like this projector can dynamically stretch and scale the image output to a different aspect than that of the image input signal. To change the projected image ratio (no matter what aspect the source is): 1. Open the OSD menu and go to the DISPLAY > Aspect Ratio menu. 2. Press Enter. 3. Press / to select an aspect ratio to suit the format of the video signal and your display requirements. About the aspect ratio 1. Auto: Scales an image proportionally to fit the projector's native resolution in its horizontal width. This is suitable for the incoming image which is neither in 4:3 nor 16:9 and you want to make most use of the screen without altering the image's aspect ratio. 2. 4:3: Scales an image so that it is displayed in the center of the screen with a 4:3 aspect ratio. This is most suitable for 4:3 images like computer monitors, standard definition TV and 4:3 aspect DVD movies, as it displays them without aspect alteration. 3. 16:9: Scales an image so that it is displayed in the center of the screen with a 16:9 aspect ratio. This is most suitable for images which are already in a 16:9 aspect, like high definition TV, as it displays them without aspect alteration. 4. 16:10: Scales an image so that it is displayed in the center of the screen with a 16:10 aspect ratio. This is most suitable for images which are already in a 16:10 aspect, as it displays them without aspect alteration. 5. Panorama: Scales a 4:3 image vertically and horizontally in a non-linear manner so that it fills the screen. 6. 2.35:1: Scales an image so that it is displayed in the center of the screen with a 2.35:1 aspect ratio without aspect alteration. 7. Anamorphic: Scales a 2.35:1 aspect image so that it fills the screen. The table below demonstrates the effects of the aspect ratio settings on projectors with different native resolutions. Please see "Projector specifications" on page 83 for the native display resolution of your projector. In the pictures below, the black portions are inactive areas and the white portions are active areas. OSD menus can be displayed on those unused black areas. Aspect ratio setting When the native aspect ratio of your projector is... 4:3 16:9 16:10 Auto 4:3 32
-
 1
1 -
2
-
3
-
4
-
5
-
6
-
7
-
8
-
9
-
10
-
11
-
12
-
13
-
14
-
15
-
16
-
17
-
18
-
19
-
20
-
21
-
22
-
23
-
24
-
25
-
26
-
27
-
28
-
29
-
30
-
31
-
 32
32 -
 33
33 -
 34
34 -
 35
35 -
 36
36 -
 37
37 -
 38
38 -
 39
39 -
 40
40 -
 41
41 -
 42
42 -
43
-
44
-
45
-
46
-
47
-
48
-
49
-
50
-
51
-
52
-
53
-
54
-
55
-
56
-
57
-
58
-
59
-
60
-
61
-
62
-
63
-
64
-
65
-
66
-
67
-
68
-
69
-
70
-
71
-
72
-
73
-
74
-
75
-
76
-
77
-
78
-
79
-
80
-
81
-
82
-
83
-
84
-
85
-
86
-
87
-
88
-
89
-
90
-
91
-
92
-
93
-
94
-
95
-
96
 |
 |