ViewSonic Pro8800WUL PRO8800WUL User Guide English - Page 27
Connecting a composite Video source device, Playing sound through the projector
 |
View all ViewSonic Pro8800WUL manuals
Add to My Manuals
Save this manual to your list of manuals |
Page 27 highlights
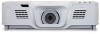
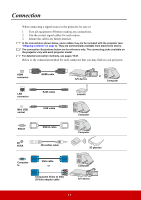
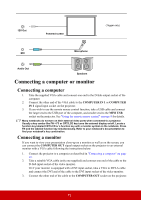
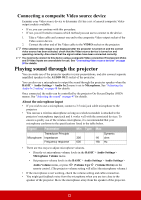
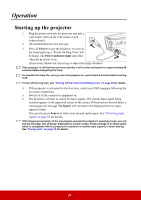
Connecting a composite Video source device Examine your Video source device to determine if it has a set of unused composite Video output sockets available: • If so, you can continue with this procedure. • If not, you will need to reassess which method you can use to connect to the device. 1. Take a Video cable and connect one end to the composite Video output socket of the Video source device. 2. Connect the other end of the Video cable to the VIDEO socket on the projector. If the selected video image is not displayed after the projector is turned on and the correct video source has been selected, check that the Video source device is turned on and operating correctly. Also check that the signal cables have been connected correctly. You need only connect to this device using a composite Video connection if Component Video and S-Video inputs are unavailable for use. See "Connecting Video source devices" on page 20 for details. Playing sound through the projector You can make use of the projector speaker in your presentations, and also connect separate amplified speakers to the AUDIO OUT socket of the projector. You can also use a microphone to output the sound through the projector speaker when the BASIC > Audio Settings > Audio In 2 menu is set to Microphone. See "Adjusting the Audio In 2 setting" on page 48 for details. Once connected, the audio can be controlled by the projector On-Screen Display (OSD) menus. See "Adjusting the sound" on page 47 for details. About the microphone input • If you wish to use a microphone, connect a 3.5 mini jack cable microphone to the projector. • You can use a wireless microphone as long as a wireless module is attached to the projector's microphone input jack and it works well with the associated devices. To ensure a quality use of the wireless microphone, it is recommended that your microphone conforms to the specifications listed in the table below. Signal Parameter Min Type Max Transducer Principle Microphone Impedance 300 Frequency response 600 Dynamic 1K ohm 16k Hz • There are two ways to adjust microphone volumes. • Directly set microphone volume levels in the BASIC > Audio Settings > Microphone Volume menu. • Set projector volume levels in the BASIC > Audio Settings > Audio Settings > Audio Volume menu, or press (Volume Up)/ (Volume Down) on the remote control. (The projector volume setting will affect the microphone volume.) • If the microphone is not working, check the volume setting and cable connection. • You might get feedback noise from the microphone when you are too close to the speaker of the projector. Move the microphone away from the speaker of the projector. 22
-
 1
1 -
2
-
3
-
4
-
5
-
6
-
7
-
8
-
9
-
10
-
11
-
12
-
13
-
14
-
15
-
16
-
17
-
18
-
19
-
20
-
21
-
 22
22 -
 23
23 -
 24
24 -
 25
25 -
 26
26 -
 27
27 -
 28
28 -
 29
29 -
 30
30 -
 31
31 -
 32
32 -
33
-
34
-
35
-
36
-
37
-
38
-
39
-
40
-
41
-
42
-
43
-
44
-
45
-
46
-
47
-
48
-
49
-
50
-
51
-
52
-
53
-
54
-
55
-
56
-
57
-
58
-
59
-
60
-
61
-
62
-
63
-
64
-
65
-
66
-
67
-
68
-
69
-
70
-
71
-
72
-
73
-
74
-
75
-
76
-
77
-
78
-
79
-
80
-
81
-
82
-
83
-
84
-
85
-
86
-
87
-
88
-
89
-
90
-
91
-
92
-
93
-
94
-
95
-
96
 |
 |