ViewSonic Pro8800WUL PRO8800WUL User Guide English - Page 67
Timing of replacing the lamp, Replacing the lamp, POWER MANAGEMENT, Smart Energy, Enter, Power Saving
 |
View all ViewSonic Pro8800WUL manuals
Add to My Manuals
Save this manual to your list of manuals |
Page 67 highlights
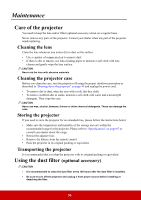
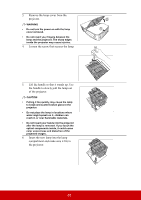
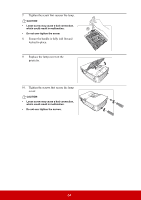
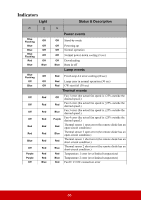
1. Open the OSD menu and go to the POWER MANAGEMENT > Smart Energy menu. 2. Press Enter and the Smart Energy page is displayed. 3. Highlight Power Saving and press / . 4. When Enable is selected, the projector lamp will be changed to Eco mode after no signal is detected for 5 minutes. Timing of replacing the lamp Please install a new lamp or consult your dealer when the Lamp indicator light lights up. An old lamp may cause a malfunction in the projector and in some instances the lamp may explode. CAUTION The Lamp indicator light and Temperature indicator light will light up if the lamp becomes too hot. Turn the power off and let the projector cool for 45 minutes. If the Lamp indicator light or Temperature indicator light still lights up after turning the power back on, please contact your dealer. See "Indicators" on page 65 for details. Replacing the lamp Turn the power off and disconnect the projector from the power outlet. Please contact qualified service personnel for changing the lamp. • To reduce the risk of electrical shock, always turn the projector off and disconnect the power cord before changing the lamp. • To reduce the risk of severe burns, allow the projector to cool for at least 45 minutes before replacing the lamp. • To reduce the risk of injuries to fingers and damage to internal components, use caution when removing lamp glass that has shattered into sharp pieces. Before replacing the lamp, clean the lamp compartment and dispose of cleaning materials. Be careful of sharp edges in the lamp compartment. Wash hands after lamp replacement. • Only ViewSonic certified lamps are tested with this projector. Use of other lamps may cause electrical shock and fire. 1. Turn the power off and disconnect the projector from the wall socket. If the lamp is hot, avoid burns by waiting for approximately 45 minutes until the lamp has cooled. 2. Loosen the screws that secure the lamp cover on the both sides of the projector until the lamp cover loosens. 62
-
 1
1 -
2
-
3
-
4
-
5
-
6
-
7
-
8
-
9
-
10
-
11
-
12
-
13
-
14
-
15
-
16
-
17
-
18
-
19
-
20
-
21
-
22
-
23
-
24
-
25
-
26
-
27
-
28
-
29
-
30
-
31
-
32
-
33
-
34
-
35
-
36
-
37
-
38
-
39
-
40
-
41
-
42
-
43
-
44
-
45
-
46
-
47
-
48
-
49
-
50
-
51
-
52
-
53
-
54
-
55
-
56
-
57
-
58
-
59
-
60
-
61
-
 62
62 -
 63
63 -
 64
64 -
 65
65 -
 66
66 -
 67
67 -
 68
68 -
 69
69 -
 70
70 -
 71
71 -
 72
72 -
73
-
74
-
75
-
76
-
77
-
78
-
79
-
80
-
81
-
82
-
83
-
84
-
85
-
86
-
87
-
88
-
89
-
90
-
91
-
92
-
93
-
94
-
95
-
96
 |
 |