Vivitar IPC-222 User Manual - Page 11
Start, Start, camera, setup, Connect, camera
 |
View all Vivitar IPC-222 manuals
Add to My Manuals
Save this manual to your list of manuals |
Page 11 highlights
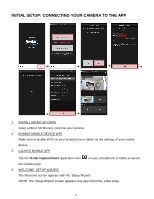
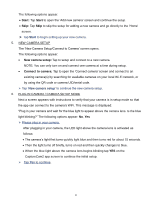
The following options appear: Start: Tap Start to open the 'Add new camera' screen and continue the setup. Skip: Tap Skip to skip the setup for adding a new camera and go directly to the 'Home' screen. Tap Start to begin setting up your new camera. 5. NEW CAMERA SETUP The 'New Camera Setup/Connect to Camera' screen opens. The following options appear: New camera setup: Tap to setup and connect to a new camera. NOTE: You can only turn on and connect one camera at a time during setup. Connect to camera: Tap to open the 'Connect camera' screen and connect to an existing camera(s) by searching for available cameras on your local Wi-Fi network, or by using the QR code or camera UID/serial code. Tap 'New camera setup' to continue the new camera setup. 6. PLUG IN CAMERA / CAMERA SETUP MODE Next a screen appears with instructions to verify that your camera is in setup mode so that the app can connect to the camera's WiFi. This message is displayed: "Plug in your camera and wait for the blue light to appear above the camera lens. Is the blue light blinking?" The following options appear: No, Yes Please plug in your camera. After plugging in your camera, the LED light above the camera lens is activated as follows: The camera's light first turns quickly light blue and then turns red for about 15 seconds. Then the light turns off briefly, turns on red and then quickly changes to blue. When the blue light above the camera lens begins blinking tap YES on the CaptureCam2 app screen to continue the initial setup. Tap Yes to continue. 10
-
 1
1 -
2
-
3
-
4
-
5
-
 6
6 -
 7
7 -
 8
8 -
 9
9 -
 10
10 -
 11
11 -
 12
12 -
 13
13 -
 14
14 -
 15
15 -
 16
16 -
17
-
18
-
19
-
20
-
21
-
22
-
23
-
24
-
25
-
26
-
27
-
28
-
29
-
30
-
31
 |
 |
