Xerox 7760DN User Guide - Page 77
facedown, faceup, Thin Glossy Paper, Thick Glossy Paper, Tray 1 MPT
 |
UPC - 095205225938
View all Xerox 7760DN manuals
Add to My Manuals
Save this manual to your list of manuals |
Page 77 highlights
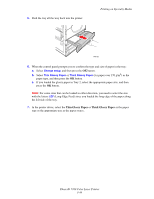
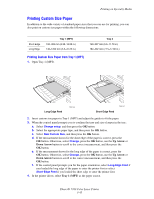
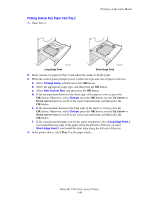
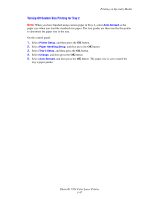
Printing on Specialty Media 3. Insert the glossy paper into Tray 1. ■ Use long-edge feed (with the long edge entering the printer first) for Letter- and A4- size paper. ■ Use short-edge feed (with the short edge entering the printer first) for Tabloid, Tabloid Extra, A3, and SRA3 paper. ■ For single-sided printing, place the side to be printed facedown. ■ For automatic 2-sided printing, place side one faceup. MAX 7760-125 Note: Do not load glossy paper above the transparency fill line inside the tray. Overloading the tray may cause jams. 4. Adjust the paper guides to match the size of the paper. 5. When the control panel prompts you to confirm the type and size of paper in the tray: a. Select Change setup, and then press the OK button. b. Select Thin Glossy Paper or Thick Glossy Paper (for paper over 170 g/m2) as the paper type, and then press the OK button. c. Select the appropriate paper size, and then press the OK button. Note: For some sizes that can be loaded in either direction, you need to select the size with the letters LEF (Long-Edge Feed) if you loaded the long edge of the paper to enter the printer first or SEF (Short-Edge Feed) if you loaded the short edge to enter the printer first. 6. In the printer driver, select the Thin Glossy Paper or Thick Glossy Paper as the paper type or Tray 1 (MPT) as the paper source. Phaser® 7760 Color Laser Printer 3-42
-
 1
1 -
2
-
3
-
4
-
5
-
6
-
7
-
8
-
9
-
10
-
11
-
12
-
13
-
14
-
15
-
16
-
17
-
18
-
19
-
20
-
21
-
22
-
23
-
24
-
25
-
26
-
27
-
28
-
29
-
30
-
31
-
32
-
33
-
34
-
35
-
36
-
37
-
38
-
39
-
40
-
41
-
42
-
43
-
44
-
45
-
46
-
47
-
48
-
49
-
50
-
51
-
52
-
53
-
54
-
55
-
56
-
57
-
58
-
59
-
60
-
61
-
62
-
63
-
64
-
65
-
66
-
67
-
68
-
69
-
70
-
71
-
 72
72 -
 73
73 -
 74
74 -
 75
75 -
 76
76 -
 77
77 -
 78
78 -
 79
79 -
 80
80 -
 81
81 -
 82
82 -
83
-
84
-
85
-
86
-
87
-
88
-
89
-
90
-
91
-
92
-
93
-
94
-
95
-
96
-
97
-
98
-
99
-
100
-
101
-
102
-
103
-
104
-
105
-
106
-
107
-
108
-
109
-
110
-
111
-
112
-
113
-
114
-
115
-
116
-
117
-
118
-
119
-
120
-
121
-
122
-
123
-
124
-
125
-
126
-
127
-
128
-
129
-
130
-
131
-
132
-
133
-
134
-
135
-
136
-
137
-
138
-
139
-
140
-
141
-
142
-
143
-
144
-
145
-
146
-
147
-
148
-
149
-
150
-
151
-
152
-
153
-
154
-
155
-
156
-
157
-
158
 |
 |
