Xerox 7760DN User Guide - Page 86
Using the Hole Puncher, Selecting Stapling From the Printer Driver, Hole Punching Options
 |
UPC - 095205225938
View all Xerox 7760DN manuals
Add to My Manuals
Save this manual to your list of manuals |
Page 86 highlights
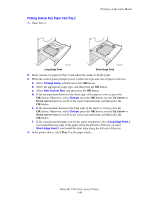
Choosing Output Options Selecting Stapling From the Printer Driver To select a stapling option for a specific print job: Operating System Steps Windows 98 SE, Windows 2000, Windows XP, Windows Server 2003 1. Select the Output Options tab. 2. Select the stapling option from the Stapling drop-down list. Mac OS 9 or Mac OS X, version 10.2 and higher 1. In the Print dialog box, select Finishing Options from the drop-down list. 2. Select the stapling option. Using the Hole Puncher If your printer has a finisher, you can have the printer punch holes in the paper after it is printed. Your finisher will have either the 3-hole or the 2-/4-hole punch options. Note: Hole punching is not available when printing booklets. Use the following guidelines when selecting hole punching options: ■ The edge of the paper to be punched must be 257 mm (10.12 in.), 267 mm (10.5 in.), 270 mm (10.63 in.), 279 (11 in.), or 297 mm (11.7 in.). ■ Thick Card Stock, Extra Thick Card Stock, Thick Glossy Paper, transparencies, labels, and envelopes are not punched. ■ If you select Quadruple for stapling and 4 Holes for hole punching, the paper is not punched. Hole Punching Options ■ None (default): Holes are not punched. ■ 2 Holes: Punches 2 holes 80 mm (3.15 in.) apart. ■ 3 Holes: Punches 3 holes 108 mm (4.25 in.) apart. ■ 4 Holes: Punches 4 holes 80 mm (3.15 in.) apart. Hole Orientation The sample image displayed in the driver shows the location of the holes, which depend on the orientation of the page and the paper feed direction (long-edge feed or short-edge feed). Phaser® 7760 Color Laser Printer 3-51
-
 1
1 -
2
-
3
-
4
-
5
-
6
-
7
-
8
-
9
-
10
-
11
-
12
-
13
-
14
-
15
-
16
-
17
-
18
-
19
-
20
-
21
-
22
-
23
-
24
-
25
-
26
-
27
-
28
-
29
-
30
-
31
-
32
-
33
-
34
-
35
-
36
-
37
-
38
-
39
-
40
-
41
-
42
-
43
-
44
-
45
-
46
-
47
-
48
-
49
-
50
-
51
-
52
-
53
-
54
-
55
-
56
-
57
-
58
-
59
-
60
-
61
-
62
-
63
-
64
-
65
-
66
-
67
-
68
-
69
-
70
-
71
-
72
-
73
-
74
-
75
-
76
-
77
-
78
-
79
-
80
-
 81
81 -
 82
82 -
 83
83 -
 84
84 -
 85
85 -
 86
86 -
 87
87 -
 88
88 -
 89
89 -
 90
90 -
 91
91 -
92
-
93
-
94
-
95
-
96
-
97
-
98
-
99
-
100
-
101
-
102
-
103
-
104
-
105
-
106
-
107
-
108
-
109
-
110
-
111
-
112
-
113
-
114
-
115
-
116
-
117
-
118
-
119
-
120
-
121
-
122
-
123
-
124
-
125
-
126
-
127
-
128
-
129
-
130
-
131
-
132
-
133
-
134
-
135
-
136
-
137
-
138
-
139
-
140
-
141
-
142
-
143
-
144
-
145
-
146
-
147
-
148
-
149
-
150
-
151
-
152
-
153
-
154
-
155
-
156
-
157
-
158
 |
 |
