Xerox 7760DN User Guide - Page 81
Printing Custom Size Paper from Tray 2, Up Arrow, Down Arrow, Tray 2
 |
UPC - 095205225938
View all Xerox 7760DN manuals
Add to My Manuals
Save this manual to your list of manuals |
Page 81 highlights
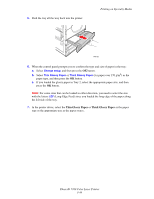
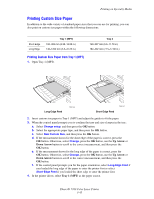
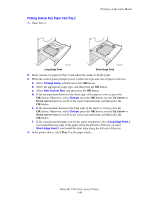
Printing Custom Size Paper from Tray 2 1. Open Tray 2. Printing on Specialty Media 7760-164 Long-Edge Feed 7760-165 Short-Edge Feed 2. Insert custom size paper in Tray 2 and adjust the guides to fit the paper. 3. When the control panel prompts you to confirm the type and size of paper in the tray: a. Select Change setup, and then press the OK button. b. Select the appropriate paper type, and then press the OK button. c. Select New Custom Size, and then press the OK button. d. If the measurement shown for the short edge of the paper is correct, press the OK button. Otherwise, select Change, press the OK button, use the Up Arrow or Down Arrow button to scroll to the correct measurement, and then press the OK button. e. If the measurement shown for the long edge of the paper is correct, press the OK button. Otherwise, select Change, press the OK button, use the Up Arrow or Down Arrow button to scroll to the correct measurement, and then press the OK button. f. If the control panel prompts you for the paper orientation, select Long-Edge Feed if you loaded the long edge of the paper along the left side of the tray or select Short-Edge Feed if you loaded the short edge along the left side of the tray. 4. In the printer driver, select Tray 2 as the paper source. Phaser® 7760 Color Laser Printer 3-46
-
 1
1 -
2
-
3
-
4
-
5
-
6
-
7
-
8
-
9
-
10
-
11
-
12
-
13
-
14
-
15
-
16
-
17
-
18
-
19
-
20
-
21
-
22
-
23
-
24
-
25
-
26
-
27
-
28
-
29
-
30
-
31
-
32
-
33
-
34
-
35
-
36
-
37
-
38
-
39
-
40
-
41
-
42
-
43
-
44
-
45
-
46
-
47
-
48
-
49
-
50
-
51
-
52
-
53
-
54
-
55
-
56
-
57
-
58
-
59
-
60
-
61
-
62
-
63
-
64
-
65
-
66
-
67
-
68
-
69
-
70
-
71
-
72
-
73
-
74
-
75
-
 76
76 -
 77
77 -
 78
78 -
 79
79 -
 80
80 -
 81
81 -
 82
82 -
 83
83 -
 84
84 -
 85
85 -
 86
86 -
87
-
88
-
89
-
90
-
91
-
92
-
93
-
94
-
95
-
96
-
97
-
98
-
99
-
100
-
101
-
102
-
103
-
104
-
105
-
106
-
107
-
108
-
109
-
110
-
111
-
112
-
113
-
114
-
115
-
116
-
117
-
118
-
119
-
120
-
121
-
122
-
123
-
124
-
125
-
126
-
127
-
128
-
129
-
130
-
131
-
132
-
133
-
134
-
135
-
136
-
137
-
138
-
139
-
140
-
141
-
142
-
143
-
144
-
145
-
146
-
147
-
148
-
149
-
150
-
151
-
152
-
153
-
154
-
155
-
156
-
157
-
158
 |
 |
