Yamaha A5000 Owner's Manual - Page 128
EDIT-MAP/OUT, Cursor, Key Range
 |
View all Yamaha A5000 manuals
Add to My Manuals
Save this manual to your list of manuals |
Page 128 highlights
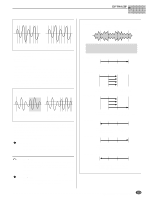
EDIT-MAP/OUT Cursor w (Key Range) Cursor w Turn action Press action Knob 1 Cursor/Page Tree View Knob 2 Original Key MIDI Knob 3 Low Key MIDI Knob 4 Knob 5 High Key Key Crossfade MIDI - Knob 1 Same function as Cursor q (page 127). Knob 2 [ Turn] Original Key Turn the knob to set the sample's "original key" - the key that best represents the sample's inherent pitch. [Range] C-2 - G8 • If the Note Display Type utility (UTILITY-SYSTEMCustom) (page 198) is set to "name" the parameter will be displayed as note names such as "C3." If set to "number" the parameter will be displayed as MIDI note numbers such as "60." • If a sample bank is being edited "(---)" will appear on the display and this parameter cannot be changed. [ Press] MIDI When this knob is pressed the parameter can be directly set by a MIDI note-on message received from an external MIDI device. Knob 3 [ Turn] Low Key Turn the knob to set the low end for the sample's key range. [Range] =Orig, C-2 - High Key • =Orig (Original) ... the Low Key will always be the same value as the original key of the sample. • C-2 - High Key ... Sets the Low Key to any note up to the High Key. • If a sample bank is being edited "(---)" will appear on the display and this parameter cannot be changed. [ Press] MIDI When this knob is pressed the parameter can be directly set by a MIDI note-on message received from an external MIDI device. Knob 4 [ Turn] High Key Turn the knob to set the high end for the sample's key range. [Range] Low Key - G8, =Orig • Low Key - G8 ... Sets the High Key to any note higher than the Low Key. • =Orig ... the Low Key will always be the same value as the original key of the sample. • If a sample bank is being edited "(---)" will appear on the display and this parameter cannot be changed. [ Press] MIDI When this knob is pressed the parameter can be directly set by a MIDI note-on message received from an external MIDI device. Knob 5 [ Turn] Key Crossfade Set this parameter on to enable key crossfade, or off to disable. [Range] on, off • on ... Keys adjacent to the key range also play the sample, with the sample's output level decreasing gradually with increasing distance from the range border. The drawing below illustrates the concept. • off ... The sample plays out over the selected key range only. Keys that are adjacent to but outside of the key range do not produce any sound from this sample. If Key Crossfade = OFF: Sound Level Pitch Low High If Key Crossfade = ON: Sound Level Pitch Low High • The use of key crossfade allows you to blend adjacent samples into one another, so as to avoid dramatic voice changes at the range borders. This is particularly useful when working with samples that map the same type of sound to different ranges on the keyboard (multisampling). 128 Chapter 5 EDIT Mode • A5000/A4000 q q q q q q q q q q q q q q q q q q q q q q q q q q q q q q q q q q q q q q q q q q q q q q q q q q q q q q q q
-
 1
1 -
2
-
3
-
4
-
5
-
6
-
7
-
8
-
9
-
10
-
11
-
12
-
13
-
14
-
15
-
16
-
17
-
18
-
19
-
20
-
21
-
22
-
23
-
24
-
25
-
26
-
27
-
28
-
29
-
30
-
31
-
32
-
33
-
34
-
35
-
36
-
37
-
38
-
39
-
40
-
41
-
42
-
43
-
44
-
45
-
46
-
47
-
48
-
49
-
50
-
51
-
52
-
53
-
54
-
55
-
56
-
57
-
58
-
59
-
60
-
61
-
62
-
63
-
64
-
65
-
66
-
67
-
68
-
69
-
70
-
71
-
72
-
73
-
74
-
75
-
76
-
77
-
78
-
79
-
80
-
81
-
82
-
83
-
84
-
85
-
86
-
87
-
88
-
89
-
90
-
91
-
92
-
93
-
94
-
95
-
96
-
97
-
98
-
99
-
100
-
101
-
102
-
103
-
104
-
105
-
106
-
107
-
108
-
109
-
110
-
111
-
112
-
113
-
114
-
115
-
116
-
117
-
118
-
119
-
120
-
121
-
122
-
 123
123 -
 124
124 -
 125
125 -
 126
126 -
 127
127 -
 128
128 -
 129
129 -
 130
130 -
 131
131 -
 132
132 -
 133
133 -
134
-
135
-
136
-
137
-
138
-
139
-
140
-
141
-
142
-
143
-
144
-
145
-
146
-
147
-
148
-
149
-
150
-
151
-
152
-
153
-
154
-
155
-
156
-
157
-
158
-
159
-
160
-
161
-
162
-
163
-
164
-
165
-
166
-
167
-
168
-
169
-
170
-
171
-
172
-
173
-
174
-
175
-
176
-
177
-
178
-
179
-
180
-
181
-
182
-
183
-
184
-
185
-
186
-
187
-
188
-
189
-
190
-
191
-
192
-
193
-
194
-
195
-
196
-
197
-
198
-
199
-
200
-
201
-
202
-
203
-
204
-
205
-
206
-
207
-
208
-
209
-
210
-
211
-
212
-
213
-
214
-
215
-
216
-
217
-
218
-
219
-
220
-
221
-
222
-
223
-
224
-
225
-
226
-
227
-
228
-
229
-
230
-
231
-
232
-
233
-
234
-
235
-
236
-
237
-
238
-
239
-
240
-
241
-
242
-
243
-
244
-
245
-
246
-
247
-
248
-
249
-
250
-
251
-
252
-
253
-
254
-
255
-
256
-
257
-
258
-
259
-
260
-
261
-
262
-
263
-
264
-
265
-
266
-
267
-
268
-
269
-
270
-
271
-
272
-
273
-
274
-
275
-
276
-
277
-
278
-
279
-
280
-
281
-
282
-
283
-
284
-
285
-
286
-
287
-
288
-
289
-
290
-
291
-
292
-
293
-
294
-
295
-
296
 |
 |
