Yamaha CDR HD1500 MCXSP10 Manual - Page 64
EDITING TRACKS, Track Rename
 |
UPC - 027108922737
View all Yamaha CDR HD1500 manuals
Add to My Manuals
Save this manual to your list of manuals |
Page 64 highlights
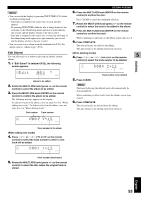
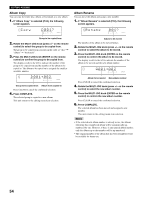
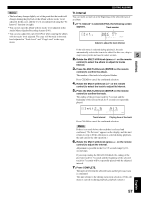
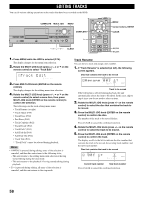
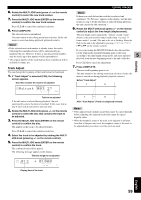
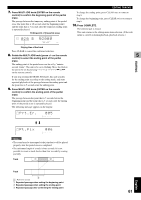
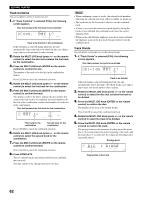
EDITING TRACKS You can do various editing operations on the tracks that have been recorded on the HDD. RAL SOUND HDD/CD RECORDER L MAX HDD CDR COPY A.M.Q.R. COMPLETE MULTI JOG MENU TEXT/TIME MODE MULTI JOG PUSH ENTER MENU TRACK NO. COMPLETE CLEAR BOOKMARK DIGITAL REC LEVEL REC FINALIZE ERASE INPUT OPTICAL COAXIAL ANALOG ANALOG REC LEVEL MIN MAX COMPLETE +, - 0 MODE 10 MENU COMPLETE ENTER CLEAR TRACK NO. WRITE HDD CDR MENU Cursor buttons, ENTER CLEAR t/e, r/y CLEAR E, R T, Y 1. Press MENU while the HDD is selected (P.14). The display changes for the menu item selection. 2. Rotate the MULTI JOG knob (press +/-, H or G on the remote control) to select "Track Edit" Track Edit L dB -30 -10 -6 -2 0 R 3. Press MULTI JOG knob (ENTER on the remote control). The display changes for the editing menu item selection. 4. Rotate the MULTI JOG knob (press +/-, H or G on the remote control) to select a menu item, then press MULTI JOG knob (ENTER on the remote control) to confirm the selection. The followings are the track editing menu items: • Track Rename (at right) • Track Adjust (P.59) • Track Erase (P.60) • Part Erase (P.60) • Track Combine (P.62) • Track Divide (P.62) • Track Pack* (P.63) • Add Fade In (P.64) • Add Fade Out (P.64) • Track Title (P.65) * "Track Pack" cannot be selected during playback. Memo • If MENU is pressed during editing, entry of the selection is canceled, and then this unit returns to the following state; - This unit returns to the editing menu item selection if having started editing during the stop mode. - This unit returns to the playback if having started editing during playback. • If a is pressed during editing, all entry of the selection is canceled, and this unit returns to the stop mode. Track Rename You can move a track and assign a new number. 1. If "Track Rename" is selected (at left), the following screen appears. Disc that contains the track to be moved Rename 001 1? L dB -30 -10 -6 -2 0 R GROUP Track to be moved If the edit menu is selected during playback, the unit automatically selects the item to be edited. In this case, skip to step 6 since you do not need to select an item. 2. Rotate the MULTI JOG knob (press +/- on the remote control) to select the disc that contains the track to be moved. 3. Press the MULTI JOG knob (ENTER on the remote control) to confirm the disc. The number of the track to be moved flashes. Press CLEAR to cancel the confirmed selection. 4. Rotate the MULTI JOG knob (press +/- on the remote control) to select the track to be moved. 5. Press the MULTI JOG knob (ENTER on the remote control) to confirm the track. The display scrolls to the left to indicate the disc number that contains the track to be moved, the existing track number, and the new track number. Disc that contains the track to be moved 001 1≥ 1 L dB -30 -10 -6 -2 0 R TRACK Current track number New track number Press CLEAR to cancel the confirmed selection. 58
-
 1
1 -
2
-
3
-
4
-
5
-
6
-
7
-
8
-
9
-
10
-
11
-
12
-
13
-
14
-
15
-
16
-
17
-
18
-
19
-
20
-
21
-
22
-
23
-
24
-
25
-
26
-
27
-
28
-
29
-
30
-
31
-
32
-
33
-
34
-
35
-
36
-
37
-
38
-
39
-
40
-
41
-
42
-
43
-
44
-
45
-
46
-
47
-
48
-
49
-
50
-
51
-
52
-
53
-
54
-
55
-
56
-
57
-
58
-
 59
59 -
 60
60 -
 61
61 -
 62
62 -
 63
63 -
 64
64 -
 65
65 -
 66
66 -
 67
67 -
 68
68 -
 69
69 -
70
-
71
-
72
-
73
-
74
-
75
-
76
-
77
-
78
-
79
-
80
-
81
-
82
-
83
-
84
-
85
-
86
-
87
-
88
-
89
-
90
 |
 |
