Yamaha CLP-240 Owner's Manual - Page 66
Attach B., Mount A., tection pad. Then, fix the protection pad with
 |
View all Yamaha CLP-240 manuals
Add to My Manuals
Save this manual to your list of manuals |
Page 66 highlights
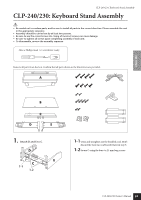
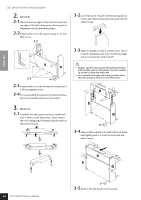
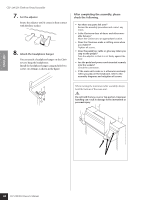
ENGLISH CLP-240/230: Keyboard Stand Assembly 2. Attach B. 2-1 Place the bottom edges of B on the feet's protrud- ing edges of D and E, then, secure the top part in alignment with the protruding edges. 2-2 Temporarily secure the top part using 4 x 12 mm thin screws. 2-2 3-2 Cover the top of D and E with the side panel pro- tection pad. Then, fix the protection pad with the adhesive tape. 2-3 2-3 Temporarily secure the bottom part using four 4 x 20 mm tapping screws. 2-4 If you assembled the stand on an unlevel surface, place the assemble stand on a level surface. 3-3 Align the dimple on side A with the inner side of D and E. Simultaneously lower the left and right side of A, and secure with D and E. CAUTION • Fingers can become pinched between the main unit and the rear or side panels, be extra careful so as not to drop the main unit. • Do not hold the keyboard in any position other than the position shown in the illustration. 3. Mount A. 3-1 Assemble the side panel protection (cardboard) pad, as shown in the illustration. Then, remove the two backing papers from the adhesive tape on the protection pad. Place your hands at least 10 cm from either end of A when positioning it. 3-4 Support the backside of D and E with your hand, and slightly push A in from the keyboard side until it stops. 66 CLP-240/230 Owner's Manual 3-5 Remove the side panel protection pad.
-
 1
1 -
2
-
3
-
4
-
5
-
6
-
7
-
8
-
9
-
10
-
11
-
12
-
13
-
14
-
15
-
16
-
17
-
18
-
19
-
20
-
21
-
22
-
23
-
24
-
25
-
26
-
27
-
28
-
29
-
30
-
31
-
32
-
33
-
34
-
35
-
36
-
37
-
38
-
39
-
40
-
41
-
42
-
43
-
44
-
45
-
46
-
47
-
48
-
49
-
50
-
51
-
52
-
53
-
54
-
55
-
56
-
57
-
58
-
59
-
60
-
 61
61 -
 62
62 -
 63
63 -
 64
64 -
 65
65 -
 66
66 -
 67
67 -
 68
68 -
 69
69 -
 70
70 -
 71
71 -
72
-
73
-
74
-
75
-
76
-
77
-
78
-
79
-
80
-
81
-
82
-
83
-
84
-
85
-
86
-
87
-
88
-
89
-
90
 |
 |
