Yamaha CLP-240 Owner's Manual - Page 67
Voltage Selector, CLP-240, Attach A., Connect the pedal cord. - mac
 |
View all Yamaha CLP-240 manuals
Add to My Manuals
Save this manual to your list of manuals |
Page 67 highlights
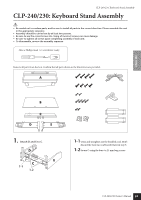
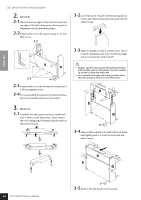
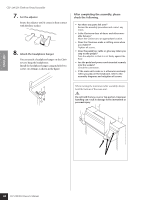
4. Attach A. 4-1 Secure A using 6 x 16 mm short screws from the front. 4-2 Firmly tighten the screws you temporarily secured in steps 2-2 and 2-3 above (assembly B). Tighten these in order starting with the top side first, then the bottom. Make sure as you do this that the spaces on the left and right sides (indicated by 1 and 2 below) are even. 2 CLP-230 CLP-240/230: Keyboard Stand Assembly 5-1 MIDIPC-1 PMCa-c2 PEDAL 5-3 5-2 1 4-2 6. Connect the power cord. 110 ENGLISH MIDIPC-1 PMCa-c2 4 -1 5. Connect the pedal cord. 5-1 Insert the pedal cord plug to the pedal connector from the front. 5-2 Attach the cord holders to B, then clip the cord into the holders. 5-3 Use a twist tie to bundle the pedal cord. CLP-240 5-1 5-3 5-2 MIDIPC-1 PMCa-c2 220 127 240 Insert the AC power cord plug into the AC INLET. For models that feature a voltage selector: Set the voltage selector to an appropriate voltage. Voltage Selector Before connecting the AC power cord, check the setting of the voltage selector which is provided in some areas. To set the selector for 110V, 127V, 220V or 240V main voltages, use a "minus" screwdriver to rotate the selector dial so that the correct voltage for your region appears next to the pointer on the panel. The voltage selector is set at 240V when the unit is initially shipped. After the proper voltage has been selected, connect the AC power cord to the AC INLET and an AC wall outlet. A plug adaptor may be also provided in some areas to match the pin configuration of the AC wall outlets in your area. WARNING An improper voltage setting can cause serious damage to the Clavinova or result in improper operation. CLP-240/230 Owner's Manual 67
-
 1
1 -
2
-
3
-
4
-
5
-
6
-
7
-
8
-
9
-
10
-
11
-
12
-
13
-
14
-
15
-
16
-
17
-
18
-
19
-
20
-
21
-
22
-
23
-
24
-
25
-
26
-
27
-
28
-
29
-
30
-
31
-
32
-
33
-
34
-
35
-
36
-
37
-
38
-
39
-
40
-
41
-
42
-
43
-
44
-
45
-
46
-
47
-
48
-
49
-
50
-
51
-
52
-
53
-
54
-
55
-
56
-
57
-
58
-
59
-
60
-
61
-
 62
62 -
 63
63 -
 64
64 -
 65
65 -
 66
66 -
 67
67 -
 68
68 -
 69
69 -
 70
70 -
 71
71 -
 72
72 -
73
-
74
-
75
-
76
-
77
-
78
-
79
-
80
-
81
-
82
-
83
-
84
-
85
-
86
-
87
-
88
-
89
-
90
 |
 |
