Yamaha CLP-240 Owner's Manual - Page 9

AUX IN [L/L+R] [R] jacks, AUX OUT [L] [R] LEVEL FIXED jacks - midi

Page 9 highlights

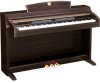
ENGLISH 1 [POWER] switch page 11 2 [MASTER VOLUME] slider page 12 Adjust the volume level using this slider. 3 [DEMO] button page 14 Demonstration playback is available for each voice. 4 [TRANSPOSE] button page 24 You can shift the pitch of the entire keyboard up or down so that the pitch will match that of another instrument or singer, while you play the same, unshifted keys. 5 [REC] button page 29 For recording your keyboard performance. 6 [RIGHT], [LEFT] buttons .......pages 17, 32 For turning the left- and right-hand parts on or off as required so you can practice the corresponding part (the part that is turned off) on the keyboard. 7 [PLAY/PAUSE], [STOP] buttons pages 15, 41 For playing back the preset songs, your recorded material or commercially available music data, etc. 8 [SONG SELECT] button ........pages 15, 41 For selecting a song to play back or edit. 9 [FILE] button (CLP-240)........pages 35, 42 For saving recorded songs and managing song files. Also lets you format a USB storage device. ) [TEMPO/FUNCTION#] button pages 28, 45 For changing the song tempo (speed) and selecting other useful functions (pages 44-55). ! [METRONOME] button.........pages 28, 52 For using the metronome. @ Display page 11 CAUTION Do not turn off the power to the instrument while flashing dashes appear in the display (indicating the operation is in process). Doing so may damage the data. # [-/NO], [+/YES] buttons For setting values or performing file operations. Pressing both buttons simultaneously for certain value settings (Transpose, Tempo, etc.) restores the default value. $ Voice group buttons page 19 For selecting voices from 14 internal sounds including Grand Piano 1 and 2. You can also combine two voices and use them together. (Only the CLP-240 has the [VARIATION] button.) Panel Controls and Terminals % [SPLIT] button (CLP-240 page 26 For playing different voices on the left- and righthand sections of the keyboard. ^ [BRILLIANCE], [REVERB], [EFFECT] buttons page 21 For adjusting the brightness of the sound and adding reverb and chorus effects to the sound. & [TOUCH] button page 23 For fine-tuning the touch response. * [DDE] button (CLP-240 page 22 For turning the DDE (Dynamic Damper Effect) function on or off. When DDE is on, the Clavinova simulates the sustain sound that occur when you press the damper pedal of a grand piano, as you press the damper pedal and play the keyboard. ( USB [TO DEVICE] terminals (CLP-240 page 57 For connecting the instrument to a USB storage device, allowing saving/loading of data to and from the connected device. The instrument has two TO DEVICE terminals, A and B, which can be specified using the [SELECT] switch. º AUX OUT [L] [R] (LEVEL FIXED) jacks page 56 For outputting the sound of the Clavinova to an external audio system, or connecting it to another device (cassette tape recorder, etc.) to record your performance. ¡ AUX IN [L/L+R] [R] jacks page 57 For connecting an external tone generator, allowing you to play the sound of that device via the Clavinova's internal sound system and speakers. ™ USB [TO HOST] terminal page 57 For connecting the instrument to your computer, allowing you to transfer MIDI data between the Clavinova and the computer. £ MIDI [IN] [OUT] [THRU] terminals page 57 For connecting external MIDI devices, allowing the use of various MIDI functions. ¢ [PHONES] jacks, [SPEAKER] switch page 12 For connecting a set of standard stereo headphones, allowing private practice. The [SPEAKER] switch turns the internal speakers on or off. ∞ PEDALS page 20 For producing a range of expressive effects similar to those produced by the pedals on an acoustic piano. The left pedal can also be assigned to a variety of functions. CLP-240/230 Owner's Manual 9

  • 1
  • 2
  • 3
  • 4
  • 5
  • 6
  • 7
  • 8
  • 9
  • 10
  • 11
  • 12
  • 13
  • 14
  • 15
  • 16
  • 17
  • 18
  • 19
  • 20
  • 21
  • 22
  • 23
  • 24
  • 25
  • 26
  • 27
  • 28
  • 29
  • 30
  • 31
  • 32
  • 33
  • 34
  • 35
  • 36
  • 37
  • 38
  • 39
  • 40
  • 41
  • 42
  • 43
  • 44
  • 45
  • 46
  • 47
  • 48
  • 49
  • 50
  • 51
  • 52
  • 53
  • 54
  • 55
  • 56
  • 57
  • 58
  • 59
  • 60
  • 61
  • 62
  • 63
  • 64
  • 65
  • 66
  • 67
  • 68
  • 69
  • 70
  • 71
  • 72
  • 73
  • 74
  • 75
  • 76
  • 77
  • 78
  • 79
  • 80
  • 81
  • 82
  • 83
  • 84
  • 85
  • 86
  • 87
  • 88
  • 89
  • 90

Panel Controls and Terminals
CLP-240/230
Owner’s Manual
ENGLISH
9
1
[POWER] switch
...........................
page 11
2
[MASTER VOLUME] slider
...........
page 12
Adjust the volume level using this slider.
3
[DEMO] button
............................
page 14
Demonstration playback is available for each voice.
4
[TRANSPOSE] button
...................
page 24
You can shift the pitch of the entire keyboard up or
down so that the pitch will match that of another
instrument or singer, while you play the same,
unshifted keys.
5
[REC] button
................................
page 29
For recording your keyboard performance.
6
[RIGHT], [LEFT] buttons
.......
pages 17, 32
For turning the left- and right-hand parts on or off as
required so you can practice the corresponding part
(the part that is turned off) on the keyboard.
7
[PLAY/PAUSE], [STOP] buttons
..............................................
pages 15, 41
For playing back the preset songs, your recorded
material or commercially available music data, etc.
8
[SONG SELECT] button
........
pages 15, 41
For selecting a song to play back or edit.
9
[FILE] button (CLP-240)
........
pages 35, 42
For saving recorded songs and managing song files.
Also lets you format a USB storage device.
)
[TEMPO/FUNCTION#] button
..............................................
pages 28, 45
For changing the song tempo (speed) and selecting
other useful functions (pages 44-55).
!
[METRONOME] button
.........
pages 28, 52
For using the metronome.
@
Display
.........................................
page 11
CAUTION
Do not turn off the power to the instrument while
flashing dashes appear in the display (indicating the
operation is in process). Doing so may damage the
data.
#
[–/NO], [+/YES] buttons
For setting values or performing file operations.
Pressing both buttons simultaneously for certain
value settings (Transpose, Tempo, etc.) restores the
default value.
$
Voice group buttons
....................
page 19
For selecting voices from 14 internal sounds includ-
ing Grand Piano 1 and 2. You can also combine two
voices and use them together. (Only the CLP-240 has
the [VARIATION] button.)
%
[SPLIT] button (CLP-240)
.............
page 26
For playing different voices on the left- and right-
hand sections of the keyboard.
^
[BRILLIANCE], [REVERB], [EFFECT]
buttons
.........................................
page 21
For adjusting the brightness of the sound and adding
reverb and chorus effects to the sound.
&
[TOUCH] button
..........................
page 23
For fine-tuning the touch response.
*
[DDE] button (CLP-240)
..............
page 22
For turning the DDE (Dynamic Damper Effect)
function on or off. When DDE is on, the Clavinova
simulates the sustain sound that occur when you
press the damper pedal of a grand piano, as you press
the damper pedal and play the keyboard.
(
USB [TO DEVICE] terminals (CLP-240)
.....................................................
page 57
For connecting the instrument to a USB storage
device, allowing saving/loading of data to and from
the connected device. The instrument has two TO
DEVICE terminals, A and B, which can be specified
using the [SELECT] switch.
º
AUX OUT [L] [R] (LEVEL FIXED) jacks
.....................................................
page 56
For outputting the sound of the Clavinova to an
external audio system, or connecting it to another
device (cassette tape recorder, etc.) to record your
performance.
¡
AUX IN [L/L+R] [R] jacks
..............
page 57
For connecting an external tone generator, allowing
you to play the sound of that device via the Clavi-
nova’s internal sound system and speakers.
USB [TO HOST] terminal
.............
page 57
For connecting the instrument to your computer,
allowing you to transfer MIDI data between the
Clavinova and the computer.
£
MIDI [IN] [OUT] [THRU] terminals
.....................................................
page 57
For connecting external MIDI devices, allowing the
use of various MIDI functions.
¢
[PHONES] jacks, [SPEAKER] switch
.....................................................
page 12
For connecting a set of standard stereo headphones,
allowing private practice. The [SPEAKER] switch
turns the internal speakers on or off.
PEDALS
.........................................
page 20
For producing a range of expressive effects similar to
those produced by the pedals on an acoustic piano.
The left pedal can also be assigned to a variety of
functions.