Yamaha CRX-M5 Owner's Manual - Page 10
Connecting the system
 |
View all Yamaha CRX-M5 manuals
Add to My Manuals
Save this manual to your list of manuals |
Page 10 highlights
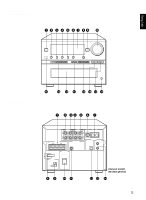
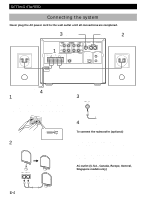
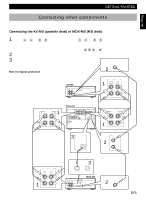
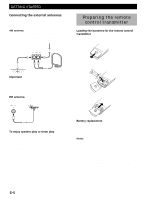
GETTING STARTED Connecting the system Never plug the AC power cord to the wall outlet until all connections are completed. Follow the steps as shown below to connect the system using the supplied cords and accessories. 3 FM antenna 2 AM loop antenna Right speaker -+ AUX/MD TAPE C IN D OUT A IN B OUT L L FM 75 UNBAL GND AM 1R SPEAKERS 8 MIN. /SPEAKER 8 MIN. /HAUT-PARLEUR +R- - L+ SUBWOOFER OUT R ANTENNA DIGITAL OUT SYSTEM CONNECTOR CD TAPE OPTICAL MD Left speaker -+ To wall outlet 4 1 Connect the speakers. Connect the speaker cords to the SPEAKERS terminals so that the polarity of the speaker cables is correct. Keep the speaker cords away from the antennas to prevent noise. + - 2 Connect the AM antenna. Set up the AM loop antenna, then connect it. GND AM 3 Connect the FM antenna. FM 75 UNBAL 4 Connect the AC power cord to a wall outlet. To connect the subwoofer (optional) You can reinforce the bass frequencies by adding a subwoofer (optional). Connect the SUBWOOFER OUT terminal of the unit to the INPUT terminal of the subwoofer amplifier, and connect the speaker terminals of the subwoofer amplifier to the subwoofer. With some subwoofers, the amplifier and subwoofer are in the same unit. AC outlet (U.S.A., Canada, Europe, General, Singapore models only) You can connect the AC power plug of the other component up to 100W power. It is convenient to connect the MDX-M5 or KX-M5. E-4
-
 1
1 -
2
-
3
-
4
-
 5
5 -
 6
6 -
 7
7 -
 8
8 -
 9
9 -
 10
10 -
 11
11 -
 12
12 -
 13
13 -
 14
14 -
 15
15 -
16
-
17
-
18
-
19
-
20
-
21
-
22
-
23
-
24
-
25
-
26
-
27
-
28
-
29
-
30
-
31
-
32
-
33
-
34
-
35
 |
 |
