Yamaha QL1 Reference Manual - Page 108
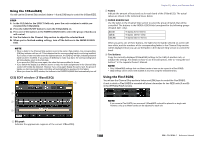
Using the 31BandGEQ, Using the Flex15GEQ, GEQ EDIT window 31BandGEQ
 |
View all Yamaha QL1 manuals
Add to My Manuals
Save this manual to your list of manuals |
Page 108 highlights
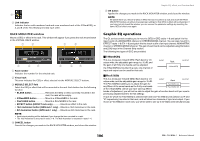
Using the 31BandGEQ You will use the Channel Strip section's faders 1-8 and [ON] keys to control the 31BandGEQ. STEP 1. In the GEQ field or the EFFECT field rack, press the rack container in which you mounted the 31BandGEQ. 2. Press the GEQ ON/OFF button to turn the 31BandGEQ on. 3. Press one of the buttons in the FADER ASSIGN field to select the group of bands you will control. 4. Use the faders in the Channel Strip section to adjust the selected band. 5. When you've finished making settings, turn off the buttons in the FADER ASSIGN field. NOTE • When a fader in the Channel Strip section is set to the center (flat) position, the corresponding [ON] key indicator will turn off. This indicates that the corresponding band is not being modified. If you raise or lower the fader even the slightest amount, the [ON] key will light, indicating that this band has been modified. If you press a lit [ON] key to make it go dark, the corresponding band will immediately return to the flat state. If you press the [ON] key once again, the value that was modified is shown. • If you switch the display to a different screen or rack, the fader assignments in the Channel Strip section will forcibly be defeated. However if you once again display the same rack, the group of bands you had previously been controlling will automatically be assigned to the faders. • When you close the GEQ window, the buttons in the FADER ASSIGN field automatically turn off. GEQ EDIT window (31BandGEQ) 4 1 2 3 Graphic EQ, effects, and Premium Rack 2 Faders Indicate the amount of boost and cut for each band of the 31BandGEQ. The actual values are shown in the numerical boxes below. 3 FADER ASSIGN field Use the faders in the Channel Strip section to select the group of bands that will be controlled. The buttons in the FADER ASSIGN field correspond to the following groups of bands (QL1 only). 20-630 125-4k 630-20k 16 bands 20 Hz-630 Hz 16 bands 125 Hz-4 kHz 16 bands 630 Hz-20 kHz When you press one of these buttons, the faders for the bands selected on screen will turn white, and the numbers of the corresponding faders in the Channel Strip section will be displayed. Now you can use the faders in the Channel Strip section to control the band. 4 Tool buttons Copy the currently-displayed 31BandGEQ settings to the GEQ of another rack, or initialize the settings. For details on how to use the tool buttons, refer to "Using the tool buttons" in the separate Owner's Manual. NOTE • Only 31BandGEQ settings that use fifteen bands or less can be copied to a Flex15GEQ. • GEQ settings can be stored and recalled at any time using the dedicated library. Using the Flex15GEQ You will use the Channel Strip section's faders and [ON] keys to control the Flex15GEQ. A rack in which a Flex15GEQ is mounted will show information for two GEQ units (A and B) in the VIRTUAL RACK window. NOTE If you mount a Flex15GEQ, two monaural 31BandGEQ units will be placed in a single rack. However, only up to fifteen bands can be adjusted for each unit. 1 EQ graph Indicates the approximate response of the current 31BandGEQ. 108 Reference Manual
-
 1
1 -
2
-
3
-
4
-
5
-
6
-
7
-
8
-
9
-
10
-
11
-
12
-
13
-
14
-
15
-
16
-
17
-
18
-
19
-
20
-
21
-
22
-
23
-
24
-
25
-
26
-
27
-
28
-
29
-
30
-
31
-
32
-
33
-
34
-
35
-
36
-
37
-
38
-
39
-
40
-
41
-
42
-
43
-
44
-
45
-
46
-
47
-
48
-
49
-
50
-
51
-
52
-
53
-
54
-
55
-
56
-
57
-
58
-
59
-
60
-
61
-
62
-
63
-
64
-
65
-
66
-
67
-
68
-
69
-
70
-
71
-
72
-
73
-
74
-
75
-
76
-
77
-
78
-
79
-
80
-
81
-
82
-
83
-
84
-
85
-
86
-
87
-
88
-
89
-
90
-
91
-
92
-
93
-
94
-
95
-
96
-
97
-
98
-
99
-
100
-
101
-
102
-
 103
103 -
 104
104 -
 105
105 -
 106
106 -
 107
107 -
 108
108 -
 109
109 -
 110
110 -
 111
111 -
 112
112 -
 113
113 -
114
-
115
-
116
-
117
-
118
-
119
-
120
-
121
-
122
-
123
-
124
-
125
-
126
-
127
-
128
-
129
-
130
-
131
-
132
-
133
-
134
-
135
-
136
-
137
-
138
-
139
-
140
-
141
-
142
-
143
-
144
-
145
-
146
-
147
-
148
-
149
-
150
-
151
-
152
-
153
-
154
-
155
-
156
-
157
-
158
-
159
-
160
-
161
-
162
-
163
-
164
-
165
-
166
-
167
-
168
-
169
-
170
-
171
-
172
-
173
-
174
-
175
-
176
-
177
-
178
-
179
-
180
-
181
-
182
-
183
-
184
-
185
-
186
-
187
-
188
-
189
-
190
-
191
-
192
-
193
-
194
-
195
-
196
-
197
-
198
-
199
-
200
-
201
-
202
-
203
-
204
-
205
-
206
-
207
-
208
-
209
-
210
-
211
-
212
-
213
-
214
-
215
-
216
-
217
-
218
-
219
-
220
-
221
-
222
-
223
-
224
-
225
-
226
-
227
-
228
-
229
-
230
-
231
-
232
-
233
-
234
-
235
-
236
-
237
-
238
-
239
-
240
-
241
-
242
-
243
-
244
-
245
-
246
-
247
-
248
-
249
-
250
-
251
-
252
-
253
-
254
-
255
-
256
-
257
-
258
-
259
-
260
-
261
-
262
-
263
-
264
 |
 |