Yamaha QL1 Reference Manual - Page 148
Recording audio to a USB flash drive, RECORDER screen when selecting the USB tab
 |
View all Yamaha QL1 manuals
Add to My Manuals
Save this manual to your list of manuals |
Page 148 highlights
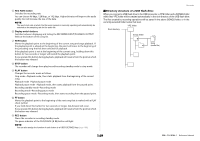
Channels that can be patched to the recorder's outputs • CH1-64 (QL5), CH1-32 (QL1) INPUT channel 1-64 (QL5) or INPUT channel 1-32 (QL1) • STIN 1L/1R-STIN 8L/8R ST IN channels 1-8L/R Recording audio to a USB flash drive You can record the signal of the desired output channels as an audio file (MP3) onto the USB flash drive inserted in the USB connector located to the right of the display. STEP 1. Refer to "Assigning channels to the input/output of the recorder" on page 146 to assign channels to the input/output of the recorder. 2. Connect a USB flash drive with sufficient free capacity to the USB connector. 3. To monitor the signal being recorded, raise the fader for the channel(s) that are patched to the input of the recorder. 4. Press the REC RATE button in the lower right of the RECORDER screen, then select the bit rate for the audio file that will be recorded. 5. Press the REC () button located at the bottom of the screen. 6. To start recording, press the PLAY/PAUSE ( ) button in the lower part of the screen. 7. To stop recording, press the STOP () button. 8. To audition the recorded content, proceed as follows. 8-1. Press the PLAY/PAUSE ( ) button to play back the recording. 8-2. To stop playback, press the STOP () button. NOTE • The FREE SIZE field indicates the amount of free capacity in the USB flash drive. • The signal being recorded will not be output from the recorder output jacks (PLAYBACK OUT). • The level meter on the RECORDER screen shows the signal level before and after the recorder. If necessary, use the GAIN knob in the RECORDER INPUT field to adjust the input level to the recorder. Operating the GAIN knob will not affect the level of the signal being output to other ports from the corresponding output channel. • In the default state, the recorded audio file will be saved in the SONGS folder within the YPE folder in the USB flash drive. However, you may also specify a folder of a level below the SONGS folder. • The recorded file will be given a default title and file name. You can change this later. RECORDER screen (when selecting the USB tab) Recorder 1 2 7 89 0 A 34 5 6 TRANSPORT field This field enables you to control recording and playback of a song. 1 Current song Indicates the currently-selected song's track number, title and artist name. The following indicators will appear during playback or recording. Playing Recording 2 Elapsed time display Indicates the elapsed playback time of the current song during playback, and the elapsed recording time during recording. 3 Remaining time display During playback, this indicates the remaining playback time of the current song. 4 Current song format Indicates the file format information for the current song (the file being recorded). 148 Reference Manual
-
 1
1 -
2
-
3
-
4
-
5
-
6
-
7
-
8
-
9
-
10
-
11
-
12
-
13
-
14
-
15
-
16
-
17
-
18
-
19
-
20
-
21
-
22
-
23
-
24
-
25
-
26
-
27
-
28
-
29
-
30
-
31
-
32
-
33
-
34
-
35
-
36
-
37
-
38
-
39
-
40
-
41
-
42
-
43
-
44
-
45
-
46
-
47
-
48
-
49
-
50
-
51
-
52
-
53
-
54
-
55
-
56
-
57
-
58
-
59
-
60
-
61
-
62
-
63
-
64
-
65
-
66
-
67
-
68
-
69
-
70
-
71
-
72
-
73
-
74
-
75
-
76
-
77
-
78
-
79
-
80
-
81
-
82
-
83
-
84
-
85
-
86
-
87
-
88
-
89
-
90
-
91
-
92
-
93
-
94
-
95
-
96
-
97
-
98
-
99
-
100
-
101
-
102
-
103
-
104
-
105
-
106
-
107
-
108
-
109
-
110
-
111
-
112
-
113
-
114
-
115
-
116
-
117
-
118
-
119
-
120
-
121
-
122
-
123
-
124
-
125
-
126
-
127
-
128
-
129
-
130
-
131
-
132
-
133
-
134
-
135
-
136
-
137
-
138
-
139
-
140
-
141
-
142
-
 143
143 -
 144
144 -
 145
145 -
 146
146 -
 147
147 -
 148
148 -
 149
149 -
 150
150 -
 151
151 -
 152
152 -
 153
153 -
154
-
155
-
156
-
157
-
158
-
159
-
160
-
161
-
162
-
163
-
164
-
165
-
166
-
167
-
168
-
169
-
170
-
171
-
172
-
173
-
174
-
175
-
176
-
177
-
178
-
179
-
180
-
181
-
182
-
183
-
184
-
185
-
186
-
187
-
188
-
189
-
190
-
191
-
192
-
193
-
194
-
195
-
196
-
197
-
198
-
199
-
200
-
201
-
202
-
203
-
204
-
205
-
206
-
207
-
208
-
209
-
210
-
211
-
212
-
213
-
214
-
215
-
216
-
217
-
218
-
219
-
220
-
221
-
222
-
223
-
224
-
225
-
226
-
227
-
228
-
229
-
230
-
231
-
232
-
233
-
234
-
235
-
236
-
237
-
238
-
239
-
240
-
241
-
242
-
243
-
244
-
245
-
246
-
247
-
248
-
249
-
250
-
251
-
252
-
253
-
254
-
255
-
256
-
257
-
258
-
259
-
260
-
261
-
262
-
263
-
264
 |
 |
