Yamaha QL1 Reference Manual - Page 127
I/O devices and external head amps, Using an I/O device
 |
View all Yamaha QL1 manuals
Add to My Manuals
Save this manual to your list of manuals |
Page 127 highlights
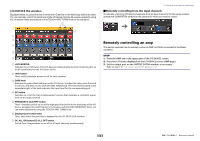
I/O devices and external head amps This chapter explains how to use an I/O device or an external head amp that is connected to the QL series console. Before you proceed, use DANTE SETUP to specify the I/O devices that will be mounted. For details, refer to "Mounting an I/O device on the Dante audio network" on page 197. Using an I/O device QL series consoles enable you to remotely control channel parameters of an I/O device (such as an Rio series product) connected to the Dante connector. For details on connecting the QL series console to an I/O device, refer to the "Connecting to I/O devices" section in the separate Owner's Manual. I/O device patching Here's how an I/O device connected to the Dante connector can be patched to the Dante audio network. STEP 1. Connecting QL series consoles and I/O devices. For details, refer to the "Connecting to I/O devices" and "Quick Guide" sections in the separate Owner's Manual. 2. In the function access area, press the I/O DEVICE button. 3. Press the DANTE PATCH tab in the upper part of the I/O DEVICE screen. 4. Press the DANTE INPUT PATCH button in the I/O DEVICE screen (DANTE PATCH page). 5. Press the AUTO SETUP button. If you want to edit individual patches, press the port select button. 6. Press the device in the I/O DEVICE screen (DANTE PATCH page). 7. Press the port select button in the OUTPUT PATCH window. 8. In the PORT SELECT screen, select the output port. I/O DEVICE screen (DANTE PATCH page) I/O devices and external head amps 2 3 1 4 1 I/O device list This shows the ID number and model name of the I/O devices. Press here to access the OUTPUT PATCH window, where you can specify patching from the console's output ports to the I/O devices. If a previously set-up device does not currently exist on the DANTE audio network, a yellow "Virtual" indicator is shown at the lower left of that device. If devices on the network belong to different DEVICE TYPEs but share the same ID, a red "Conflict" indicator will appear to the left, below the device. If multiple devices share the same ID, a yellow "Duplicate" indicator will appear to the right, below the device. 2 DANTE SETUP button Press this button to open the DANTE SETUP window, in which you can make settings for the audio network. 3 DANTE INPUT PATCH button Press this button to open the DANTE INPUT PATCH window, in which you can select the 64 channels (32 channels for the QL1) that will be input from the I/O device to the console. 4 OUTPUT PORT SETUP button Press this button to access the PATCH VIEW 1 tab of the OUTPUT PORT window, where you can choose the 64 channels (32 channels for the QL1) that will be output from the console's output ports to I/O devices. 127 Reference Manual
-
 1
1 -
2
-
3
-
4
-
5
-
6
-
7
-
8
-
9
-
10
-
11
-
12
-
13
-
14
-
15
-
16
-
17
-
18
-
19
-
20
-
21
-
22
-
23
-
24
-
25
-
26
-
27
-
28
-
29
-
30
-
31
-
32
-
33
-
34
-
35
-
36
-
37
-
38
-
39
-
40
-
41
-
42
-
43
-
44
-
45
-
46
-
47
-
48
-
49
-
50
-
51
-
52
-
53
-
54
-
55
-
56
-
57
-
58
-
59
-
60
-
61
-
62
-
63
-
64
-
65
-
66
-
67
-
68
-
69
-
70
-
71
-
72
-
73
-
74
-
75
-
76
-
77
-
78
-
79
-
80
-
81
-
82
-
83
-
84
-
85
-
86
-
87
-
88
-
89
-
90
-
91
-
92
-
93
-
94
-
95
-
96
-
97
-
98
-
99
-
100
-
101
-
102
-
103
-
104
-
105
-
106
-
107
-
108
-
109
-
110
-
111
-
112
-
113
-
114
-
115
-
116
-
117
-
118
-
119
-
120
-
121
-
 122
122 -
 123
123 -
 124
124 -
 125
125 -
 126
126 -
 127
127 -
 128
128 -
 129
129 -
 130
130 -
 131
131 -
 132
132 -
133
-
134
-
135
-
136
-
137
-
138
-
139
-
140
-
141
-
142
-
143
-
144
-
145
-
146
-
147
-
148
-
149
-
150
-
151
-
152
-
153
-
154
-
155
-
156
-
157
-
158
-
159
-
160
-
161
-
162
-
163
-
164
-
165
-
166
-
167
-
168
-
169
-
170
-
171
-
172
-
173
-
174
-
175
-
176
-
177
-
178
-
179
-
180
-
181
-
182
-
183
-
184
-
185
-
186
-
187
-
188
-
189
-
190
-
191
-
192
-
193
-
194
-
195
-
196
-
197
-
198
-
199
-
200
-
201
-
202
-
203
-
204
-
205
-
206
-
207
-
208
-
209
-
210
-
211
-
212
-
213
-
214
-
215
-
216
-
217
-
218
-
219
-
220
-
221
-
222
-
223
-
224
-
225
-
226
-
227
-
228
-
229
-
230
-
231
-
232
-
233
-
234
-
235
-
236
-
237
-
238
-
239
-
240
-
241
-
242
-
243
-
244
-
245
-
246
-
247
-
248
-
249
-
250
-
251
-
252
-
253
-
254
-
255
-
256
-
257
-
258
-
259
-
260
-
261
-
262
-
263
-
264
 |
 |
