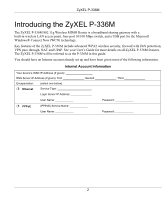
ZyXEL P-336M Quick Start Guide - Page 7
b. Username / Password Connection PPPoE, 4c. Static IP Address Connection
 |
View all ZyXEL P-336M manuals
Add to My Manuals
Save this manual to your list of manuals |
Page 7 highlights
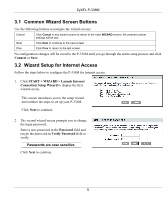
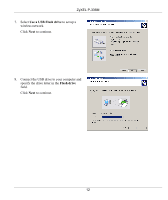
ZyXEL P-336M 4b. Username / Password Connection (PPPoE) Enter your Internet access account user name and password in the fields as provided by your ISP. Configure the Service Name field when required by your ISP with the information given. Click Next to continue. 4c. Static IP Address Connection Configure the IP Address, Subnet Mask, Gateway Address, Primary DNS Address and Secondary DNS Address fields with the information provided by your ISP. Click Next to continue. 5. You have completed Internet access setup using the wizard screens. Click Connect to save the settings and restart the device to make the changes take effect. 7
-
 1
1 -
 2
2 -
 3
3 -
 4
4 -
 5
5 -
 6
6 -
 7
7 -
 8
8 -
 9
9 -
 10
10 -
 11
11 -
 12
12 -
13
-
14
-
15
-
16
-
17
-
18
-
19
-
20
-
21
-
22
-
23
-
24
-
25
-
26
-
27
-
28
-
29
-
30
-
31
-
32
-
33
-
34
-
35
-
36
-
37
-
38
-
39
-
40
-
41
-
42
-
43
-
44
-
45
-
46
-
47
-
48
-
49
-
50
-
51
-
52
-
53
-
54
-
55
-
56
-
57
-
58
-
59
-
60
-
61
-
62
-
63
-
64
-
65
-
66
-
67
-
68
-
69
-
70
-
71
-
72
-
73
-
74
-
75
-
76
-
77
-
78
-
79
-
80
-
81
-
82
-
83
-
84
-
85
-
86
-
87
-
88
-
89
-
90
-
91
-
92
-
93
-
94
-
95
-
96
-
97
-
98
-
99
-
100
-
101
-
102
-
103
-
104
-
105
-
106
-
107
-
108
-
109
-
110
-
111
-
112
-
113
-
114
-
115
-
116
-
117
-
118
-
119
-
120
-
121
-
122
-
123
-
124
-
125
 |
 |

ZyXEL P-336M
7
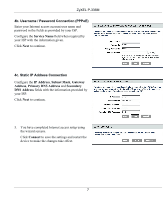
4b. Username / Password Connection (PPPoE)
Enter your Internet access account user name and
password in the fields as provided by your ISP.
Configure the
Service Name
field when required by
your ISP with the information given.
Click
Next
to continue.
4c. Static IP Address Connection
Configure the
IP Address
,
Subnet Mask
,
Gateway
Address
,
Primary DNS Address
and
Secondary
DNS Address
fields with the information provided by
your ISP.
Click
Next
to continue.
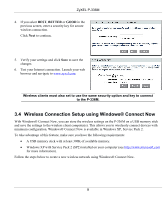
5.
You have completed Internet access setup using
the wizard screens.
Click
Connect
to save the settings and restart the
device to make the changes take effect.