AIWA NSX-V2100 Operating Instructions
AIWA NSX-V2100 Manual
 |
View all AIWA NSX-V2100 manuals
Add to My Manuals
Save this manual to your list of manuals |
AIWA NSX-V2100 manual content summary:
- AIWA NSX-V2100 | Operating Instructions - Page 1
- AIWA NSX-V2100 | Operating Instructions - Page 2
moved from a cold spot to a warm spot - The heating system has just been turned on - The unit is used in a USER-SERVICEABLE PARTS INSIDE. REFER SERVICING TO QUALIFIED SERVICE PERSONNEL." Electric Power 1 Power sources - Connect this unit only to power sources specified in the Operating Instructions - AIWA NSX-V2100 | Operating Instructions - Page 3
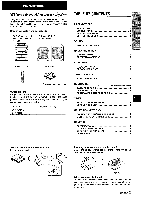
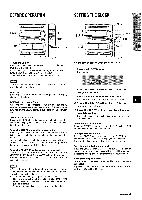
on your purchase of an Aiwa Stereo System. To optimize the performance of this system, please take the time to read through these Operating Instructions and become familiar with the operating procedures. Check your system and accessories CX-NV2100 compact disc stereo cassette receiver SX-NV21OO - AIWA NSX-V2100 | Operating Instructions - Page 4
speakers. q Do not bring the FM antenna near metal objects or curtain rails, q Do not bring the AM antenna near other optional equipment, the stereo system itself, the AC cord or speaker cords, since noise will be picked up. q Do not unwind the AM antenna wire. To connect other optional equipment - AIWA NSX-V2100 | Operating Instructions - Page 5
of the inserted disc begins, or the previously tuned station is received (Direct Play Function). The POWER button is also available power is off. In this time, the clock on the display flashes. Go to step 2 of the SETTING THE CLOCK to set the clock, To use the SHIFT button on the remote control - AIWA NSX-V2100 | Operating Instructions - Page 6
cyclically as follows. ROCK - POP - JAZZ - EQoFF (cancel) To select with the remote control Press the T-BASS button while pressing the SHIFT button. Low frequency sound may be distorted when the T-BASS system is used for a disc or tape in which low frequency sound is originally emphasized. In this - AIWA NSX-V2100 | Operating Instructions - Page 7
To stop the Auto Search manually, press the 144 DOWN or ®>1 UP button. * The Autcl Search may not stop at stations with very weak signals. When an FM stereo broadcast contains noise Press the ivlONO TUNER button while pressing the SHIFT button on the remote control to extinguish AUTO in the display - AIWA NSX-V2100 | Operating Instructions - Page 8
button or one of the DISC DIRECT PLAY buttons. The power is turned on and play of the loaded disc(s) begins. To replade discs before play, press the= OPEN/CLOSE button to open the disc compartment. To check the remaining time Press the EDIT/CHECK button on the remote control during play. The amount - AIWA NSX-V2100 | Operating Instructions - Page 9
from any of the inserted discs. 2 1 3 5 Use the remote control. 1 Press the PRGM button while pressing the SHIFT button in stop mode. PGM is displayed. Flash window The window on the top of the unit lights up or flashes while the unit is being powered - AIWA NSX-V2100 | Operating Instructions - Page 10
to be recorded. To record from a CD Press the CD button and load a disc. To record from a tape Press the TAPE button. Then, insert the original tape . When you wish to start recording, press the II button again. To record part of the CD When the q button is pressed, recording always starts from the - AIWA NSX-V2100 | Operating Instructions - Page 11
, press the EDIT /CHECK button on the remote control. "AI EDIT" is surrounded by red in the display. 5 Select a disc by pressing one of the DISC DIRECT PLAY buttons. If only one disc is inserted, skip this step. 6 Press the numeric buttons on the remote control to designate the tape length. 10 to - AIWA NSX-V2100 | Operating Instructions - Page 12
button, 2 Press the CD button on the main unit and load the disc (s). 3 Press the EDIT/CHECK button twice while pressing the SHIFT button on the remote control. PRGM is displayed. 4 Press the numeric buttons on the remote control to designate the tape length. 10 to 99 minutes can be specified - AIWA NSX-V2100 | Operating Instructions - Page 13
remote control. 1 Press the SLEEP button while pressing the SHIFT button. To erase a recording A previous recording is erased when a new recording is made on that part To check the time remaining until the power is turned off Press the SLEEP button discs, ri~dio or external tape for the country - AIWA NSX-V2100 | Operating Instructions - Page 14
See page 4.) 1 Press the TIMER button on the remote control white pressing the SHIFT button once to display 0, 5 Prepare the source. To listen to a CD, load the disc to be played first on tray 1. To listen to a tape, are set as you wish, turn off the power and set step 7 if necessary. To change - AIWA NSX-V2100 | Operating Instructions - Page 15
an optical cable to connect digital audio equipment (digital amplifier, DAT deck, MD recorder, etc.). Remove the dust cap @ from the CD DIGITAL OUT (OPTICAL) jack. Then, connect an optical cable plug@ to the CD DIGITAL OUT (OPTICAL) jack. POWER -1 ,1 .,,_ __ ,,, ,,._=_ ~ To play equipment - AIWA NSX-V2100 | Operating Instructions - Page 16
antenna Amplifier section Power output Total harmonic AUDIO) VIDEO/AUX: 400 mV SPEAKERS: accept speakers of 6 ohms or more PHONES (stereo system Heads 4 tracks, 2 channels stereo 50 Hz - 10000 HZ AC bias Deck 1: Recording/playback/ erase head x 1 Deck 2: Playback head x 1 Compact disc parts - AIWA NSX-V2100 | Operating Instructions - Page 17
AC cord and repeat step Instructions about each ~art on the main unit or remote control are indicated on the pages listed below. (in alphabetical order) Parts CD s CLEAR GRAPHIC EGWALiZER (ROCK/POP/JAZZ) DISC CHANGE DiSC DiRECT PLAY (1, 2, 3) = OpEN/CLOSE PHONES POWER - PRESET 11 SET TAPE T-BASS - AIWA NSX-V2100 | Operating Instructions - Page 18
SHOCK, DO NOT REMOVE COVER (OR BACK). NO USER-SERVICEABLE PARTS INSIDE. REFER SERVICING TO QUALIFIED SERVICE PERSONNEL." Explicaci6n A de Ios simbolos graficos: El sfmbolo Limpie la unidad solo como se recomienda en el manual de instrucciones. Dairos aue necesitan ser reparados Haga que - AIWA NSX-V2100 | Operating Instructions - Page 19
estereo Aiwa. Para optim izar Ias prestaciones de este sistema, tome el tiempo necesario para leer completamente este manual de ~ Q'> y& Insertion de Ias pilas en el control remoto Quite la tapa de Ias pilas, ubicada en la parte trasera del control remoto, e inserte dos pilas R6 (tamaiio AA - AIWA NSX-V2100 | Operating Instructions - Page 20
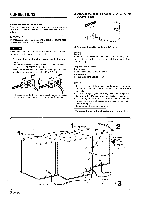
CONEXIONES Antes de conectar el cable de aiimentacion de CA La tension nominal de su unidad, mostrada en el panel trasero, es de 120 V CA. Asegurese de que la tension nominal coincida con la tension empleada en su Iocalidad. IMPORTANTE Conecte primero Ios altavoces, Ias antenas y todos Ios demas - AIWA NSX-V2100 | Operating Instructions - Page 21
el reloj empezara desde 00 segundos. Para corregir la hors actual Pulse el boton POWER para apagar la unidad. Pulse el boton II SET y siga Ios pasos 1 modo de 24 horas Pulse el boton CLOCK mientras pulsa el boton SHIFT del control remoto y Iuego pulse el boton s antes de que pasen 4 segundos. - AIWA NSX-V2100 | Operating Instructions - Page 22
uno de Ios botones GEQ. Para cancelar el modo seleccionado Pulse de nuevo el boton seleccionado. Se visualizara "EQ oFF. Para seleccionar con el control remoto Pulse repetidamente el boton GE(2 mientras pulsa el boton SHIFT. El modo GEQ se visualizara c[clicamente de la forma siguiente: ROCK - POP - AIWA NSX-V2100 | Operating Instructions - Page 23
MANUAL MONO TUNER BAND SHIFT 1 Pulse repetidamente el boton TUNEFUBAND para seleccionar la banda deseada, FM o AM. Si la alimentaci6n esta desconectada se recibira la emisora previalmente sintonizada (funcion de reproduction directs). Para seleccionar una banda con el control el boton POWER mientras - AIWA NSX-V2100 | Operating Instructions - Page 24
visualizara. Para reponer la visualization del tiempo de reproduction, repita este procedimiento. Seleccion de una canci6n con el control remoto 1 Pulse uno de Ios botones DISC DIRECT PLAY para seleccionar un disco. 2 Pulse Ios botones numericos y el bot6n +1 Opara seleccionar una canci6n. Ejemplo - AIWA NSX-V2100 | Operating Instructions - Page 25
, DISC DIRECT PLAY y numericos no funcionaran. q La reproduction aleatoria no se realiza durante la reproduction programada. Utilice el control remoto. 7 Pulse el boton PRGM mientras SHIFT en e! modo de parada. Se visualiza PGM. pulsa el boton Ventanilla parpadeante La ventanilla de la parte - AIWA NSX-V2100 | Operating Instructions - Page 26
el boton q . La platina entra en el modo de pausa de grabacion. Cuando desee reanudar ia grabacion, pulse de nuevo el boton 11. Para grabar parte del disco compacto Al pulsar el boton q , la grabacion se inicia siempre desde la primers cancion. Para iniciar la grabacion en el medio de una - AIWA NSX-V2100 | Operating Instructions - Page 27
esta rodeado en rojo en el visualizador. 5 Sekccione un disco pulsando uno de Ios botones DISC DIRECT PLAY. Si esta insertado solo un disco, omits este paso. 6 Pulse Ios botones numericos del control remoto para designar la Iongitud de la cinta. Pueden especificarse de 10 a 99 minutes. Ejemplo - AIWA NSX-V2100 | Operating Instructions - Page 28
de la cinta (cara delantera) 5 Pulse uno de Ios botones DISC DIRECT PLAY para seleccionar un disco y pulse Ios botones numericos para Para grabar la segunda cara, pulse EDIT/CHECK mientras pulsa al boton SHIFT del control remoto. Despues de confirmar que B aparezca en el visualizador, vaya al paso - AIWA NSX-V2100 | Operating Instructions - Page 29
en el mecanismo. AJUSTE DEL TEMPORIZADOR PARA DORMIR 1 2 La unidad se podra apagar automaticamente despues de transcurrido un tiempo especificado. Utilice el control remoto. 1 Pulse el boton SLEEP mientras pulsa el boton SHIFT. Para borrar una grabacion La grabacion anterior se borra al hater una - AIWA NSX-V2100 | Operating Instructions - Page 30
pagina 4.) 1 Pulse una vez el boton TIMER mientras puisa el boton SHIFT del control remoto para visualizer 0, y pulse el boton II SET antes de aue pasen 4 la 2. Para escuchar la radio, sintonice una emisora. 6 Pulse el boton POWER para apagar la unidad despues de haber ajustado el volumen y ei tono. - AIWA NSX-V2100 | Operating Instructions - Page 31
Aiwa con amplificador incorporado. ecualizador TOMA CD DIGITAL OUT (OPTICAL) Esta unidad pueda dar salida a sefiales de sonido digital de discos compactos a traves de esta toma. Utilice un cable optico para conectar el equipo de audio digital (amplificador digital el boton POWER mientras pulsa el - AIWA NSX-V2100 | Operating Instructions - Page 32
(platina 1 solamente), [OScabrestantes y Ios rodillos de presion. /- \ AUDIO) Entradas VIDEO/AUX: 400 mV te Salidas SPEAKERS: Acepta altavoces de algodon humedecido en Iiquido de Iimpieza, espere hasta que Ias partes Iimpiadas esten completamente secas antes de introducer Ias cintas. Para - AIWA NSX-V2100 | Operating Instructions - Page 33
instrucciones principals de cada parte de la unidad principal o del control remoto se indican en Ias paginas mostradas a continuation. (En orden alfabetico) Partes Paginas CD s CLEAR GRAPHIC EQUALIZER (ROCK/POP/JAZZ) DISC CHANGE DISC DIRECT PLAY (1, 2, 3) A OpEN/CLQSE PHONES POWER P PRESET 11 SET - AIWA NSX-V2100 | Operating Instructions - Page 34
USER-SERVICEABLE PARTS INSIDE. REFER SERVICING TO QUALIFIED SERVICE PERSONNEL presence d'instructions importances concernant Chariot et support - Si I'appareil est pose ou monte sur un support ou un la Ientille du capteur du Iecteur de disques compacts quand: - I'appareil est deplace d'un endroit - AIWA NSX-V2100 | Operating Instructions - Page 35
stereo Aiwa. La lecture de ce mode d'emploi vous permettra de ma~triser I'utilisation et d'optimiser Ies performances de cette chahe. Contr61er la chaine et Ies accessoires. CX-NV2100 Radio magnetocassette Iecteur SX-NV21OO (G, D) Enceintes avant de disques compacts stereo DE PROBLEME 16 - AIWA NSX-V2100 | Operating Instructions - Page 36
pas mettre I'antenne FM pres d'objets metalliques ou de tringles a rideaux. q Ne pas mettre I'antenne AM pres d'un appareil optionnel, de la chaine stereo proprement dite, du cordon secteur ou des cordons d'enceinte; elle pourrait capter des parasites, q Ne pas derouler Ie fil de I'antenne AM. Pour - AIWA NSX-V2100 | Operating Instructions - Page 37
en place commence, ou la station ecoutee en dernier est re~ue (fonction de lecture directe). On peut aussi appuyer sur la touche POWER pour mettre I'appareil sous tension. -m Quand I'appareil est mis sous tension, Ie compartment peut s'ouwir et se fermer pour reinitialiser I'appareil. a disques - AIWA NSX-V2100 | Operating Instructions - Page 38
son aux basses frequencies est accentue d'oriqine. Dans ce cas, annuler Ie systeme T-BASS. 5 FRAN~AIS Reglage du son pendant I'enregistrement On peut faire varier Utilisation d'un casque Brancher un casque muni d'une fiche stereo standard (6,3 mm a) a la prise PHONES. Aucun son ne sort par - AIWA NSX-V2100 | Operating Instructions - Page 39
Ies stations presentant des signaux tres faibles. Quand une emission FM stereo presente des parasites Appuyer Sur la touche MONO TUNER tout en un endroit ou Ie systeme deallocation de frequencies est de 9 kHz/pas, changer I'intervalle d'accord. Appuyer sur la touche POWER tout en appuyant sur - AIWA NSX-V2100 | Operating Instructions - Page 40
Ies plateaux 1 et 2. Pour Iire trois disques, appuyer sur la touche DISC CHANGE pour faire tourner Ies plateaux apres avoir mis deux disques en place. Mettre du plateau. q Ne pas mettre plus d'un disque compact sur un plateau. q Ne pas incliner I'appareil avec des disques en place. - AIWA NSX-V2100 | Operating Instructions - Page 41
PROGRAMMED On peut programmer un maximum de 30 plages de n'importe Iequel des disques en place. 2 1 3 5 2 Appuyer sur une des touches DISC DIRECT PLAY pour selectionner un disque. Le disque selectionne est indique en rouge sur I'affichage. Passer a I'etape suivante quand Ie plateau arr6te de - AIWA NSX-V2100 | Operating Instructions - Page 42
la source en marche. 3 Appuyer sur la touche q pour demarrer I'enregistrement. La touche ®est mise en service simultanement. Lors de I'enreaistrement a ~artir d'un disaue compact, la lecture et I'enregistrement demarrent simultanement a la premiere plage. Pour arr&er I'enregistrement Appuyer sur la - AIWA NSX-V2100 | Operating Instructions - Page 43
en rouge sur l'affichage. 5 Selectionner un disque en appuyant sur une des touches DISC DIRECT PLAY. S'il n'y a qu'un disque en place, sauter cette &ape. ou appuyer sur la touche = OPEN/CLOSE du Iecteur de disques compacts. Pour contrbler Ie contenu du montage Avant I'enregistrement, appuyer sur - AIWA NSX-V2100 | Operating Instructions - Page 44
de la cassette (face avant) 5 Appuyer sur une des touches DISC DIRECT PLAY pour selectionner un disque, puis programmer une plage a I' la platine 1 pour demarrer I'enregistrement. La lecture du disque compact et I'enregistrement des plages programmers pour la premiere face demarrent simultanement - AIWA NSX-V2100 | Operating Instructions - Page 45
\ Au sujet des cassettes q Pour eviter un effacement accidental, utiliser un tournevis ou tout autre objet effile pour casser Ies ergots en plastique de la cassette apres I'enregistrement. REGLAGE DE LA MINUTERIE D'ARRET , @Q;;! Face A @ IL-J Ergot pour la face A Pour enregistrer de nouveau - AIWA NSX-V2100 | Operating Instructions - Page 46
recommence a partir de I'etape 1. 5 Preparer la source. Pour ecouter un disque compact, mettre Ie disque a Iire en premier en place clans Ie plateau 1. Pour Apres avoir regle Ie volume et la tonalite, appuyer sur la touche POWER pour mettre I'appareil hors tension. Q) reste sur I'affichage une - AIWA NSX-V2100 | Operating Instructions - Page 47
Utiliser un tourne-disque Aiwa muni d'un amplificateur a egaliseur integre. PRISE CD DIGITAL OUT (OPTICAL) Cet appareil peut sortir Ies signaux sonores numeriques de disque ccmpact par cette prise. Utiliser un cable optique pour connecter un appareil audio numerique (amplificateur numerique, platine - AIWA NSX-V2100 | Operating Instructions - Page 48
(5 W, 1 kHz, 6 ohms, AUDIO DIN) VIDEO/AUX: 400 mV SPEAKERS: accepte des enceintes de 6 ohms ou plus PHONES (prise stereo): accepte un casque de 32 ohms ou magnetocassette Format de piste Reponse en frequence Systeme d'enregistrement T&es 4 pistes, 2 canaux stereo 50 Hz -10000 Hz Polarisation CA - AIWA NSX-V2100 | Operating Instructions - Page 49
2. NOMENCLATURE Pour Ies instructions concernant chaque partie de I'appareil principal ou de la telecommande, se reporter aux pages indiquees. (Ordre alphabetique) Parties CD , CLEAR GRAPHIC EQUALIZER (ROCK/POP/JAZZ) DISC CHANGE DISC DIRECT PLAY (1, 2, 3) ~ OpEN/CLOSE PHONES POWER - PRESET 1[ SET - AIWA NSX-V2100 | Operating Instructions - Page 50
- AIWA NSX-V2100 | Operating Instructions - Page 51
- AIWA NSX-V2100 | Operating Instructions - Page 52
tested and found to comply with the limits for a Class B digital device, pursuant to Part 15 of the FCC Rules. These limits are designed to provide by the manufacturer, may void the user's right or authority to operate this product. Call TO// ~h% I-8M7-BUY-AIWA (United States and Puerto Rico)
-
 1
1 -
 2
2 -
 3
3 -
 4
4 -
 5
5 -
 6
6 -
 7
7 -
8
-
9
-
10
-
11
-
12
-
13
-
14
-
15
-
16
-
17
-
18
-
19
-
20
-
21
-
22
-
23
-
24
-
25
-
26
-
27
-
28
-
29
-
30
-
31
-
32
-
33
-
34
-
35
-
36
-
37
-
38
-
39
-
40
-
41
-
42
-
43
-
44
-
45
-
46
-
47
-
48
-
49
-
50
-
51
-
52
 |
 |