AIWA NSX-V2100 Operating Instructions - Page 11
Al Edit Recording
 |
View all AIWA NSX-V2100 manuals
Add to My Manuals
Save this manual to your list of manuals |
Page 11 highlights
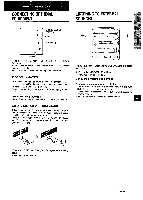
Al EDIT RECORDING The Al edit function enables CD recording without worrying about tape length and track length. When a CD is inserted, the unit automatically calculates track lengths. If necessary, the order of tracks is rearranged so that no track is cut short. (Al: Artificial Intelligence) 5 6 4,8 - 7- 1 Insert the tape to be recorded on into deck 1, and wind up to the beginning of the front side. Press the W= button to open the cassette holder and insert the tape with the exposed side down. Press the TAPE button, and wind up the tape with the
-
 1
1 -
2
-
3
-
4
-
5
-
 6
6 -
 7
7 -
 8
8 -
 9
9 -
 10
10 -
 11
11 -
 12
12 -
 13
13 -
 14
14 -
 15
15 -
 16
16 -
17
-
18
-
19
-
20
-
21
-
22
-
23
-
24
-
25
-
26
-
27
-
28
-
29
-
30
-
31
-
32
-
33
-
34
-
35
-
36
-
37
-
38
-
39
-
40
-
41
-
42
-
43
-
44
-
45
-
46
-
47
-
48
-
49
-
50
-
51
-
52
 |
 |

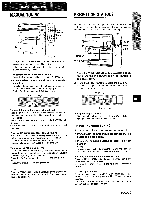
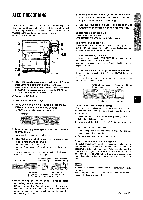
Al EDIT RECORDING
The Al edit function enables CD recording without worrying about
tape length and track length.
When a CD is inserted, the unit
automatically
calculates track lengths.
If necessary, the order of
tracks is rearranged
so that no track is cut short.
(Al: Artificial
Intelligence)
1
2
3
4
5
6
-
7-
5
6
4,8
Insert the tape to be recorded
on into deck 1, and
wind
up to the beginning
of the front
side.
Press the W=
button to open the cassette holder and insert
the tape with the exposed side down.
Press the TAPE button,
and wind up the tape with the <+
button.
Press the CD button.
Load discs onto the trays.
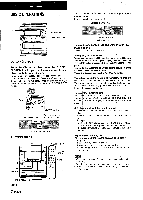
While
pressing
the SHIFT
button,
press the EDIT
/CHECK
button
on the remote
control.
“AI EDIT” is surrounded
by red in the display.
Select a disc by pressing
one of the DISC DIRECT
PLAY buttons.
If only one disc is inserted, skip this step.
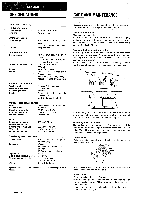
Press the numeric
buttons
on the remote
control
to designate
the tape length.
10 to 99 minutes can be specified.
Example:
When using a 46-minute
tape, press the 4 and 6
buttons.
In a few seconds,
the microcomputer
decides the tracks to
be recorded on each side of the tape.
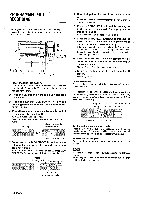
Remaining time
Programmed
Tape length
of recording
1
track numbers
7
Tape side
I
Number of
A: First recording side
programmed
B: Second recording side
tracks
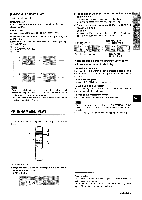
Press
the
button
on
deck
1 first
to
start
recording
on the first side.
CD play and recording of edited tracks for the first side start
simultaneously.
When the end of the tape is reached, deck 1
enters the recording stop mode. After entering the recording
stop mode, go to step 8.
8
Press
the
EDIT/CHECK
button
on
the
remote
control
while
pressing
the
SHIFT
button
to
prepare
for the second
recording.
9 Turn
over
the
tape
in deck
1 and
press
the
o
button
to start recording
on the second
side.
To stop
recording
in the middle
Press the W&
button on deck 1.
Deck operation
and CD play stop simultaneously.
To
clear the editing
contents
Press the
CLEAR button for CD twice in the stop mode so
that the red line surrounding
“Al EDIT
in the display goes out,
or press the ~
OPEN/CLOSE
button for CD.
To
check
the editing
contents
Before recording, press the EDIT/CHECK
button on the remote
control while pressing the SHIFT button.
Each time it is pressed, the contents of each side of the tape are
displayed
in turn.
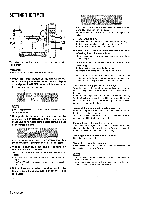
To check
the order
of the programmed
track
numbers
Before recording,
press the
>
UP or <~
DOWN button for
CD repeatedly.
Each time
it is pressed,
the track
number
and programmed
number are displayed
in order,
Order of the tracks
Programmed
track
to be played
numbers
To add tracks
to the edited
contents
If the remaining time is enough to record some tracks in step 6,
you can add tracks from other discs in the compartment
before
recording starts.
1
Press the EDIT/CHECK
button
while
pressing
the SHIFT
button to select side A or B.
2
Press one of the DISC DIRECT
PLAY buttons
to select a
disc,
3
Press the numeric buttons to select tracks,
If the playing time of a selected track is longer than the tape
remaining time, it is not added,
4
Repeat steps 2 and 3 for adding more tracks.
Time on cassette
tapes
and editing
time
The actual cassette recording time is usually a little longer than
the specified
recording time printed on the label.
This unit can
program tracks to use the extra time.
When the total recording
time is a little longer than the tape’s specified
recording
time
after editing, the display shows the extra time (without a minus
mark), instead of the time remaining on the tape (with the minus
mark).
m
The edit function cannot be used with discs containing 31 tracks
or more.
Recording
is inhibited
if the erasure prevention
tab on either
side of the tape is broken off.
ENGLISH
10