Acer Altos G530 Altos G530 User's Guide - Page 57
Attach the SATA data cable to the SATA HDD connector on the, backplane board
 |
View all Acer Altos G530 manuals
Add to My Manuals
Save this manual to your list of manuals |
Page 57 highlights
47 4 Install the hot-plug cage. (1) Slide the cage into the chassis. The cage is locked to the chassis with an audible click. 5 Connect the following cables to their corresponding connectors on the SATA RAID backplane board, mainboard and adapter: Important: If a four-bay hot-plug SATA HDD cage is already installed in the top HDD bay, you must block the J1 jumper. Set pins 2 and 3 to short. (1) Attach the SATA data cable to the SATA HDD connector on the backplane board (1), then connect the other end of the cable to the SATA connector on the SATA RAID card. Note: SATA connectors on the controller are keyed. Make sure the SATA data cables are properly connected to its corresponding connectors on the SATA RAID card.
-
 1
1 -
2
-
3
-
4
-
5
-
6
-
7
-
8
-
9
-
10
-
11
-
12
-
13
-
14
-
15
-
16
-
17
-
18
-
19
-
20
-
21
-
22
-
23
-
24
-
25
-
26
-
27
-
28
-
29
-
30
-
31
-
32
-
33
-
34
-
35
-
36
-
37
-
38
-
39
-
40
-
41
-
42
-
43
-
44
-
45
-
46
-
47
-
48
-
49
-
50
-
51
-
 52
52 -
 53
53 -
 54
54 -
 55
55 -
 56
56 -
 57
57 -
 58
58 -
 59
59 -
 60
60 -
 61
61 -
 62
62 -
63
-
64
-
65
-
66
-
67
-
68
-
69
-
70
-
71
-
72
-
73
-
74
-
75
-
76
-
77
-
78
-
79
-
80
-
81
-
82
-
83
-
84
-
85
-
86
-
87
-
88
-
89
-
90
-
91
-
92
-
93
-
94
-
95
-
96
-
97
-
98
-
99
-
100
-
101
-
102
-
103
-
104
-
105
-
106
-
107
-
108
-
109
-
110
-
111
-
112
-
113
-
114
-
115
-
116
-
117
-
118
-
119
-
120
-
121
-
122
-
123
-
124
-
125
-
126
-
127
-
128
-
129
-
130
-
131
-
132
-
133
-
134
-
135
-
136
-
137
-
138
-
139
-
140
-
141
-
142
-
143
-
144
-
145
-
146
-
147
-
148
-
149
-
150
-
151
-
152
-
153
-
154
-
155
-
156
-
157
-
158
-
159
-
160
-
161
-
162
-
163
-
164
-
165
-
166
-
167
-
168
-
169
-
170
-
171
-
172
-
173
-
174
-
175
-
176
-
177
-
178
-
179
-
180
-
181
-
182
-
183
-
184
-
185
-
186
-
187
-
188
-
189
-
190
 |
 |

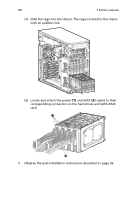
47
4
Install the hot-plug cage.
(1)
Slide the cage into the chassis. The cage is locked to the chassis
with an audible click.
5
Connect the following cables to their corresponding connectors on
the SATA RAID backplane board, mainboard and adapter:
Important:
If a four-bay hot-plug SATA HDD cage is already
installed in the top HDD bay, you must block the J1 jumper. Set
pins 2 and 3 to short.
(1)
Attach the SATA data cable to the SATA HDD connector on the
backplane board
(1)
, then connect the other end of the cable
to the SATA connector on the SATA RAID card.
Note:
SATA connectors on the controller are keyed. Make sure
the SATA data cables are properly connected to its corresponding
connectors on the SATA RAID card.