Acer EL1210 Service Guide - Page 40
Removing the Heat Sink Fan Assembly, See Removing the Side Panel
 |
View all Acer EL1210 manuals
Add to My Manuals
Save this manual to your list of manuals |
Page 40 highlights
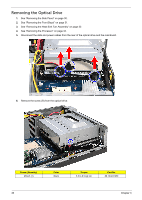
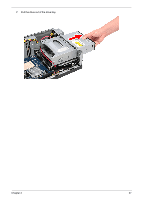
Removing the Heat Sink Fan Assembly WARNING:The heat sink becomes very hot when the system is on. NEVER touch the heat sink with any metal or with your hands. 1. See "Removing the Side Panel" on page 30. 2. See "Removing the Front Bezel" on page 31. 3. Use a long-nosed screwdriver to loosen the four screws on the heat sink, in the order as shown below. 4. Lift the heat sink fan assembly away from the mainboard. 32 Chapter 3
-
 1
1 -
2
-
3
-
4
-
5
-
6
-
7
-
8
-
9
-
10
-
11
-
12
-
13
-
14
-
15
-
16
-
17
-
18
-
19
-
20
-
21
-
22
-
23
-
24
-
25
-
26
-
27
-
28
-
29
-
30
-
31
-
32
-
33
-
34
-
 35
35 -
 36
36 -
 37
37 -
 38
38 -
 39
39 -
 40
40 -
 41
41 -
 42
42 -
 43
43 -
 44
44 -
 45
45 -
46
-
47
-
48
-
49
-
50
-
51
-
52
-
53
-
54
-
55
-
56
-
57
-
58
-
59
-
60
-
61
-
62
-
63
-
64
-
65
-
66
-
67
-
68
-
69
-
70
-
71
-
72
-
73
-
74
-
75
-
76
-
77
-
78
-
79
-
80
-
81
-
82
-
83
-
84
-
85
-
86
 |
 |
32
Chapter 3
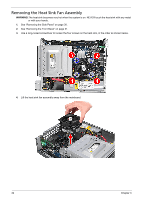
Removing the Heat Sink Fan Assembly
WARNING:
The heat sink becomes very hot when the system is on. NEVER touch the heat sink with any metal
or with your hands.
1.
See “Removing the Side Panel” on page 30.
2.
See “Removing the Front Bezel” on page 31.
3.
Use a long-nosed screwdriver to loosen the four screws on the heat sink, in the order as shown below.
4.
Lift the heat sink fan assembly away from the mainboard.