Acer EL1210 Service Guide - Page 47
Place the bracket on a clean, static-free work surface.
 |
View all Acer EL1210 manuals
Add to My Manuals
Save this manual to your list of manuals |
Page 47 highlights
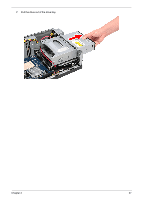
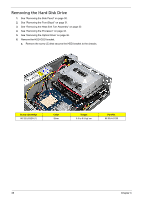
b. Lift the bracket up and turn it over. 7. Disconnect the data and power cables from the rear of the hard drive. 8. Place the bracket on a clean, static-free work surface. Chapter 3 39
-
 1
1 -
2
-
3
-
4
-
5
-
6
-
7
-
8
-
9
-
10
-
11
-
12
-
13
-
14
-
15
-
16
-
17
-
18
-
19
-
20
-
21
-
22
-
23
-
24
-
25
-
26
-
27
-
28
-
29
-
30
-
31
-
32
-
33
-
34
-
35
-
36
-
37
-
38
-
39
-
40
-
41
-
 42
42 -
 43
43 -
 44
44 -
 45
45 -
 46
46 -
 47
47 -
 48
48 -
 49
49 -
 50
50 -
 51
51 -
 52
52 -
53
-
54
-
55
-
56
-
57
-
58
-
59
-
60
-
61
-
62
-
63
-
64
-
65
-
66
-
67
-
68
-
69
-
70
-
71
-
72
-
73
-
74
-
75
-
76
-
77
-
78
-
79
-
80
-
81
-
82
-
83
-
84
-
85
-
86
 |
 |

Chapter 3
39
b.
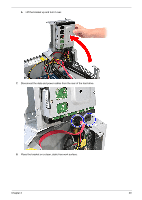
Lift the bracket up and turn it over.
7.
Disconnect the data and power cables from the rear of the hard drive.
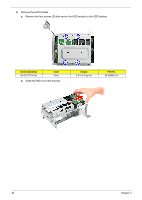
8.
Place the bracket on a clean, static-free work surface.