Acer EL1210 Service Guide - Page 52
Removing the Memory Modules
 |
View all Acer EL1210 manuals
Add to My Manuals
Save this manual to your list of manuals |
Page 52 highlights
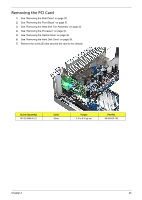
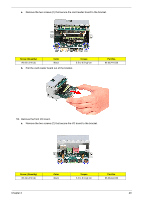
Removing the Memory Modules IMPORTANT:Before removing any DIMM from the memory board, make sure to create a backup file of all important data. 1. See "Removing the Side Panel" on page 30. 2. See "Removing the Front Bezel" on page 31. 3. See "Removing the Heat Sink Fan Assembly" on page 32. 4. See "Removing the Processor" on page 34. 5. See "Removing the Optical Drive" on page 36. 6. See "Removing the Hard Disk Drive" on page 38. 7. Press the holding clips on both sides of the DIMM slot outward to release the DIMM. 8. Gently pull the DIMM upward to pull it away from the chassis. 44 Chapter 3
-
 1
1 -
2
-
3
-
4
-
5
-
6
-
7
-
8
-
9
-
10
-
11
-
12
-
13
-
14
-
15
-
16
-
17
-
18
-
19
-
20
-
21
-
22
-
23
-
24
-
25
-
26
-
27
-
28
-
29
-
30
-
31
-
32
-
33
-
34
-
35
-
36
-
37
-
38
-
39
-
40
-
41
-
42
-
43
-
44
-
45
-
46
-
 47
47 -
 48
48 -
 49
49 -
 50
50 -
 51
51 -
 52
52 -
 53
53 -
 54
54 -
 55
55 -
 56
56 -
 57
57 -
58
-
59
-
60
-
61
-
62
-
63
-
64
-
65
-
66
-
67
-
68
-
69
-
70
-
71
-
72
-
73
-
74
-
75
-
76
-
77
-
78
-
79
-
80
-
81
-
82
-
83
-
84
-
85
-
86
 |
 |

44
Chapter 3
Removing the Memory Modules
IMPORTANT:
Before removing any DIMM from the memory board, make sure to create a backup file of all
important data.
1.
See “Removing the Side Panel” on page 30.
2.
See “Removing the Front Bezel” on page 31.
3.
See “Removing the Heat Sink Fan Assembly” on page 32.
4.
See “Removing the Processor” on page 34.
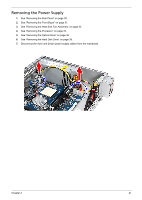
5.
See “Removing the Optical Drive” on page 36.
6.
See “Removing the Hard Disk Drive” on page 38.
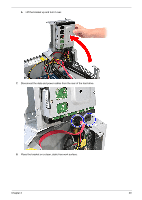
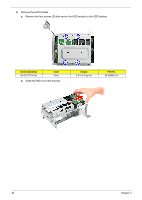
7.
Press the holding clips on both sides of the DIMM slot outward to release the DIMM.
8.
Gently pull the DIMM upward to pull it away from the chassis.