Acer Veriton 5200D Veriton 5200D - Page 67
Installing additional memory for Veriton 5200D, Removing and installing a DIMM
 |
View all Acer Veriton 5200D manuals
Add to My Manuals
Save this manual to your list of manuals |
Page 67 highlights
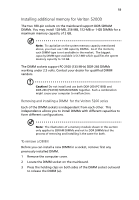
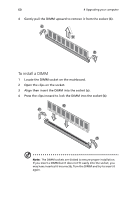
59 Installing additional memory for Veriton 5200D The two 180-pin sockets on the mainboard support DDR-SDRAM DIMMs. You may install 128-MB, 256-MB, 512-MB or 1-GB DIMMs for a maximum memory capacity of 2 GB. Note: To capitalize on the system memory capacity mentioned above, you must use 1-GB capacity DIMMs. As of the moment, such DIMM type is not available in the market. The biggest capacity DIMM type available is 512-MB which qualifies the system memory capacity to 1.0 GB. The DIMM sockets support PC-2100 (133 MHz) DDR-266 DIMMs working under 2.5 volts. Contact your dealer for qualified DIMM vendors. Caution! Do not install and use both DDR-200 (PC1600) and DDR-266 (PC2100) SDRAM DIMMs together. Such a combination might cause your computer to malfunction. Removing and installing a DIMM for the Veriton 5200 series Each of the DIMM sockets is independent from each other. This independence allows you to install DIMMs with different capacities to form different configurations. Note: The illustration of a memory module shown in this section only applies to SDRAM DIMMs and not to DDR DIMMs but the process of removing and installing is the same for both. To remove a DIMM Before you can install a new DIMM in a socket, remove first any previously installed DIMM. 1 Remove the computer cover. 2 Locate the DIMM socket on the mainboard. 3 Press the holding clips on both sides of the DIMM socket outward to release the DIMM (a).
-
 1
1 -
2
-
3
-
4
-
5
-
6
-
7
-
8
-
9
-
10
-
11
-
12
-
13
-
14
-
15
-
16
-
17
-
18
-
19
-
20
-
21
-
22
-
23
-
24
-
25
-
26
-
27
-
28
-
29
-
30
-
31
-
32
-
33
-
34
-
35
-
36
-
37
-
38
-
39
-
40
-
41
-
42
-
43
-
44
-
45
-
46
-
47
-
48
-
49
-
50
-
51
-
52
-
53
-
54
-
55
-
56
-
57
-
58
-
59
-
60
-
61
-
 62
62 -
 63
63 -
 64
64 -
 65
65 -
 66
66 -
 67
67 -
 68
68 -
 69
69 -
 70
70 -
 71
71 -
 72
72 -
73
-
74
-
75
-
76
-
77
-
78
-
79
-
80
-
81
-
82
-
83
-
84
-
85
-
86
-
87
-
88
 |
 |