Belkin F6D42304 User Manual - Page 47
Setting WPA/WPA2-Personal PSK, IMPORTANT
 |
View all Belkin F6D42304 manuals
Add to My Manuals
Save this manual to your list of manuals |
Page 47 highlights
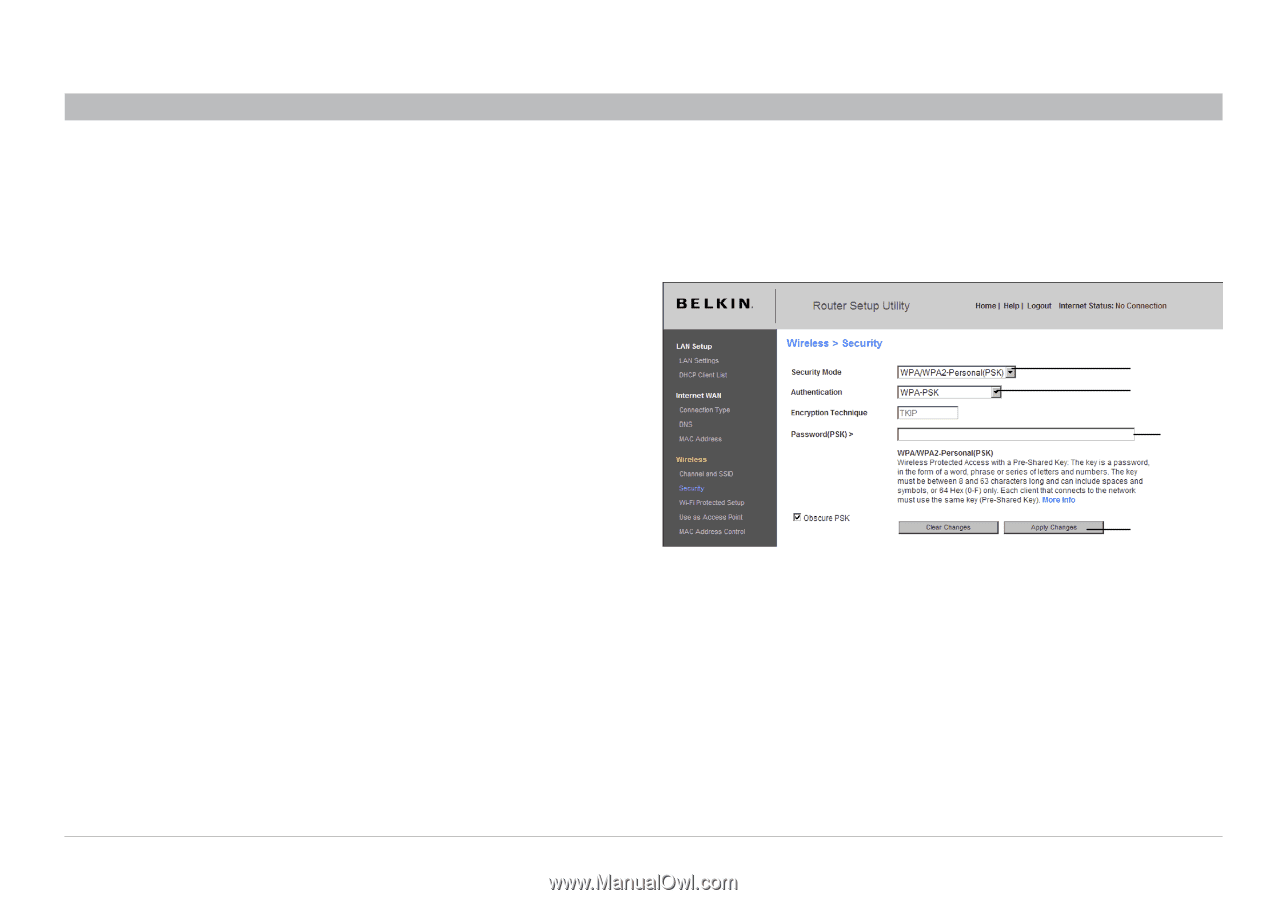
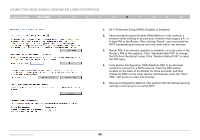
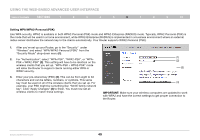
Using the Web-Based Advanced User Interface Table of Contents sections 1 2 3 4 5 6 7 8 9 10 Setting WPA/WPA2-Personal (PSK) Like WPA security, WPA2 is available in both WPA2-Personal (PSK) mode and WPA2-Enterprise (RADIUS) mode. Typically, WPA2-Personal (PSK) is the mode that will be used in a home environment, while WPA2-Enterprise (RADIUS) is implemented in a business environment where an external radius server distributes the network key to the clients automatically. Your Router supports WPA2-Personal (PSK). 1. After you've set up your Router, go to the "Security" under "Wireless" and select "WPA/WPA2-Personal (PSK)" from the "Security Mode" drop-down menu (1). 2. For "Authentication", select "WPA-PSK", "WPA2-PSK", or "WPAPSK + WPA2-PSK" (2). This setting will have to be identical on the wireless clients that you set up. "WPA-PSK + WPA2-PSK" mode will allow the Router to support clients running either WPA or WPA2 security. 3. Enter your pre-shared key (PSK) (3). This can be from eight to 63 characters and can be letters, numbers, or symbols. This same key must be used on all of the wireless clients that you set up. For example, your PSK might be something like: "Smith family network key". Click "Apply Changes" (4) to finish. You must now set all wireless clients to match these settings. (1) (2) (3) (4) IMPORTANT: Make sure your wireless computers are updated to work with WPA2 and have the correct settings to get proper connection to the Router. Enhanced Wireless Router 45
-
 1
1 -
2
-
3
-
4
-
5
-
6
-
7
-
8
-
9
-
10
-
11
-
12
-
13
-
14
-
15
-
16
-
17
-
18
-
19
-
20
-
21
-
22
-
23
-
24
-
25
-
26
-
27
-
28
-
29
-
30
-
31
-
32
-
33
-
34
-
35
-
36
-
37
-
38
-
39
-
40
-
41
-
 42
42 -
 43
43 -
 44
44 -
 45
45 -
 46
46 -
 47
47 -
 48
48 -
 49
49 -
 50
50 -
 51
51 -
 52
52 -
53
-
54
-
55
-
56
-
57
-
58
-
59
-
60
-
61
-
62
-
63
-
64
-
65
-
66
-
67
-
68
-
69
-
70
-
71
-
72
-
73
-
74
-
75
-
76
-
77
-
78
-
79
-
80
-
81
-
82
-
83
-
84
-
85
-
86
-
87
-
88
-
89
-
90
-
91
-
92
-
93
-
94
-
95
-
96
-
97
-
98
 |
 |