Bernina 1150MDA Owners Manual - Page 12
Notes, Sergers, Adjusting Tensions - used
 |
View all Bernina 1150MDA manuals
Add to My Manuals
Save this manual to your list of manuals |
Page 12 highlights
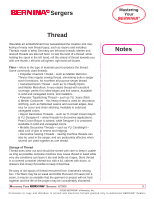
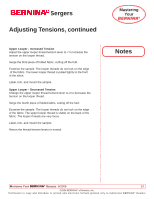
Sergers Adjusting Tensions Mastering Your BERNINA® Fabric 6 pieces firm fabric, each 3" x 6 1 piece of lightweight cotton, 3" x 4" Needle 80/12 Universal Thread 4 cones of serger thread yellow, red, green, blue) Presser Foot standard Stitch 4-thread overlock Notes Lower Looper - Increased Tension Thread the serger for a 4-thread overlock stitch using thread colors to match the color-coded threading path on the serger. Fold each piece of the firm fabric to 1½" x 4" and set aside. Locate the thread tension levers on the front of the serger. From left to right, these levers adjust tension for the Left Needle, Right Needle, Upper Looper, and the Lower Looper. Adjust the lower looper thread tension lever to 7 to increase the tension on the looper thread. Place the first piece of folded fabric under the presser foot with the fold to the right and serge to the end of the fabric, cutting off the fold. Examine the sample. The looper threads do not lock on the edge of the fabric. The upper looper thread is pulled tightly to the back of the stitch. The left needle thread may be pulled to the back of the stitch. Trim, label, and mount the sample. Lower Looper - Decreased Tension Change the lower looper thread tension lever to 2 to decrease the tension on the looper thread. Serge the second piece of folded fabric, cutting off the fold. Examine the sample. The looper threads do not lock on the edge of the fabric. The lower looper thread is visible on the face of the fabric. The looper threads are very loose. Label, trim, and mount the sample. Return the thread tension levers to normal. MASTERING YOUR BERNINA® SERGERS 6/2006 12 ©2006 BERNINA® of America, Inc. Permission to copy and distribute in printed and electronic formats granted only to Authorized BERNINA® Dealers
-
 1
1 -
2
-
3
-
4
-
5
-
6
-
 7
7 -
 8
8 -
 9
9 -
 10
10 -
 11
11 -
 12
12 -
 13
13 -
 14
14 -
 15
15 -
 16
16 -
 17
17 -
18
-
19
-
20
-
21
-
22
-
23
-
24
-
25
-
26
-
27
-
28
-
29
-
30
-
31
-
32
-
33
-
34
-
35
-
36
-
37
-
38
-
39
-
40
-
41
-
42
-
43
-
44
-
45
-
46
-
47
-
48
-
49
-
50
-
51
-
52
-
53
-
54
-
55
-
56
-
57
-
58
-
59
-
60
-
61
-
62
-
63
-
64
-
65
-
66
-
67
-
68
-
69
-
70
-
71
-
72
-
73
-
74
-
75
-
76
-
77
-
78
-
79
-
80
-
81
-
82
-
83
-
84
-
85
-
86
-
87
-
88
-
89
-
90
-
91
-
92
-
93
-
94
-
95
-
96
-
97
-
98
-
99
-
100
-
101
-
102
-
103
-
104
-
105
-
106
-
107
-
108
-
109
-
110
-
111
-
112
-
113
-
114
-
115
-
116
-
117
-
118
-
119
-
120
-
121
-
122
-
123
-
124
-
125
-
126
-
127
-
128
-
129
-
130
-
131
-
132
-
133
-
134
-
135
-
136
-
137
-
138
-
139
-
140
 |
 |
