Bernina 1150MDA Owners Manual - Page 30
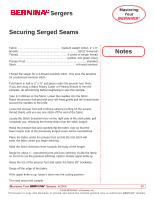
Notes, Sergers, Securing Serged Seams
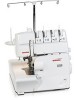 |
View all Bernina 1150MDA manuals
Add to My Manuals
Save this manual to your list of manuals |
Page 30 highlights
Sergers Securing Serged Seams Mastering Your BERNINA® Fabric medium weight cotton, 4" x 6" Needle 80/12 Universal Thread 4 cones of serger thread yellow, red, green, blue) Presser Foot standard Stitch 4-thread overlock Notes Thread the serger for a 4-thread overlock stitch. Fine tune the tensions for a balanced overlock stitch. Fold fabric in half to 2" x "6" and place under the presser foot. Note: If you are using a Wavy Rotary Cutter or Pinking Shears to trim the samples, do all trimming before beginning to sew this sample. Take 2-3 stitches on the fabric. Lower the needles into the fabric. Raise the presser foot and with your left hand gently pull the thread chain around the needles to the knife. Lower the presser foot and continue serging (cutting off the excess thread chain) until you are one stitch off the end of the fabric. Locate the Stitch Selection lever on the right side of the cloth plate; pull it towards you, releasing the thread chain from the stitch tongue. Raise the presser foot and carefully flip the fabric over so that the lower looper side of the previously serged seam will be overstitched. Place the fabric under the presser foot so that the first stitch will enter the fabric when you begin stitching. Slide the Stitch Selection lever towards the body of the serger. Serge for about 1", overstitching the previous stitching. Guide the fabric so as not to cut the previous stitching. Option: Rotate upper knife up. Raise the toe of the presser foot and rotate the fabric 90° clockwise. Serge off the edge of the fabric. If the upper knife is up, rotate it down into the cutting position. Trim and mount the sample MASTERING YOUR BERNINA® SERGERS 6/2006 30 ©2006 BERNINA® of America, Inc. Permission to copy and distribute in printed and electronic formats granted only to Authorized BERNINA® Dealers
-
 1
1 -
2
-
3
-
4
-
5
-
6
-
7
-
8
-
9
-
10
-
11
-
12
-
13
-
14
-
15
-
16
-
17
-
18
-
19
-
20
-
21
-
22
-
23
-
24
-
 25
25 -
 26
26 -
 27
27 -
 28
28 -
 29
29 -
 30
30 -
 31
31 -
 32
32 -
 33
33 -
 34
34 -
 35
35 -
36
-
37
-
38
-
39
-
40
-
41
-
42
-
43
-
44
-
45
-
46
-
47
-
48
-
49
-
50
-
51
-
52
-
53
-
54
-
55
-
56
-
57
-
58
-
59
-
60
-
61
-
62
-
63
-
64
-
65
-
66
-
67
-
68
-
69
-
70
-
71
-
72
-
73
-
74
-
75
-
76
-
77
-
78
-
79
-
80
-
81
-
82
-
83
-
84
-
85
-
86
-
87
-
88
-
89
-
90
-
91
-
92
-
93
-
94
-
95
-
96
-
97
-
98
-
99
-
100
-
101
-
102
-
103
-
104
-
105
-
106
-
107
-
108
-
109
-
110
-
111
-
112
-
113
-
114
-
115
-
116
-
117
-
118
-
119
-
120
-
121
-
122
-
123
-
124
-
125
-
126
-
127
-
128
-
129
-
130
-
131
-
132
-
133
-
134
-
135
-
136
-
137
-
138
-
139
-
140
 |
 |
