Bosch WTMC5521UC Operating, Care, Installation (all languages)
Bosch WTMC5521UC - 500 Plus Series Nexxt Clothes Dryer Manual
 |
View all Bosch WTMC5521UC manuals
Add to My Manuals
Save this manual to your list of manuals |
Bosch WTMC5521UC manual content summary:
- Bosch WTMC5521UC | Operating, Care, Installation (all languages) - Page 1
- Bosch WTMC5521UC | Operating, Care, Installation (all languages) - Page 2
care 19 Cleaning the dryer 19 Cleaning the lint filter 19 Cleaning the exhaust duct 19 Cleaning the moisture sensor 19 Cleaning the bearing shield 20 Change the light bulb 20 Troubleshooting 20 SERVICE and REPAIR 21 STATEMENT OF WARRANTIES BOSCH CLOTHES DRYERS 22 Exclusions 22 - Bosch WTMC5521UC | Operating, Care, Installation (all languages) - Page 3
gas supplier's instructions. q If you cannot reach your gas supplier, call the fire department. - Installation and service must be performed by a qualified installer, service agency or the gas supplier. dIMPORTANT SAFETY INSTRUCTIONS 1. Read all instructions before using the dryer. Bosch dryers - Bosch WTMC5521UC | Operating, Care, Installation (all languages) - Page 4
the dryer. Always contact your dealer, distributor, service agent or the manufacturer about any problems or conditions that you do not understand. C Follow also the Safety Information in the INSTALLATION INSTRUCTIONS and the OPERATING INSTRUCTIONS. GROUNDING INSTRUCTIONS This appliance must - Bosch WTMC5521UC | Operating, Care, Installation (all languages) - Page 5
plug provided with the appliance ć if it will not fit the outlet have a proper outlet installed by a qualified electrician or exchange the cord with an appropriate one rated for the dryer. KEEP THESE INSTRUCTIONS FOR FUTURE REFERENCE. In case of change of ownership, manual should be conveyed with - Bosch WTMC5521UC | Operating, Care, Installation (all languages) - Page 6
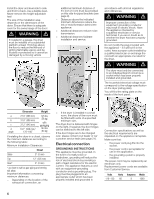
as gasĆpiping dryer door is delivered with hinges on the right. If required, the door hinges can be switched to the left side. If the door hinges are to be changed over, please contact your dealer or our customer service team (see page 21). Electrical connection GROUNDING INSTRUCTIONS This appliance - Bosch WTMC5521UC | Operating, Care, Installation (all languages) - Page 7
line connections must be teĆ sted for leaks prior to appliance operation. Apply soapy water to gas line connections and check for forĆ mation of new bubbles. Bubbles inĆ dicate leak! When installing the gas supply to the gas dryer inlet pipe, do not exceed 310 lbf in (35 Nm). d WARNING d Never use - Bosch WTMC5521UC | Operating, Care, Installation (all languages) - Page 8
included in standard delivery of the dryer. Accessories The parts required for the exhaust air system can be obtained from customer service or your local dealer. Please follow the installation instructions supplied by the appropriate manufacturer! Side exhaust kit part no. WTZ 1265 Note: The maximum - Bosch WTMC5521UC | Operating, Care, Installation (all languages) - Page 9
LP - Gas Kit part no. WTZ1280 The parts required for the LP version can be obtained from your local dealer. Please follow the installation instructions supplied by the appropriate manufacturer! If you have a propane gas dryer and need to convert it to natural gas, (Service Kit 496297) please consult - Bosch WTMC5521UC | Operating, Care, Installation (all languages) - Page 10
in the troubleshooting section (page 20) of the OPERATING INSTRUCTIONS and find the fault. Preparing to transport the dryer ć step by step 1. Close the shutĆoff valve. 2. Rotate the program selector to Off". 3. Pull out the power supply plug or turn off the circuit breaker. 4. Disconnect gas supply - Bosch WTMC5521UC | Operating, Care, Installation (all languages) - Page 11
OPERATING INSTRUCTIONS Your new dryer Open the door .... (colored marking) ....and close the door. Lint filter dCAUTION The access panel located on the bottom left of the dryer is for Service Access and is only to be opened by an Authorized or Qualified Service Technician. 11 - Bosch WTMC5521UC | Operating, Care, Installation (all languages) - Page 12
Serves as a reminder to clean the lint filter. Program selector Selects a program. See page 18 Can be rotated in both directions. To switch off the dryer, rotate the program selector to "Off". Indicator lights (LED) Indicate the current state of the drying process. 12 - Bosch WTMC5521UC | Operating, Care, Installation (all languages) - Page 13
a program d CAUTION Before using your dryer read and follow all installation and operatĆ ing instructions. Preparing the dryer i Check the lint filter. The filter should be cleaned before and after every drying process. Choose an option... Using the dryer rack (Option, see page 8) ...and - Bosch WTMC5521UC | Operating, Care, Installation (all languages) - Page 14
with a damp cloth. 8. Conduct an appliance test, see page 10. 9. If the dryer does not work, switch the dryer to "Off". Look in the troubleshooting section (page 20) of the operating instructions and find the fault. Temporary disconnection of the dryer Operate your dryer only when you are at home - Bosch WTMC5521UC | Operating, Care, Installation (all languages) - Page 15
textiles. The temperature of the drying process is reduced, the drying time is extended. Signal Your dryer outputs different signals, if the "Signal" button is pressed. Signal Type Start Short tone End Sequence is in Off-Position - turn off the circuit breaker and call for customer service! 15 - Bosch WTMC5521UC | Operating, Care, Installation (all languages) - Page 16
Program selection table Automatic programs For Cottons and coloreds made of cotton or linen. Press Delicates low temp." button for temperatureĆsensitive textiles. For laundry, Regular/Cottons" ECOSENSOR Automatic program Bed linen, table linen, towels Bed linen and table linen, towels, TĆ - Bosch WTMC5521UC | Operating, Care, Installation (all languages) - Page 17
are completely in the drum. 6. Close the door. The Start/Stop" indicator light continues flashing. i If the door has not been closed properly, the dryer will not start. i At program end an acoustic signal is emitted (if set) and the LED Wrinkle block" illuminates. i When the drying process is - Bosch WTMC5521UC | Operating, Care, Installation (all languages) - Page 18
up a towel and place the heels of the shoes on the towel. This will ensure a more uniform drying result. 3. Remove the lint filter. 4. Lift the dryer rack horizontally into the drum. 18 2. Place laundry loosely on the basket. Do not crush! Laundry must not touch the drum! Do not allow items - Bosch WTMC5521UC | Operating, Care, Installation (all languages) - Page 19
indicated drying time: q Fold the item of clothing so that the damp parts are on the outside. q Restart the program and reduce the drying duration dryer. q Vacuum and reconnect the duct. d WARNING d Remove gas connection before moving the dryer to clean the duct. Be careful not to destroy the gas - Bosch WTMC5521UC | Operating, Care, Installation (all languages) - Page 20
appliance bulb only (obtainable through parts department). q Replace the cover and secure with the screw. q Plug in dryer or reconnect power supply. Troubleshooting 4. Close the shutĆoff valve. 5. Call customer service (see page 21). Problem Dryer does not start. Start/Stop" indicator light does - Bosch WTMC5521UC | Operating, Care, Installation (all languages) - Page 21
dealer or installer or an authorized service center. Do not attempt to repair the appliance yourself. Any work performed by unauthorized personnel may void the warranty. If you are having a problem with your Bosch dryer and are not pleased with the service you have received: - First, please contact - Bosch WTMC5521UC | Operating, Care, Installation (all languages) - Page 22
STATEMENT OF WARRANTIES BOSCH CLOTHES DRYERS The warranties provided by BSH Home Appliances (``Bosch'') in this Statement of Warranties apply only to Bosch Clothes dryers sold to the first using purchaser by Bosch or its authorized dealers, retailers or service centers in the United States or - Bosch WTMC5521UC | Operating, Care, Installation (all languages) - Page 23
votre nouveau sècheĆlinge 33 Le bandeau de commande 34 Résumé des instructions 35 Informations de sécurit 36 Avant d'allumer le sècheĆlinge 36 Utilisation 42 Dérangement et remèdes 43 SERVICE ET RÉPARATIONS 44 DECLARATION DES GARANTIES SECHEĆLINGE BOSCH 45 Exclusions de garantie 45 23 - Bosch WTMC5521UC | Operating, Care, Installation (all languages) - Page 24
appareil font de ce dernier un assistant pratique au service de votre foyer. Ce sècheĆlinge Bosch offre les caractéristiques standard suivantes: - Système chose de particulier. AVERTISSEMENT: Assurez-vous de bien suivre les instructions données dans cette notice pour réduire au minimum le risque - Bosch WTMC5521UC | Operating, Care, Installation (all languages) - Page 25
toutes les instructions figurant dans cette notice avant d'utiliser le sècheĆlinge. A la livraison, les sècheĆlinge Bosch sont accompagnées flux d'air et provoquer une surchauffe. 13. Il faudrait que le personnel de service aprèsĆvente qualifié nettoie régulièrement l'intérieur de la machine et le - Bosch WTMC5521UC | Operating, Care, Installation (all languages) - Page 26
avec les instructions du fabricant peut provoquer des dommages corporels et/ou des dégâts matériels. 30. AVANT DE METTRE L'APPAREIL HORS SERVICE OU AU ces réglementations, à la réglementation nationale sur le gaz combustible (National Fuel Gas Code), à la norme ANSI Z223.1/NFPA 54 ou à la norme CAN/ - Bosch WTMC5521UC | Operating, Care, Installation (all languages) - Page 27
de récupérer de précieuses matières premières. Pour connaître les circuits de mise au rebut, veuillez consulter votre revendeur ou les services compétents de votre mairie. Avant d'installer le sècheĆlinge Déballage de l'appareil d PRUDENCE Ce sècheĆlinge est très lourd. Ne tentez pas de le - Bosch WTMC5521UC | Operating, Care, Installation (all languages) - Page 28
revendeur ou l'équipe du SAV (voir page 44). Branchement électrique Instructions de mise a terre Il faut impérativement raccorder ce sècheĆlinge vérification de l'appareil à un électricien agréé ou à un technicien du service aprèsĆvente. 28 Ne modifiez jamais la fiche mâle fournie avec l'appareil. - Bosch WTMC5521UC | Operating, Care, Installation (all languages) - Page 29
contacter votre revendeur ou notre équipe du service aprèsĆvente (voir page 44). Conduite du séchoir, ceci conformément au National Fuel Gas Code (Code national sur le gaz combustible), ANSI Z223 oiseaux ou d'animaux non domestiqués. Les sècheĆlinge Bosch ont été conçus pour rejeter la chaleur et la - Bosch WTMC5521UC | Operating, Care, Installation (all languages) - Page 30
- Sur la face inférieure de l'appareil. 2 1 3 1 ć Orifice de sortie d'air situé à l'arrière de l'appareil (standard) 2 ć Orifice de sortie d'air sur le côté (option) 3 ć Orifice de sortie d'air sur la face inférieure (option) A votre revendeur ou fournisseur de pièces, il faudra demander des - Bosch WTMC5521UC | Operating, Care, Installation (all languages) - Page 31
Accessoires Vous pouvez vous procurer les pièces requises par le système d'échappement d'air auprès du service aprèsĆvente ou de votre revendeur local. Veuillez s.v.p. respecter les instructions de pose fournies par le fabricant concerné. Kit de sortie par le côté N° de réf. WTZ 1265 Remarque : Le - Bosch WTMC5521UC | Operating, Care, Installation (all languages) - Page 32
sence d'un espace très exigu, nous recommandons de fixer l'orifice de départ du conduit d'échappement sur le sècheĆlinge avant d'amener le sècheĆ , ramenez le programĆ mateur sur «Off». Consultez la section de ces INSTRUCTIONS D'UTILISATION consacrée au dépannage (page 43) et essayez de localiser le - Bosch WTMC5521UC | Operating, Care, Installation (all languages) - Page 33
INSTRUCTIONS D'UTILISATION Présentation de votre nouveau sècheĆlinge. Ouvrez la porte ..... (repère en couleur) ...puis fermez-la. Filtre à peluches d PRUDENCE. La trappe d'accès située - Bosch WTMC5521UC | Operating, Care, Installation (all languages) - Page 34
Le bandeau de commande Bouton Start/Pause Ce bouton sert à faire démarrer, à interrompre et à mettre fin au processus de séchage. Boutons des options (ces options viennent compléter un programme si vous le souhaitez). Voir page 37. Delicates low temp. (Délicats basse température) Appuyez sur ce - Bosch WTMC5521UC | Operating, Care, Installation (all languages) - Page 35
d PRUDENCE Avant d'utiliser votre sècheĆlinge, veuillez lire et respecter toutes les instructions d'installation et d'utilisation. Préparation du sècheĆlinge i Vérifiez le filtre à peluches. Il faut nettoyer le filtre après et avant chaque séchage. Sélection d'un programme - Bosch WTMC5521UC | Operating, Care, Installation (all languages) - Page 36
matériaux inflammables, tels que des briquets. Le nonĆrespect de ces instructions peut engendrer un risque d'explosion ou d'incendie. Poue eviter Danger de mort nergie Pour économiser de l'énergie, de l'argent et du temps, Bosch vous recommande ceci : - Essorez suffisamment le linge. Avant le séchage - Bosch WTMC5521UC | Operating, Care, Installation (all languages) - Page 37
que pendant que vous vous trouvez à votre domicile. En prévision d'un départ en vacances ou si vous devez ne pas utiliser le sècheĆlinge pendant une à celle du caoutchouc. Conseils pour le séchage En principe, les instructions suivantes s'appliquent à tous les programmes de séchage : - Pour assurer - Bosch WTMC5521UC | Operating, Care, Installation (all languages) - Page 38
si vous avez appuyé sur le bouton «Signal». Signal Type Départ Signal bref Fin Séquence de tons courts DysfonctionneĆ ment Séquence de Off, ramenez le disjoncteur en position éteinte et prévenez le service aprèsĆvente. Tableau de sélection des programmes Programmes automatiques Pour le - Bosch WTMC5521UC | Operating, Care, Installation (all languages) - Page 39
Utilisation Utilisation du sècheĆlinge 1. Ouvrez la porte. 3. Amenez le programmateur sur le programme voulu. A l'aide du tableau de sélection, choisissez un programme adapté au linge présent dans le tambour (voir page 38). L'éclairage du sècheĆlinge s'allume dans le tambour. i Le voyant - Bosch WTMC5521UC | Operating, Care, Installation (all languages) - Page 40
le tambour. Veillez à ce qu'aucune pièce de linge ne pende du tiroir. 3. Refermez le hublot. 4. Pour utiliser un programme de durée, suivez les instructions de la page suivante. Séchage de chaussures sur le tiroir : 1. Préparez les chaussures. q Nettoyez les chaussures pour empêcher le tambour de se - Bosch WTMC5521UC | Operating, Care, Installation (all languages) - Page 41
q Retirez les semelles intérieures et les talonnettes. Choisissez un programme à durée définissable 2. Placez les chaussures sur le panier. q Directement sur le tiroir de séchage ou q Enroulez une serviette et placez les talons dessus. Ceci permettra d'obtenir un résultat de séchage plus uniforme. - Bosch WTMC5521UC | Operating, Care, Installation (all languages) - Page 42
ouvrez ce dernier. q Tournez l'ampoule en sens inverse des aiguilles d'une montre. RemplacezĆla par une ampoule neuve adaptée à l'appareil (fournie par le service aprèsĆvente). q Remettez le couvercle en place puis fixezĆle en position à l'aide de la vis. q Rebranchez la fiche mâle du sècheĆlinge - Bosch WTMC5521UC | Operating, Care, Installation (all languages) - Page 43
sur «Off». 2. Ramener le disconecteur en position éteinte. 3. Débranchez la fiche mâle de la prise de courant. 4. Fermez le robinet de gaz. 5. Appelez le service aprèsĆvente (voir page 44). Problème Le sècheĆlinge ne démarre pas. Le voyant «Start/Stop» ne s'allume pas. Linge resté mouille après le - Bosch WTMC5521UC | Operating, Care, Installation (all languages) - Page 44
au tableau de la page 51 avant d'appeler le service aprèsĆvente (SAV). Si des opérations de par contacter votre installateur ou l'entreprise de SAV Bosch agréée située dans votre région, et nous écrivant à l'adresse suivante, BSH Home Appliances 5551 McFadden Ave. Huntington Beach, CA 92649, - Bosch WTMC5521UC | Operating, Care, Installation (all languages) - Page 45
Appliances (ciĆaprès dénommé «Bosch») dans la présente déclaration s'appliquent exclusivement aux sècheĆlinge Bosch vendus par Bosch au premier acheteur par Bosch ou par ses revendeurs agréés, ses détaillants ou centres de service Ćlinge, pour fournir des instructions sur l'utilisation de cet - Bosch WTMC5521UC | Operating, Care, Installation (all languages) - Page 46
Limpieza de la protección del rodamiento 65 Cambiar la lamparilla 65 Localización de fallos 66 SERVICIO y REPARACIONES 67 DECLARACIÓN DE GARANTÍA PARA SECADORES PARA ROPA BOSCH 68 Exclusiones 68 46 - Bosch WTMC5521UC | Operating, Care, Installation (all languages) - Page 47
sumamente útil en su hogar. El secador Bosch presenta las siguientes características estándar: - su seguridad, las informaciones contenidas en este manual deben tenerse en cuenta a fin de minimizar u otros electrodomésticos. - SI SIENTE OLOR A GAS q No intente encender ningún electrodoméstico. q - Bosch WTMC5521UC | Operating, Care, Installation (all languages) - Page 48
todas las instrucciones antes de utilizar el secador. Los secadores Bosch se entregan con instrucciones de manejo, cuidado e instalación. . 7. No juegue con los controles. 8. No reparar o reemplazar ninguna parte del secador ni intentar cualquier tipo de servicio a menos que haya sido recomendado - Bosch WTMC5521UC | Operating, Care, Installation (all languages) - Page 49
POSTERIORES. En caso de un cambio de propietario, este manual debe entregarse conjuntamente con el secador. INSTRUCCIONES PARA LA PUESTA de 7700 ft (2350 m) sin más modificaciones en los componentes de gas natural o gas propano. Información sobre eliminación de residuos Eliminación del embalaje d - Bosch WTMC5521UC | Operating, Care, Installation (all languages) - Page 50
y nivélelo un lado respecto del otro y la parte anterior respecto de la parte posterior. Utilice un nivel de alcohol. ¡Nunca desenrosque 0" (0 mm) * tan cerca de la pared como lo permita la tubería de gas y de ventilación Información importante respecto de las distancias mínimas: - Dependiendo de la - Bosch WTMC5521UC | Operating, Care, Installation (all languages) - Page 51
características). La chapa de características la encontrará en la parte interior del panel frontal. Las especificaciones de la conexión al nuevas. ¡Éstas señalan las pérdidas! Cuando instale la alimentación de gas al tubo de ingreso de gas del secador, no exceda 310 lbf in (35 Nm). d ADVERTENĆ - Bosch WTMC5521UC | Operating, Care, Installation (all languages) - Page 52
B149.2. Se recomienda instalar una válvula de paso manual dentro de los 6 ft (1.8 m) antes del conexión de gas Tubo de gas para el secador El tubo de gas que sale de la parte posterior del la entrada de pájaros u otros animales. Los secadores Bosch se han construido para que el aire de secado sea - Bosch WTMC5521UC | Operating, Care, Installation (all languages) - Page 53
de salida se obtienen del servicio técnico para cada tipo de conexión (ver página 53): - Salida de aire lateral - Salida de aire por la parte inferior El cambio de la salida de aire y una conexión opcional, debe efectuarla un técnico calificado. Tubería Para asegurar un rendimiento máximo, la tuber - Bosch WTMC5521UC | Operating, Care, Installation (all languages) - Page 54
Kit N° de parte: WTZ1280 Las partes necesarias para la conversión lp, pueden obtenerse del comerciante de la zona. ¡Rogamos se tengan en cuenta las instrucciones suministradas por el fabricante adecuado! Si usted posee un secador a gas propano y desea convertirlo a gas natura, (Service Kit 496297 - Bosch WTMC5521UC | Operating, Care, Installation (all languages) - Page 55
este caso se dañarían tanto los pies ajustables, como la parte inferior del secador. 10. Posicione y nivele luego el secador. El secador «Off». 3. Desconecte el enchufe de alimentación. 4. Desconecte el alimentación de gas. 5. Desconecte el tubo de ventilación de la salida correspondiente en el secador - Bosch WTMC5521UC | Operating, Care, Installation (all languages) - Page 56
Abra la puerta .... (con la marca en colore) ...y cierre la puerta. Filtro de pelusas dCUIDADO: el panel de acceso ubicado en la parte inferior izquierda de la secadora, es exclusivaĆ mente para tareas de service y debe ser abierto solamente por personal debidamente autorizaĆ do y capacitado. 56 - Bosch WTMC5521UC | Operating, Care, Installation (all languages) - Page 57
Panel de manejo Botón Start/Stop (Arranque y parada) Arranca, interrumpe y para el proceso de secado. Botones para seleccionar las opciones (adicionales a los programas, si así se lo requiere). Ver página 60. Delicates low temp. (Ropa fina baja temperatura) Accione este botón cuando se trata de - Bosch WTMC5521UC | Operating, Care, Installation (all languages) - Page 58
Resumen de instrucciones Selección de un programa Uso de la canastilla (Accesorio, ver página 53) d CUIDADO Antes de usar su secador lea y tenga en cuenta todas las instrucciones de instalación y funcionamiento. Preparación del secador i Controle el filtro de pelusas. Debe limpiárselo antes y - Bosch WTMC5521UC | Operating, Care, Installation (all languages) - Page 59
partes sobresalientes del mismo. ¡Peligro de quebraduras! Protección del medio ambiente Consejos para la racionalización de energía Bosch primera vez: 1. Lea este manual de instrucciones cuidadosamente. 2. Controle W.C./ 3.49 kPa/ 0.506 psig.(Gas Natural o Gas Propano) 5. Quite todos los objetos - Bosch WTMC5521UC | Operating, Care, Installation (all languages) - Page 60
Desconexión temporal del secador Haga funcionar su secador únicamente cuando está en su casa. Si tiene intención de irse de vacaciones o no va a usar el secador por un tiempo prolongado: 1. Corte el conmutador de alimentación. 2. Cierre la válvula de paso. 3. Si es posible, desconecte el enchufe de - Bosch WTMC5521UC | Operating, Care, Installation (all languages) - Page 61
Signal (Señal) Su secador emite diversos sonidos si se presiona el botón «señal». Señal Tipo Arranque Sonido corto Fin de programa Secuencia de sonidos cortos Fallo en el funcionamiento Secuencia de sonidos prolongados Advertencia de mal Secuencia de funcionamiento sonidos prolongados i - Bosch WTMC5521UC | Operating, Care, Installation (all languages) - Page 62
Funcionamiento Uso del secador 3. Gire el selector de programas al programa deseado. Selecciones el programa que corresponda a la ropa colocada en el secador de la tabla correspondiente (ver página 61). Se enciende la luz en el interior del secador. i La luz indicadora «Start/Stop» comienza a - Bosch WTMC5521UC | Operating, Care, Installation (all languages) - Page 63
para evitar que el tambor se ensucie. q Al preparar el calzado, extienda la lengua de los mismos. q Afloje o quite los cordones. q Extraiga partes adicionales como plantillas. 6. Coloque el filtro para la pelusa. !Éste debe insertarse de modo que quede alineado con el borde del tambor! 2. Coloque - Bosch WTMC5521UC | Operating, Care, Installation (all languages) - Page 64
/Stop» quedará encendida permanentemente. 3. Si la prenda aún presenta una humedad residual después del secado: q pliegue la prenda de modo que las partes húmedas están hacia fuera, q vuelva a hacer arrancar el proceso de secado y selecciones un tiempo de secado menor, según el grado de humedad - Bosch WTMC5521UC | Operating, Care, Installation (all languages) - Page 65
lvalo a conectar. d ADVERTENĆ CIA d Desconecte las conexiones de gas antes de mover el secador a fin de limpiar el conducto. Sea cuidadoso de no enchufe de alimentación. q Abra la puerta y localice la lamparilla en la parte superior izquierda del la junta. q Afloje el tornillo de la cobertura y - Bosch WTMC5521UC | Operating, Care, Installation (all languages) - Page 66
Localización de fallos d ADVERTENCIA d ¡Existe riesgo de descargas eléctricas! ¡Peligro de explosiones! Eventuales reparaciones debe efectuarlas exclusivamente un técnico autorizado. Antes de llamar el servicio a clientes, controle si no puede reparar el fallo usted mismo, consultando la esta - Bosch WTMC5521UC | Operating, Care, Installation (all languages) - Page 67
en contacto con su instalador o bien el servicio autorizado y contratado Bosch de su zona, explicando porque no está conforme. explicando a que solucionado a su satisfacción, háganoslo saber, o bien escribiendo a: BSH Home Appliances 5551 McFadden Ave. Huntington Beach, CA 92649 O bien llámenos a - Bosch WTMC5521UC | Operating, Care, Installation (all languages) - Page 68
DECLARACIÓN DE GARANTÍA PARA SECADORES PARA ROPA BOSCH Las garantías brindadas por BSH Home Appliances («Bosch») en esta declaración son aplicables únicamente a secadores Bosch vendidos al consumidor final por Bosch o sus comerciantes autorizados, revendedores o centros de servicio en los Estados
-
 1
1 -
 2
2 -
 3
3 -
 4
4 -
 5
5 -
 6
6 -
 7
7 -
8
-
9
-
10
-
11
-
12
-
13
-
14
-
15
-
16
-
17
-
18
-
19
-
20
-
21
-
22
-
23
-
24
-
25
-
26
-
27
-
28
-
29
-
30
-
31
-
32
-
33
-
34
-
35
-
36
-
37
-
38
-
39
-
40
-
41
-
42
-
43
-
44
-
45
-
46
-
47
-
48
-
49
-
50
-
51
-
52
-
53
-
54
-
55
-
56
-
57
-
58
-
59
-
60
-
61
-
62
-
63
-
64
-
65
-
66
-
67
-
68
 |
 |