Brother International 925D Users Manual - Multi - Page 12
Aguja
 |
View all Brother International 925D manuals
Add to My Manuals
Save this manual to your list of manuals |
Page 12 highlights
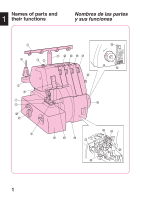
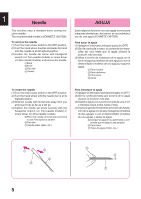
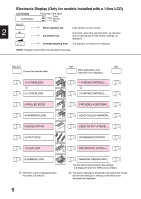
1 Needle This machine uses a standard home sewing machine needle. The recommended needle is SCHMETZ 130/705H. To remove the needle (1) Turn the main power switch to the OFF position. (2) Turn the hand wheel counter-clockwise by hand until the needle is at its highest position. (3) Loosen the needle set screw with hexagonal wrench (on Two-needle models) or screw driver (on One-needle models) and remove the needle. 1 Back 2 Front 3 Flat side 4 Groove AGUJA Está máquina funciona con una aguja normal para máquinas domésticas. Así mismo, se recomienda el uso de una aguja SCHMETZ 130/705H. Para sacar la aguja (1) Apague el interruptor principal (posición OFF). (2) Gire la ruedecilla a mano, en contra de las mane- cillas del reloj hasta que la aguja alcance la posición más elevada. (3) Afloje el tornillo de instalación de la aguja con la llave hexagonal (modelos de dos agujas) o con el destornillador (modelos de una aguja) y saque la aguja. 1 Parte trasera 2 Parte delantera 3 Parte llana 4 Canal To insert the needle (1) Turn the main power switch to the OFF position. (2) Turn the hand wheel until the needle bar is at its highest position. (3) Hold the needle with its flat side away from you and insert it up as far as it will go. (4) Tighten the needle set screw securely with the hexagonal wrench (on Two-needle models) or screw driver (on One-needle models). 5 Place the needle on its flat side and check to see if the space is parallel. 6 Flat side 7 (needle-plate, glass, etc.) Para introducir la aguja (1) Apague el interruptor principal (póngalo en OFF). (2) Gire la ruedecilla hasta que la barra de la aguja alcance la posición más alta. (3) Sujete la aguja con la parte curvada de cara a Vd. e insértela hacia arriba hasta el tope. (4) Vuelva a apretar firmemente el tornillo de instala- ción de la aguja con la llave hexagonal (modelos de dos agujas) o con el destornillador (modelos de una aguja) y saque la aguja. 5 Coloque la aguja en su parte llana y compruebe que el espacio sea paralelo. 6 Parte llana 7 Placa de aguja (Vidrio, etc.) 1 3 2 4 5 6 7 5
-
 1
1 -
2
-
3
-
4
-
5
-
6
-
 7
7 -
 8
8 -
 9
9 -
 10
10 -
 11
11 -
 12
12 -
 13
13 -
 14
14 -
 15
15 -
 16
16 -
 17
17 -
18
-
19
-
20
-
21
-
22
-
23
-
24
-
25
-
26
-
27
-
28
-
29
-
30
-
31
-
32
-
33
-
34
-
35
-
36
-
37
-
38
-
39
-
40
-
41
-
42
-
43
-
44
-
45
-
46
-
47
-
48
-
49
-
50
-
51
-
52
-
53
-
54
-
55
-
56
-
57
-
58
-
59
-
60
-
61
-
62
-
63
-
64
-
65
-
66
-
67
-
68
-
69
-
70
-
71
-
72
-
73
 |
 |