Brother International 925D Users Manual - Multi - Page 34
Enhebrado de la aguja, izquierda.
 |
View all Brother International 925D manuals
Add to My Manuals
Save this manual to your list of manuals |
Page 34 highlights
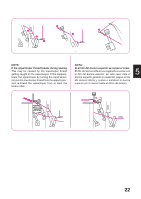
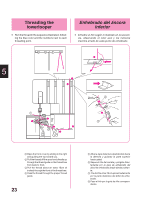
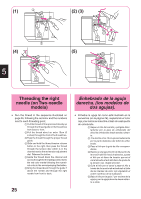
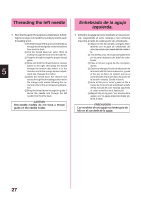
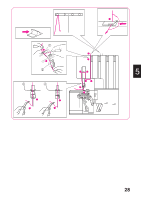
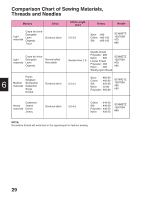
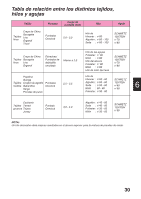
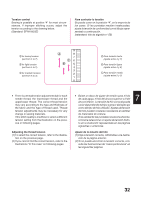
Threading the left needle 5 • Run the thread in the sequence illustrated, following the orange color and the numbers next to each threading point. 1 Pull the thread off the spool and directly up through the thread guide on the thread tree from back to front. 2 Pull the thread about an extra 15cm (6 inches) through the front of the thread tree. 3 Pass the thread through the proper thread guide. 4 Slide and hold the thread tension release button to the right, then pass the thread through the tension disc which is in the channel next to the orange tension adjustment dial. Release the button. 5 Guide the thread down the channel and across through the threading points next to the orange color marks following the numerical order in the accompanying illustration. 6 Bring the thread down through the guide 7 above the needle and through the left needle from front to back. CAUTION One-needle models do not have a thread guide on the needle holder. Enhebrado de la aguja izquierda. • Enhebre la aguja tal como ilustrado en la secuencia, respetando el color naranja y los números inscritos al lado de cada punto de enhebrado. 1 Saque el hilo del carrete y póngalo directamente por la guía de enhebrado del árbol de enhebrado desde detrás a delante. 2 Tire del hilo otros 15 cm aproximadamente por la parte delantera del árbol de enhebrado. 3 Pase el hilo por la guía de hilo correspondiente. 4 Deslice y retenga el botón de liberación de la tensión del hilo hacia la derecha, y pase el hilo por el disco de tensión que es el canal situado al lado del disco de ajuste de la tensión naranja. Suelte el botón. 5 Guíe el hilo por el canal y pase el hilo a través de los puntos de enhebrado al lado de las marcas de color naranja siguiendo el orden numérico de la ilustración. 6 Baje el hilo por la guía 7 por encima de la aguja y por la aguja izquierda desde delante a atrás. PRECAUCION Los modelos de una aguja no tienen guía de hilo en el corchete de la aguja. 27
-
 1
1 -
2
-
3
-
4
-
5
-
6
-
7
-
8
-
9
-
10
-
11
-
12
-
13
-
14
-
15
-
16
-
17
-
18
-
19
-
20
-
21
-
22
-
23
-
24
-
25
-
26
-
27
-
28
-
 29
29 -
 30
30 -
 31
31 -
 32
32 -
 33
33 -
 34
34 -
 35
35 -
 36
36 -
 37
37 -
 38
38 -
 39
39 -
40
-
41
-
42
-
43
-
44
-
45
-
46
-
47
-
48
-
49
-
50
-
51
-
52
-
53
-
54
-
55
-
56
-
57
-
58
-
59
-
60
-
61
-
62
-
63
-
64
-
65
-
66
-
67
-
68
-
69
-
70
-
71
-
72
-
73
 |
 |