Brother International 925D Users Manual - Multi - Page 58
Examples of Sewing, Applications for this, Serger
 |
View all Brother International 925D manuals
Add to My Manuals
Save this manual to your list of manuals |
Page 58 highlights
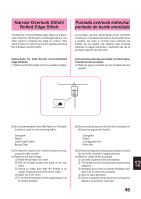
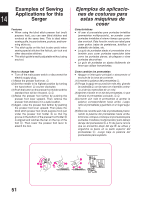
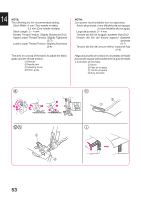
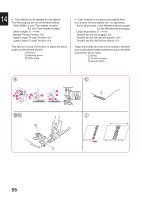
Examples of Sewing Applications for this 14 Serger Features • When using the blind stitch presser foot (multi purpose foot), you can sew blind stitches and overlock at the same time. This is ideal when sewing cuffs, trouser bottoms, pockets, and hemming skirts etc. • The stitch guide on this foot is also useful when sewing special stitches like flatlock, pin tuck and other decorative stitches. • This stitch guide is easily adjustable without using any tool. How to change feet • Turn off the main power switch or disconnect the electric supply plug. (1) Raise the presser foot lever. 1 (2) Set the needle to its highest position by turning the hand wheel 2 counter clockwise. (3) Push the button on the presser foot holder and the standard foot will be released. 3 4 (4) Raise the presser foot farther by pushing the presser foot lever upward. Then remove the presser foot and store it in a safe location. (5) Again, raise the presser foot farther by pushing the presser foot lever upward. Then place the blind stitch presser foot (multi purpose foot) just under the presser foot holder A so that the groove in the bottom of the presser foot holder B is aligned and catches the bar on the top of the foot C. Then lower the presser foot lever to attatch the foot. Ejemplos de aplicaciones de costuras para estas máquinas de coser Características • Al usar el prensatelas para puntadas invisibles (prensatelas multipropósito), se pueden coser puntadas invisibles al mismo tiempo que puntadas overlock. Esta función revela ser ideal para coser puños, bajos de pantalones, bolsillos, el dobladillo de faldas, etc. • La guía de puntadas atada al prensatelas sirve también para coser puntadas especiales tales como las puntadas planas, de pliegues o otras puntadas decorativas. • La guía de puntadas se ajusta fácilmente sin tener que utilizar herramientas. Como cambiar los prensatelas • Apague el interruptor principal o desconecte el enchufe de la toma de corriente. (1) Levante la palanca del prensatelas 1. (2) Ponga la aguja en su posición más alta, girando la ruedecilla 2 con la mano en el sentido contrario al de las manecillas de un reloj. (3) Apriete el botón en el eje del prensatelas, lo que liberará el prensatelas colocado. 3 4 (4) Levante aún más el prensatelas al apretar la palanca correspondiente hacia arriba. Luego, retire el prensatelas y guárdelo en un lugar seguro. (5) Otra vez, levante aún más el prensatelas presionando la palanca del prensatelas hacia arriba. Entonces, coloque el coloque el prensatelas para puntadas invisibles (multipropósito) justo debajo del eje del prensatelas A a fin de que la ranura que se encuentra abajo del eje B se alinee y enganche la barra en la parte superior del prensatelas C. Luego baje la palanca del prensatelas para sujetarlo. a 41 2 A 1 2 B 3 C4 51
-
 1
1 -
2
-
3
-
4
-
5
-
6
-
7
-
8
-
9
-
10
-
11
-
12
-
13
-
14
-
15
-
16
-
17
-
18
-
19
-
20
-
21
-
22
-
23
-
24
-
25
-
26
-
27
-
28
-
29
-
30
-
31
-
32
-
33
-
34
-
35
-
36
-
37
-
38
-
39
-
40
-
41
-
42
-
43
-
44
-
45
-
46
-
47
-
48
-
49
-
50
-
51
-
52
-
 53
53 -
 54
54 -
 55
55 -
 56
56 -
 57
57 -
 58
58 -
 59
59 -
 60
60 -
 61
61 -
 62
62 -
 63
63 -
64
-
65
-
66
-
67
-
68
-
69
-
70
-
71
-
72
-
73
 |
 |