Brother International 925D Users Manual - Multi - Page 63
Costuras de pliegues pe, queños con prensatelas, multipropósito
 |
View all Brother International 925D manuals
Add to My Manuals
Save this manual to your list of manuals |
Page 63 highlights
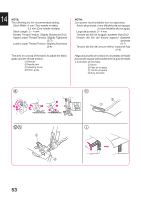
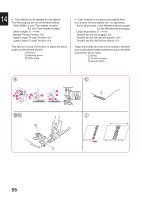
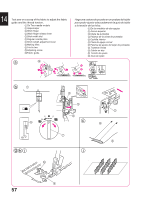
Pin tuck stitching with blind stitch presser foot The Pin tuck stitch uses a rolled edge to add shape and decoration to any sewing project. Fold the fabric on a line where the pin tuck is to be located and guide the fold through the serger. Contrasting thread in the upper looper adds an accent to your project. Use the blind stitch presser foot to make narrow overlock stitches to produce seams in the form of tucks at equal distances from each other. For thin fabrics, it's a good idea to choose a fine thread which will run smoothly. a Replace the presser foot with a blind stitch presser foot (multi purpose presser foot). (Refer to page 45.) b Set up the machine for narrow overlock stitching. (Refer to pages 46-50.) c Draw equally spaced lines on the fabric with a fabric pencil as guides for pin tuck placement. Fold the fabric along one of the lines and press in place lightly with an iron. d Turn the handwheel counterclockwise to set the needle at its highest position. e Lift the presser foot lever and insert the fabric with the folded edge in such a way that the needle pierces just the folded edge. f Lower the presser foot lever, adjust the fabric guide toward the folded edge. g Align the blind stitch presser foot guide with the line on the right side of the stitch finger. By turning the screw forward (toward you) the stitch guide will go to the right. By turning the screw backward (away from you) the stitch guide will go to the left. h Align the fold with the guide and insert the fabric up to the needle position. i Guide the fold in the fabric to sew half way between the needle and the upper knife. j Continue sewing until all marked lines have been sewn. • Correct minor contractions by hand. 14 Costuras de pliegues pe- queños con prensatelas multipropósito Las puntadas de pliegues pequeños usan un borde enrollado para agregar cierta forma y decoración a cualquier obra de costura. Doble el tejido en una línea donde quiere situar los pliegues y guie el doblado por la máquina. Un hilo de color que contraste en el áncora superior añade cierta nota a su obra. Utilice el prensatelas multipropósito para coser puntadas overlock en flecha y producir costuras como pliegues a igual distancia cada una de la otra. Para tejidos finos, le sugerimos elegir un hilo fino que corre fácilmente. a Cambie el prensatelas por un prensatelas para puntadas invisibles (prensatelas multipropósito) (véase página 45). b Ajuste la máquina en la puntada overlock estrecha (véase páginas 46-50). c Con un lápiz especial de costura, dibuje líneas en el tejido a igual distancia las unas de las otras para que sirvan de guías en la ubicación de los pliegues. Doble el tejido a lo largo de una línea y plánchelo un poco. d Gire la ruedecilla en el sentido contrario al de las manecillas de un reloj y ponga la aguja en su posición más alta. e Levante la palanca del prensatelas e inserte el tejido con el borde doblado a la izquierda para que la aguja pique justo en el borde doblado al coser. f Baje la palanca del prensatelas y ajuste la guía de tejido hacia el borde doblado. g Alinee la guía del prensatelas para puntadas invisibles en la línea a la derecha de la uñeta de puntadas. Al girar el tornillo hacia delante (hacia usted), la guía de tejido se desplazará hacia la derecha y al girarlo hacia atrás (alejándose de usted), la guía de tejido se desplazará a la izquierda. h Alinee el doblado con la guía e inserte el tejido hasta la posición de la aguja. i Guie el doblado del tejido para coser a medio camino entre la aguja y la cuchilla superior. j Siga cosiendo hasta que todas las líneas marcadas hayan sido cosidas. • Corrija las arrugas menores con la mano. 56
-
 1
1 -
2
-
3
-
4
-
5
-
6
-
7
-
8
-
9
-
10
-
11
-
12
-
13
-
14
-
15
-
16
-
17
-
18
-
19
-
20
-
21
-
22
-
23
-
24
-
25
-
26
-
27
-
28
-
29
-
30
-
31
-
32
-
33
-
34
-
35
-
36
-
37
-
38
-
39
-
40
-
41
-
42
-
43
-
44
-
45
-
46
-
47
-
48
-
49
-
50
-
51
-
52
-
53
-
54
-
55
-
56
-
57
-
 58
58 -
 59
59 -
 60
60 -
 61
61 -
 62
62 -
 63
63 -
 64
64 -
 65
65 -
 66
66 -
 67
67 -
 68
68 -
69
-
70
-
71
-
72
-
73
 |
 |