Brother International BAS-342G Instruction Manual - English - Page 16
Tilting back and returning the machine head, may become unbalanced and fall down
 |
View all Brother International BAS-342G manuals
Add to My Manuals
Save this manual to your list of manuals |
Page 16 highlights
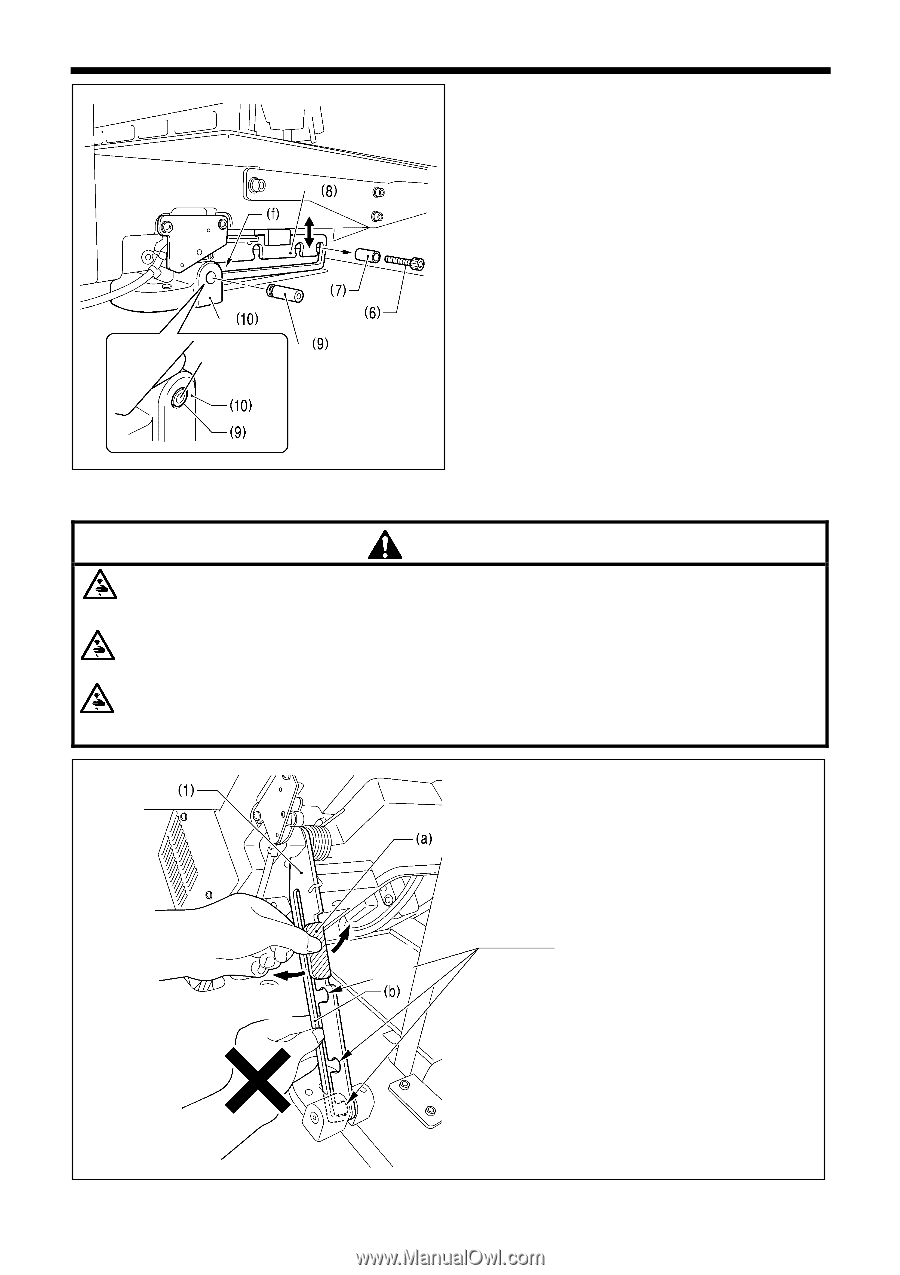
4. INSTALLATION Flush 2. After placing the machine head onto the table, remove the bolt (6) and the spacer (7). * The bolt (6) and the spacer (7) are necessary for securing the support lever (8) when the machine head is removed from the table, so keep them in a safe place. 3. Pass the support lever shaft (9) through the hole in the support lever base (10) and through the groove (f) in the support lever (8), and push it in until it is flush with the surface of the support lever base (10). * If it is difficult to pass the support lever shaft (9) through the groove (f) in the support lever (8), move the end of the support lever (8) up and down while passing the support lever shaft (9) through. 3966M 4-5. Tilting back and returning the machine head CAUTION Hold the machine head with both hands when tilting it back or returning it to its original position. In addition, do not subject the machine head to extra force while it is tilted back. If this is not observed, the machine head may become unbalanced and fall down, and serious injury or damage to the sewing machine may result. Always be sure to engage the stopper of the support lever (1) when tilting back the machine head. If the stopper is not engaged, the machine head may return to its original position and your hands may get caught and injury may result. When disengaging the stopper, hold it by the knob (a). If you hold at the place indicated by (b), your hand will get caught between the support lever (1) and the table when the machine head is returned to its original position and injury will result. Engaging the stopper Disengaging the stopper The machine head can be tilted back and returned to one of three heights. 3967M 7 BAS-342G
-
 1
1 -
2
-
3
-
4
-
5
-
6
-
7
-
8
-
9
-
10
-
 11
11 -
 12
12 -
 13
13 -
 14
14 -
 15
15 -
 16
16 -
 17
17 -
 18
18 -
 19
19 -
 20
20 -
 21
21 -
22
-
23
-
24
-
25
-
26
-
27
-
28
-
29
-
30
-
31
-
32
-
33
-
34
-
35
-
36
-
37
-
38
-
39
-
40
-
41
-
42
-
43
-
44
-
45
-
46
-
47
-
48
-
49
-
50
-
51
-
52
-
53
-
54
-
55
-
56
-
57
-
58
-
59
-
60
-
61
-
62
-
63
-
64
-
65
-
66
-
67
-
68
-
69
-
70
-
71
-
72
-
73
-
74
-
75
-
76
-
77
-
78
-
79
-
80
-
81
-
82
-
83
-
84
 |
 |