Brother International BAS-342G Instruction Manual - English - Page 35
Setting 2-step operation for the work clamp, PREPARATION BEFORE SEWING
 |
View all Brother International BAS-342G manuals
Add to My Manuals
Save this manual to your list of manuals |
Page 35 highlights
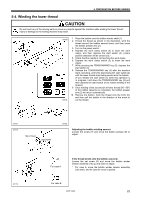
5. PREPARATION BEFORE SEWING 5-8. Setting 2-step operation for the work clamp 4009M When these settings are made, the work clamp (1) can be lowered in two steps. 1st step 2nd step Intermediate position 1st step 2nd step 1. Set memory switch No. 002 to "1". (Refer to "7-2. Setting memory switches".) 2. With the work clamp (1) raised, loosen the wing screw (2). 3. Move the work clamp stopper (3) up or down to determine the intermediate position, and then tighten the wing screw (2) to secure the work clamp stopper (3) in place. 4. Depress the work clamp switch (4) to the 1st step and check the intermediate position for the work clamp. 5. Depress the work clamp switch (4) to the 2nd step to fully lower the work clamp. * 2-step work clamp operation is enabled when memory switch No. 002 is set to "1". * Do not set memory switch No. 002 to "2". 4010M 1. Set memory switch No. 002 to "0". (Refer to "7-2. Setting memory switches".) 2. With the work clamp (1) raised, loosen the wing screw (2). 3. Move the work clamp stopper (3) to its highest position, and then tighten the wing screw (2) to secure the work clamp stopper (3) in place. 4011M BAS-342G 26
-
 1
1 -
2
-
3
-
4
-
5
-
6
-
7
-
8
-
9
-
10
-
11
-
12
-
13
-
14
-
15
-
16
-
17
-
18
-
19
-
20
-
21
-
22
-
23
-
24
-
25
-
26
-
27
-
28
-
29
-
 30
30 -
 31
31 -
 32
32 -
 33
33 -
 34
34 -
 35
35 -
 36
36 -
 37
37 -
 38
38 -
 39
39 -
 40
40 -
41
-
42
-
43
-
44
-
45
-
46
-
47
-
48
-
49
-
50
-
51
-
52
-
53
-
54
-
55
-
56
-
57
-
58
-
59
-
60
-
61
-
62
-
63
-
64
-
65
-
66
-
67
-
68
-
69
-
70
-
71
-
72
-
73
-
74
-
75
-
76
-
77
-
78
-
79
-
80
-
81
-
82
-
83
-
84
 |
 |
