Brother International BAS-342G Instruction Manual - English - Page 64
STANDARD ADJUSTMENTS, 11-1. Adjusting the thread take-up spring
 |
View all Brother International BAS-342G manuals
Add to My Manuals
Save this manual to your list of manuals |
Page 64 highlights
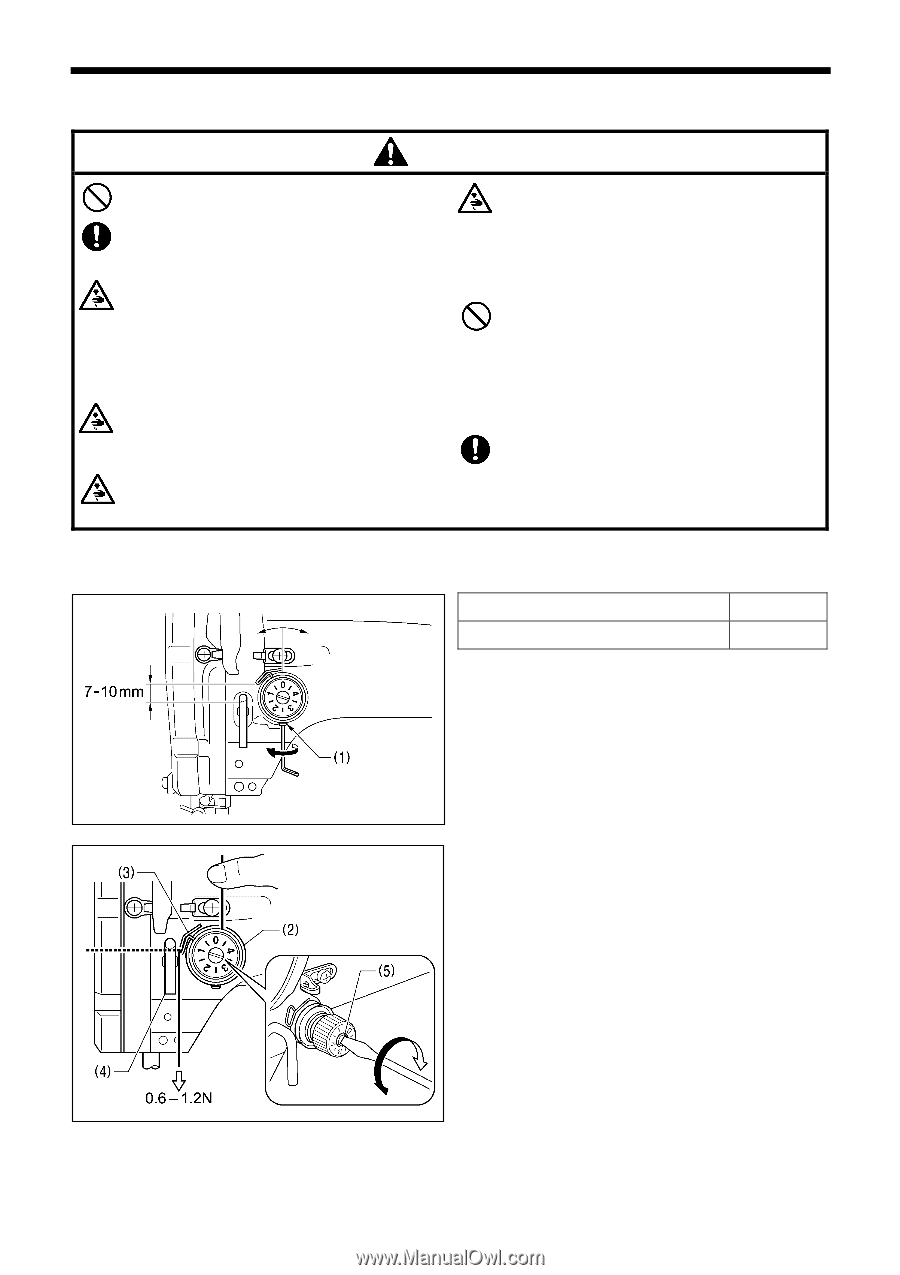
11. STANDARD ADJUSTMENTS 11. STANDARD ADJUSTMENTS CAUTION Maintenance and inspection of the sewing machine should only be carried out by a qualified technician. Ask your Brother dealer or a qualified electrician to carry out any maintenance and inspection of the electrical system. Turn off the power switch and disconnect the power cord before carrying out the following operations. If the foot switch is depressed by mistake, the sewing machine might start operating and injury could result. • Inspection, adjustment and maintenance • Replacing consumable parts such as the rotary hook Disconnect the air hoses from the air supply and wait for the needle on the pressure gauge to drop to "0" before carrying out inspection, adjustment and repair of any parts which use the pneumatic equipment. If the power switch and air need to be left on when carrying out some adjustment, be extremely careful to observe all safety precautions. Hold the machine head with both hands when tilting it back or returning it to its original position. In addition, do not subject the machine head to extra force while it is tilted back. If this is not observed, the machine head may become unbalanced and fall down, and serious injury or damage to the sewing machine may result. Be sure to wear protective goggles and gloves when handling the lubricating oil and grease, so that they do not get into your eyes or onto your skin. If the oil and grease get into your eyes or onto your skin, inflammation can result. Furthermore, do not drink or eat the lubricating oil or grease. They may cause diarrhea or vomiting. Keep the oil out of the reach of children. If any safety devices have been removed, be absolutely sure to re-install them to their original positions and check that they operate correctly before using the machine. 11-1. Adjusting the thread take-up spring Lower Higher Thread take-up spring height (mm) Thread take-up spring tension (N) 7 − 10 0.6 − 1.2 Loosen the set screw (1) and turn the adjuster to adjust. 4029M 1. Press the upper thread slightly above the tension bracket (2) with a finger to stop the thread spooling out. 2. Pull the upper thread downward so that the thread take-up spring (3) is extended to the same height as the base of the thread guide arm (4), and then measure the tension of the thread take-up spring (3). 3. Use a screwdriver to turn the tension stud (5) in order to adjust the tension of the thread take-up spring (3). Stronger Weaker 4030M NOTE: If the thread tension spring (3) is not adjusted correctly, the upper thread trailing length will be uneven after thread trimming. 55 BAS-342G
-
 1
1 -
2
-
3
-
4
-
5
-
6
-
7
-
8
-
9
-
10
-
11
-
12
-
13
-
14
-
15
-
16
-
17
-
18
-
19
-
20
-
21
-
22
-
23
-
24
-
25
-
26
-
27
-
28
-
29
-
30
-
31
-
32
-
33
-
34
-
35
-
36
-
37
-
38
-
39
-
40
-
41
-
42
-
43
-
44
-
45
-
46
-
47
-
48
-
49
-
50
-
51
-
52
-
53
-
54
-
55
-
56
-
57
-
58
-
 59
59 -
 60
60 -
 61
61 -
 62
62 -
 63
63 -
 64
64 -
 65
65 -
 66
66 -
 67
67 -
 68
68 -
 69
69 -
70
-
71
-
72
-
73
-
74
-
75
-
76
-
77
-
78
-
79
-
80
-
81
-
82
-
83
-
84
 |
 |