Brother International BAS-342G Thread Break Detector Instruction Manual - Engl
Brother International BAS-342G Manual
 |
View all Brother International BAS-342G manuals
Add to My Manuals
Save this manual to your list of manuals |
Brother International BAS-342G manual content summary:
- Brother International BAS-342G | Thread Break Detector Instruction Manual - Engl - Page 1
THREAD BREAKAGE DETECTOR DETECTOR DE RUPTURA DE HILO BAS-311G, 326G, 342G 目 次 CONTENTS 1 2 2 5 2-1 5 2-2 6 3 7 4 9 5 11 6 E600]が sensor sensitivity 9 5. Setting memory switches 11 6. If error code [E600] is displayed·····14 PARTS LIST 目 录 1 2 2 5 2-1 5 2-2 6 3 7 4 9 5 11 - Brother International BAS-342G | Thread Break Detector Instruction Manual - Engl - Page 2
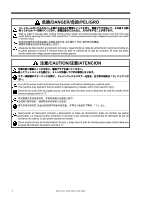
/注意/ATENCION Turn off the power switch and disconnect the power cord before installing any optional parts. The machine may operate if the foot switch is depressed by mistake, which could result aire hasta que la aguja del indicador de presión apunte a "0". 1 BAS-311G, BAS-326G, BAS-342G - Brother International BAS-342G | Thread Break Detector Instruction Manual - Engl - Page 3
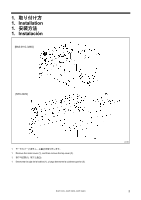
1 1. Installation 1 1. Instalación [BAS-311G, 326G] [BAS-342G] 1 1 2 1. Remove the motor cover (1), and then remove the top cover (2). 1 1 2)。 1. Desmontar la caja de la bobina (1), y luego desmonte la cubierta superior (2). BAS-311G, BAS-326G, BAS-342G 1327B 2 - Brother International BAS-342G | Thread Break Detector Instruction Manual - Engl - Page 4
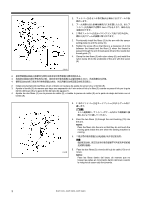
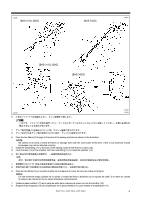
and the fiber (3) when the thread is passed through the arm thread guide (6) and the needle bar thread guide (7). 4. Clamp the two fibers (3) with nylon clamp (8), and no toquen las partes en movimiento dentro del brazo cuando la máquina de coser está funcionando. 3 BAS-311G, BAS-326G, BAS-342G - Brother International BAS-342G | Thread Break Detector Instruction Manual - Engl - Page 5
roturas de hilo no serán detectadas correctamente. 7. Instale la pieza metálica (11) en la parte de atrás de la máquina de coser con los dos tornillos (12). 8. Enganche las lengüetas (13) del amplificador en la pieza metálica (11) para instalar el amplificador (14). BAS-311G, BAS-326G, BAS-342G 4 - Brother International BAS-342G | Thread Break Detector Instruction Manual - Engl - Page 6
en el agujero de diámetro 2,2 mm, y empuje la cuchilla en un movimiento para cortar la fibra (2) al largo deseado. NOTA: No use los agujeros que han sido usados para cortar. Si se usan, el rendimiento de corte se dificultará y la distancia de sensibilidad será menor. 5 BAS-311G, BAS-326G, BAS-342G - Brother International BAS-342G | Thread Break Detector Instruction Manual - Engl - Page 7
será menor y las roturas de hilo no serán detectadas correctamente. 3. Vuelva la palanca de bloqueo de fibra (1) en la dirección de B hasta que se detenga. BAS-311G, BAS-326G, BAS-342G 6 - Brother International BAS-342G | Thread Break Detector Instruction Manual - Engl - Page 8
amplificador (1), alinee la ranura en el amplificador (2) con la lengüeta del conector (3), y luego inserte el conector hasta que haga clic en su lugar. 5265Q [BAS-311G, 326G] [BAS-342G] 1356B 7 BAS-311G, BAS-326G, BAS-342G 1330B - Brother International BAS-342G | Thread Break Detector Instruction Manual - Engl - Page 9
el tablero P.C. principal. 6. Apriete la cubierta de la caja de controles con los ocho tornillos. * Verifique que los cables no son apretados por la cubierta. BAS-311G, BAS-326G, BAS-342G 8 - Brother International BAS-342G | Thread Break Detector Instruction Manual - Engl - Page 10
. 4. Mueva el interruptor de selección de modo (3) a "STD". 5. Mueva el interruptor de selección de operación (4) a "L". 6. Mueva el interruptor de selección de operación del temporizador (5) a "OFF". 9 BAS-311G, BAS-326G, BAS-342G - Brother International BAS-342G | Thread Break Detector Instruction Manual - Engl - Page 11
goes past "MAX" at this time, there is a problem. Check the connection of the fibers again. 10. Turn the 1 8 7. Quite el hilo superior de manera que no haya hilo en la parte delantera de la fibra (1). 8. Después de girar el control de sensibilidad (6) hacia BAS-311G, BAS-326G, BAS-342G 10 - Brother International BAS-342G | Thread Break Detector Instruction Manual - Engl - Page 12
Setting items Thread breakage detector 554 OFF Disabled ON Fiber-type thread breakage detector used Thread breakage detector detection sensitivity 555 OFF 5 stitches at sewing start, 3 stitches de la costura, 3 puntadas mientras cose Valor inicial OFF OFF 11 BAS-311G, BAS-326G, BAS-342G - Brother International BAS-342G | Thread Break Detector Instruction Manual - Engl - Page 13
TEST Press the TEST key. TEST The changes will be memorized and the sewing TEST indicator off machine will switch to home position detection standby. BAS-311G, BAS-326G, BAS-342G 12 - Brother International BAS-342G | Thread Break Detector Instruction Manual - Engl - Page 14
apaga. Pulse la tecla TEST. ・ Los cambios serán memorizados y la máquina de coser cambiará al modo de espera de detección de posición de inicio. 13 BAS-311G, BAS-326G, BAS-342G - Brother International BAS-342G | Thread Break Detector Instruction Manual - Engl - Page 15
stitch at a time. (The feed will move quicker if you keep the key pressed down.) 4443Q Depress the foot switch to the 2nd step. (If using a two-pedal foot switch, depress the start switch.) • The sewing machine will start operating and sewing will start. 4441Q BAS-311G, BAS-326G, BAS-342G 14 - Brother International BAS-342G | Thread Break Detector Instruction Manual - Engl - Page 16
un interruptor de pie de dos pedales, presione el interruptor de puesta en marcha.) • La máquina de coser comenzará a funcionar y comenzará la costura. 4441Q 15 BAS-311G, BAS-326G, BAS-342G - Brother International BAS-342G | Thread Break Detector Instruction Manual - Engl - Page 17
PARTS LIST LISTA DE PIEZAS - Brother International BAS-342G | Thread Break Detector Instruction Manual - Engl - Page 18
BAS-311G/326G/342G-940 1 - Brother International BAS-342G | Thread Break Detector Instruction Manual - Engl - Page 19
Thread breakage detector Detector de ruptura de hilo REF.NO CODE Q'TY 品名 NAME OF PARTS 1 SA5193101 1 F F TR-BREAKAGE DETECTOR SET F 2 SA4816001 1 NYLON CLAMP NK-2N 10 0A5401006 1 4X10DB M4X10DB SCREW PAN (S/P WASHER) M4X10 BAS-311G/326G/342G-940 2 - Brother International BAS-342G | Thread Break Detector Instruction Manual - Engl - Page 20
INSTRUCTION MANUAL □ MANUAL DE INSTRUCCIONES Printed in Japan Impreso en Japón BAS-311G, 326G, 342G SA6427-101 2007.07. B (1)
-
 1
1 -
 2
2 -
 3
3 -
 4
4 -
 5
5 -
 6
6 -
 7
7 -
8
-
9
-
10
-
11
-
12
-
13
-
14
-
15
-
16
-
17
-
18
-
19
-
20
 |
 |

上糸切れ感知装置
THREAD BREAKAGE DETECTOR
面线断线传感装置
DETECTOR DE RUPTURA DE HILO
BAS-311G, 326G, 342G
目
次
1.
取り付け方
···········································2
2.
ファイバーの接続
································5
2-1.
ファイバーの切断
····································· 5
2-2.
アンプへの接続
········································ 6
3.
アンプケーブルの配線
·························7
4.
センサーの感度調整
·····························9
5.
メモリースイッチの設定
···················11
6.
エラーコード[
E600
]が
表示されたとき
··································14
パーツリスト
目
录
1.
安装方法
··············································2
2.
光导纤维传感器的接续
·························5
2-1.
导纤维传感器的切断
································· 5
2-2.
光导纤维传感器的接续
····························· 6
3.
信号放大器电缆线的配线
·····················7
4.
传感器的传感度的调整
·························
9
5
.
存储器开关的设定
······························
11
6
.
当错码[
E600
]被显示时
··················
15
零部件表
CONTENTS
1. Installation··········································2
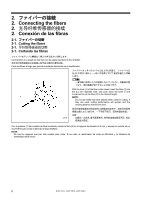
2. Connecting the fibers························5
2-1. Cutting the fibers ······································· 5
2-2. Connecting to the amplifier························ 6
3. Routing the amplifier cable···············7
4. Adjusting the sensor sensitivity·······9
5. Setting memory switches ···············11
6. If error code [E600] is displayed·····14
PARTS LIST
CONTENIDO
1. Instalación··········································2
2. Conexión de las fibras ······················5
2-1. Cortando las fibras ···································· 5
2-2. Conexión al amplificador ··························· 6
3. Pasando el cable del amplificador ···7
4. Ajuste de sensibilidad del sensor····9
5. Ajuste de interruptores
de memoria·······································11
6. Si se exhibe el código de error [E600]
···························································15
LISTA DE PIEZAS