Brother International BAS-342G Thread Break Detector Instruction Manual - Engl - Page 11

the red light from the fiber 1 touches the thread.

Page 11 highlights

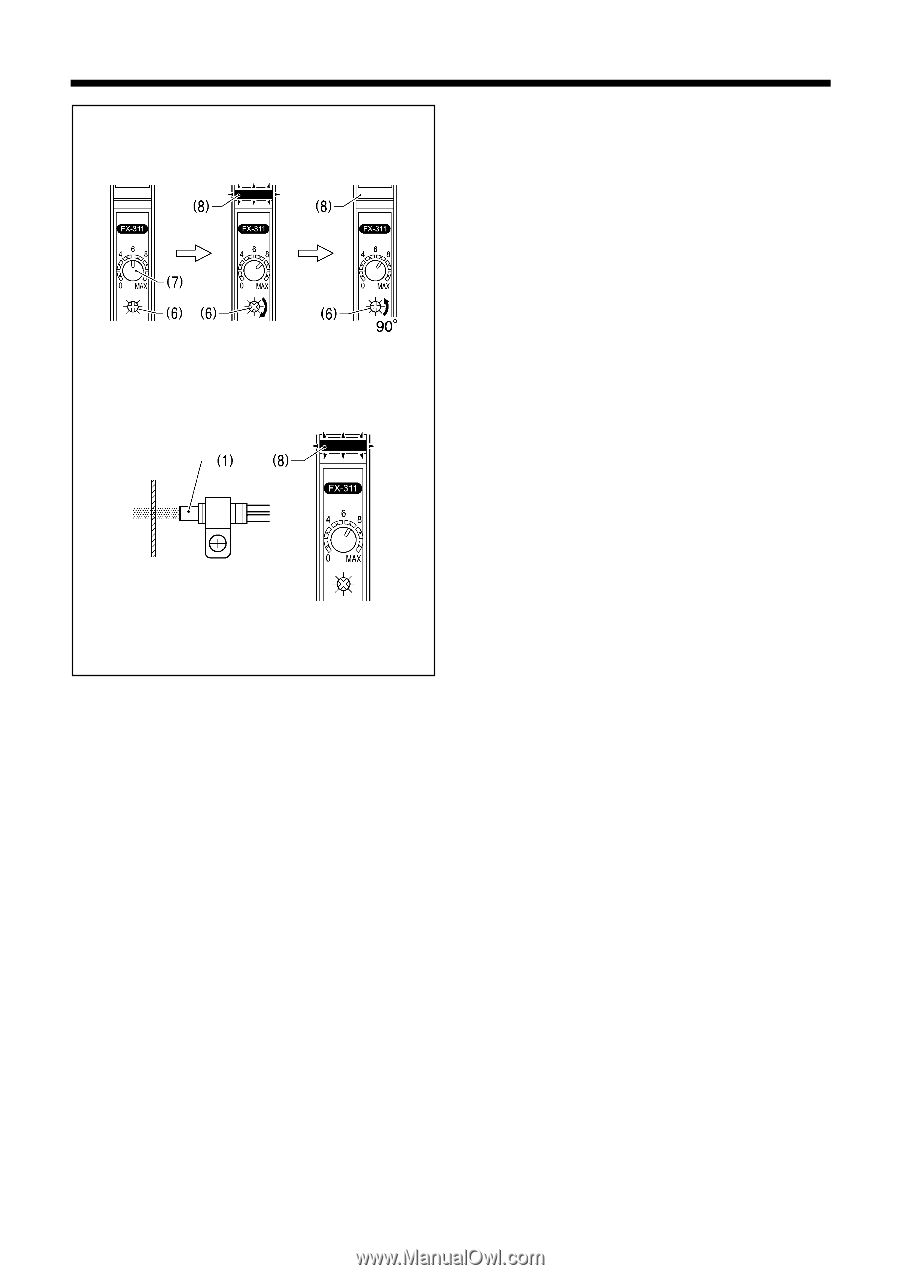
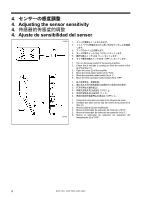
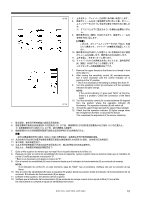
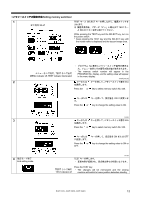
5270Q 5271Q 7 1 8 6 7)が「6 6 9 8 6 7)が「MAX さい。 10 8 90 6 8 11 12 1 (8 7. Remove the upper thread so that there is no thread in front of the fiber (1). 8. After turning the sensitivity control (6) counterclockwise, turn it back clockwise until the control indicator (7) is pointing to the "6" position. * This is not necessary if the setting is already less than "6". 9. Turn the sensitivity control (6) clockwise until the operation indicator (8) lights orange. NOTE: If the control indicator (7) goes past "MAX" at this time, there is a problem. Check the connection of the fibers again. 10. Turn the sensitivity control (6) counterclockwise 90 degrees from the position where the operation indicator (8) illuminates. The operation indicator (8) will switch off. 11. Thread the upper thread and pull the upper thread straight. 12. Check that the operation indicator (8) lights orange when the red light from the fiber (1) touches the thread. This completes the adjustment of the sensor sensitivity. 7 1 8 6 6 7)指向「6 7)指向「6 9 6 8 注意: 7)超过「MAX 10 8 6 90 8 11 12 1 8 7. Quite el hilo superior de manera que no haya hilo en la parte delantera de la fibra (1). 8. Después de girar el control de sensibilidad (6) hacia la izquierda, vuelva a girarlo hacia la derecha hasta que el indicador de control (7) esté apuntando a la posición "6". * Esto no es necesario si el ajuste es menor de "6". 9. Gire el control de sensibilidad (6) hacia la derecha hasta que el indicador de funcionamiento (8) se enciende de naranja. NOTA: Si el indicador de control (7), en este momento, pasa de "MAX", hay un problema. Verifique otra vez la conexión de las fibras. 10. Gire el control de sensibilidad (6) hacia la izquierda 90 grados desde la posición donde el indicador de funcionamiento (8) se enciende. El indicador de funcionamiento (8) se apaga. 11. Enhebre el hilo superior y tire derecho del hilo superior. 12. Verifique que el indicador de funcionamiento (8) se enciende de naranja cuando la luz roja de la fibra (1) toca el hilo. De esta manera se completa el ajuste de sensibilidad del sensor. BAS-311G, BAS-326G, BAS-342G 10

  • 1
  • 2
  • 3
  • 4
  • 5
  • 6
  • 7
  • 8
  • 9
  • 10
  • 11
  • 12
  • 13
  • 14
  • 15
  • 16
  • 17
  • 18
  • 19
  • 20

10
BAS-311G, BAS-326G, BAS-342G
7.
上糸を外し、ファイバー
(1)
の前に糸の無い状態にします。
8.
感度ボリューム
(6)
を一度反時計方向に回した後、ボリュー
ムインジケータ
(7)
が「
6
」を指す位置まで時計方向に戻しま
す。
すでに「
6
」以下に設定されている場合は必要ありませ
ん。
9.
動作表示灯
(8)
[橙色]が点灯するまで、感度ボリューム
(6)
を時計方向に回します。
[ご注意]
このとき、ボリュームインジケータ
(7)
が「
MAX
」を超
えたら異常です。ファイバーの接続を再確認してくだ
さい。
10.
動作表示灯
(8)
が点灯した位置から
90
度反時計方向に感度
ボリューム
(6)
を戻します。動作表示灯
(8)
は消灯します。
11.
上糸を通し、糸をまっすぐに張ります。
12.
ファイバー
(1)
からの赤色光を糸に当てたとき、動作表示灯
(8)
[橙色]が点灯することを確認します。
これでセンサーの感度調整は完了です。
7.
Remove the upper thread so that there is no thread in front
of the fiber (1).
8.
After turning the sensitivity control (6) counterclockwise,
turn it back clockwise until the control indicator (7) is
pointing to the “6” position.
* This is not necessary if the setting is already less than “6”.
9.
Turn the sensitivity control (6) clockwise until the operation
indicator (8) lights orange.
NOTE:
If the control indicator (7) goes past “MAX” at this time,
there is a problem. Check the connection of the fibers
again.
10. Turn the sensitivity control (6) counterclockwise 90 degrees
from the position where the operation indicator (8)
illuminates. The operation indicator (8) will switch off.
11. Thread the upper thread and pull the upper thread straight.
12. Check that the operation indicator (8) lights orange when
the red light from the fiber (1) touches the thread.
This completes the adjustment of the sensor sensitivity.
7.
除去面线,在光导纤维传感器
(1)
前面呈无线状态。
8.
感度容量调节旋钮
(6)
先按逆时针方向回转到「
6
」以下后,再按顺时针方向回转直到容量指示针
(7)
指向「
6
」的位置为止。
如果容量指示针
(7)
指向「
6
」以下时,就不须要做上述操作。
9.
继续按顺时针方向回转感度容量调节旋钮
(6)
直到动作指示灯
(8)
点橙色灯为止。
注意:
此时
,
如果容量指示针
(7)
超过「
MAX
」的话
,
为异常情况,请再确认光导纤维传感器的连接。
10.
从动作指示灯
(8)
点灯位置开始感度容量调节旋钮
(6)
再按逆时针方向回转
90
度时,动作指示灯
(8)
将熄灯。
11.
穿上面线,线应该笔直拉下。
12.
当从光导纤维传感器
(1)
中发出的红色光照在线上时,确认动作指示灯
(8)
有点橙色灯。
到此为止,传感器的传感度的调整完成了。
7.
Quite el hilo superior de manera que no haya hilo en la parte delantera de la fibra (1).
8.
Después de girar el control de sensibilidad (6) hacia la izquierda, vuelva a girarlo hacia la derecha hasta que el indicador de
control (7) esté apuntando a la posición "6".
* Esto no es necesario si el ajuste es menor de "6".
9.
Gire el control de sensibilidad (6) hacia la derecha hasta que el indicador de funcionamiento (8) se enciende de naranja.
NOTA:
Si el indicador de control (7), en este momento, pasa de "MAX", hay un problema. Verifique otra vez la conexión de las
fibras.
10. Gire el control de sensibilidad (6) hacia la izquierda 90 grados desde la posición donde el indicador de funcionamiento (8) se
enciende. El indicador de funcionamiento (8) se apaga.
11. Enhebre el hilo superior y tire derecho del hilo superior.
12.
Verifique que el indicador de funcionamiento (8) se enciende de naranja cuando la luz roja de la fibra (1) toca el hilo.
De esta manera se completa el ajuste de sensibilidad del sensor.
5270Q
5271Q