Brother International BAS-415 Instruction Manual - English - Page 32
Brother International BAS-415 Manual
 |
View all Brother International BAS-415 manuals
Add to My Manuals
Save this manual to your list of manuals |
Page 32 highlights
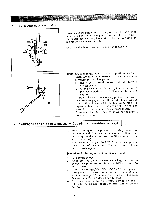
* The proper needle bar stop position O 0 0 -40 1,- liy l - ,4r fq, Looking into the inside from the gap, each needle bar is in the jump condition and at its highest point as in the left figure, the needle bar elevating block ® is below so as not to run against the needle bar clamp O. All the needle thread take-ups are in a horizontal line. [NOTE) Check that the needle bar stop position is proper when turning on the power and when reopening to sew during standstill or pause. (1) The needle thread take-ups should form a horizontal line. (2) All the needle bars, including the needle bar in the sewing position, should line up at the highest position. If the needle bar in the sewing position is down, it must be disengaged from the needle bar elevating block 42) and returned to the highest position. To separate them, insert a screw driver in the gap according to the diagram, then push and rotate. Once separated, the needle bar moves to the highest point by a spring. 2. If carriages X and Y operate unusually (Clearing and resetting memory) 1. When turning on the power not during restarting, carriages X and Y move to an abnormal position after returning to the home position (the center of the embroidery area). 2. After having exchanged the P-ROM on the main printed circuit board of the machine. (The power switch should be off in exchanging.) [Procedures in clearing and and resetting memory] 1. Turn off the power. 2. While pressing the key, turn on the power. Keep on pressing the key. Do not release it. 3. After the message,"CAUTION MOVING!" is displayed, carriages X and Y start to return to the home position or another message, "Turn Pulley" and so on, is displayed. Release the key after that. 4. The inside memory storage is reset. Carriages X and Y return to the ordinary operation after turning on the power. - 29 -
-
 1
1 -
2
-
3
-
4
-
5
-
6
-
7
-
8
-
9
-
10
-
11
-
12
-
13
-
14
-
15
-
16
-
17
-
18
-
19
-
20
-
21
-
22
-
23
-
24
-
25
-
26
-
 27
27 -
 28
28 -
 29
29 -
 30
30 -
 31
31 -
 32
32 -
 33
33 -
 34
34 -
 35
35 -
 36
36 -
 37
37 -
38
-
39
-
40
-
41
-
42
-
43
-
44
-
45
-
46
-
47
-
48
-
49
-
50
-
51
-
52
-
53
-
54
-
55
-
56
-
57
-
58
-
59
-
60
-
61
-
62
-
63
-
64
-
65
-
66
-
67
-
68
-
69
-
70
-
71
-
72
-
73
-
74
-
75
-
76
-
77
-
78
-
79
-
80
-
81
-
82
-
83
-
84
-
85
-
86
-
87
-
88
-
89
-
90
-
91
-
92
 |
 |
